PatioTime Documentation

Bilingual / Multilingual – WPML

December 4, 2022

In this chapter, we will provide some explanations and points to explain how to make your WordPress site to be a bilingual/multilingual site when you are using PatioTime theme and the third-party plugin WPML.

What you will need
  • PatioTime theme
  • A recent version of WPML, including the WPML Multilingual CMSWPML String Translation and WPML Media add-ons.
Essential Resources
How to Translate
Step 1 – Getting started and WPML’s Set-up Wizard
  1. Install and activate PatioTime theme, the required plugin and recommended plugins (please refer to PatioTime Installation).
  2. Install and activate the main WPML components (Please see WPML Getting Started Guide for complete reference):
    • WPML Multilingual CMS (the core plugin)
    • String Translation
    • Media Translation
  3. Set up WPML. When you first activate WPML a Setup Wizard will help you specify the essential settings required to prepare your site for multilingual content. Follow the wizard you can:

After setting up your site, you can also customize your site’s language switcher, which is added to the footer by default.

Translation Mode Options (See details)

You have two options for translating your site: Translate Everything or Translate Some. The WPML setup wizard will try to choose the best option for you depending on how much content is on your site.

  • Translate Everything
    All of the site’s main content will be automatically translated into all secondary languages as content is published or updated. Translations can then be reviewed on the front-end and edited by the user (or local translator) if needed.
  • Translate Some
    Users can pick and choose what to translate, when to translate it, and who will translate it. This mode allows for content to be translated manually, translated via WPML’s Advanced Translation Editor, translated by professional translation services, or even translated by a team of local translators.
Step 2 – Translating pages and posts

When you have created some pages and posts on your website, you can translate them into other languages.

For example, if you are going to translate a page. On your website dashboard > “Pages” > in the “All Pages” list, you will see these icons (translation controls) in the “Language” column. Or, you will find the “Language” box when editing the page.

List of Pages with translation controls
WPML Language box when editing a page

Click on the “+” button of the language you are about to translate the content to. For example, “German”. This creates a new German translation for it. Then enter the content written in German. And publish the page.

If you need to updating the translation of a page or post, please go to “Pages” or “Posts”. For the translated pages or posts, the “+” icon will change to a pencil icon. Click on the pencil icon if you need to modify your translation.

Click on the “Pencil” icon to update the translation
Step 3 – Translating post categories and tags

TRANSLATING POST CATEGORIES:

  1. Navigating to Posts > Categories, as an example we will create a category and name it “Vegan”, also upload a category image for it, and click on the Add New Category button. (Please refer to Edit a category.)
  2. When editing this category, find the Language box, and click on the “add” link to add the translation of the category.
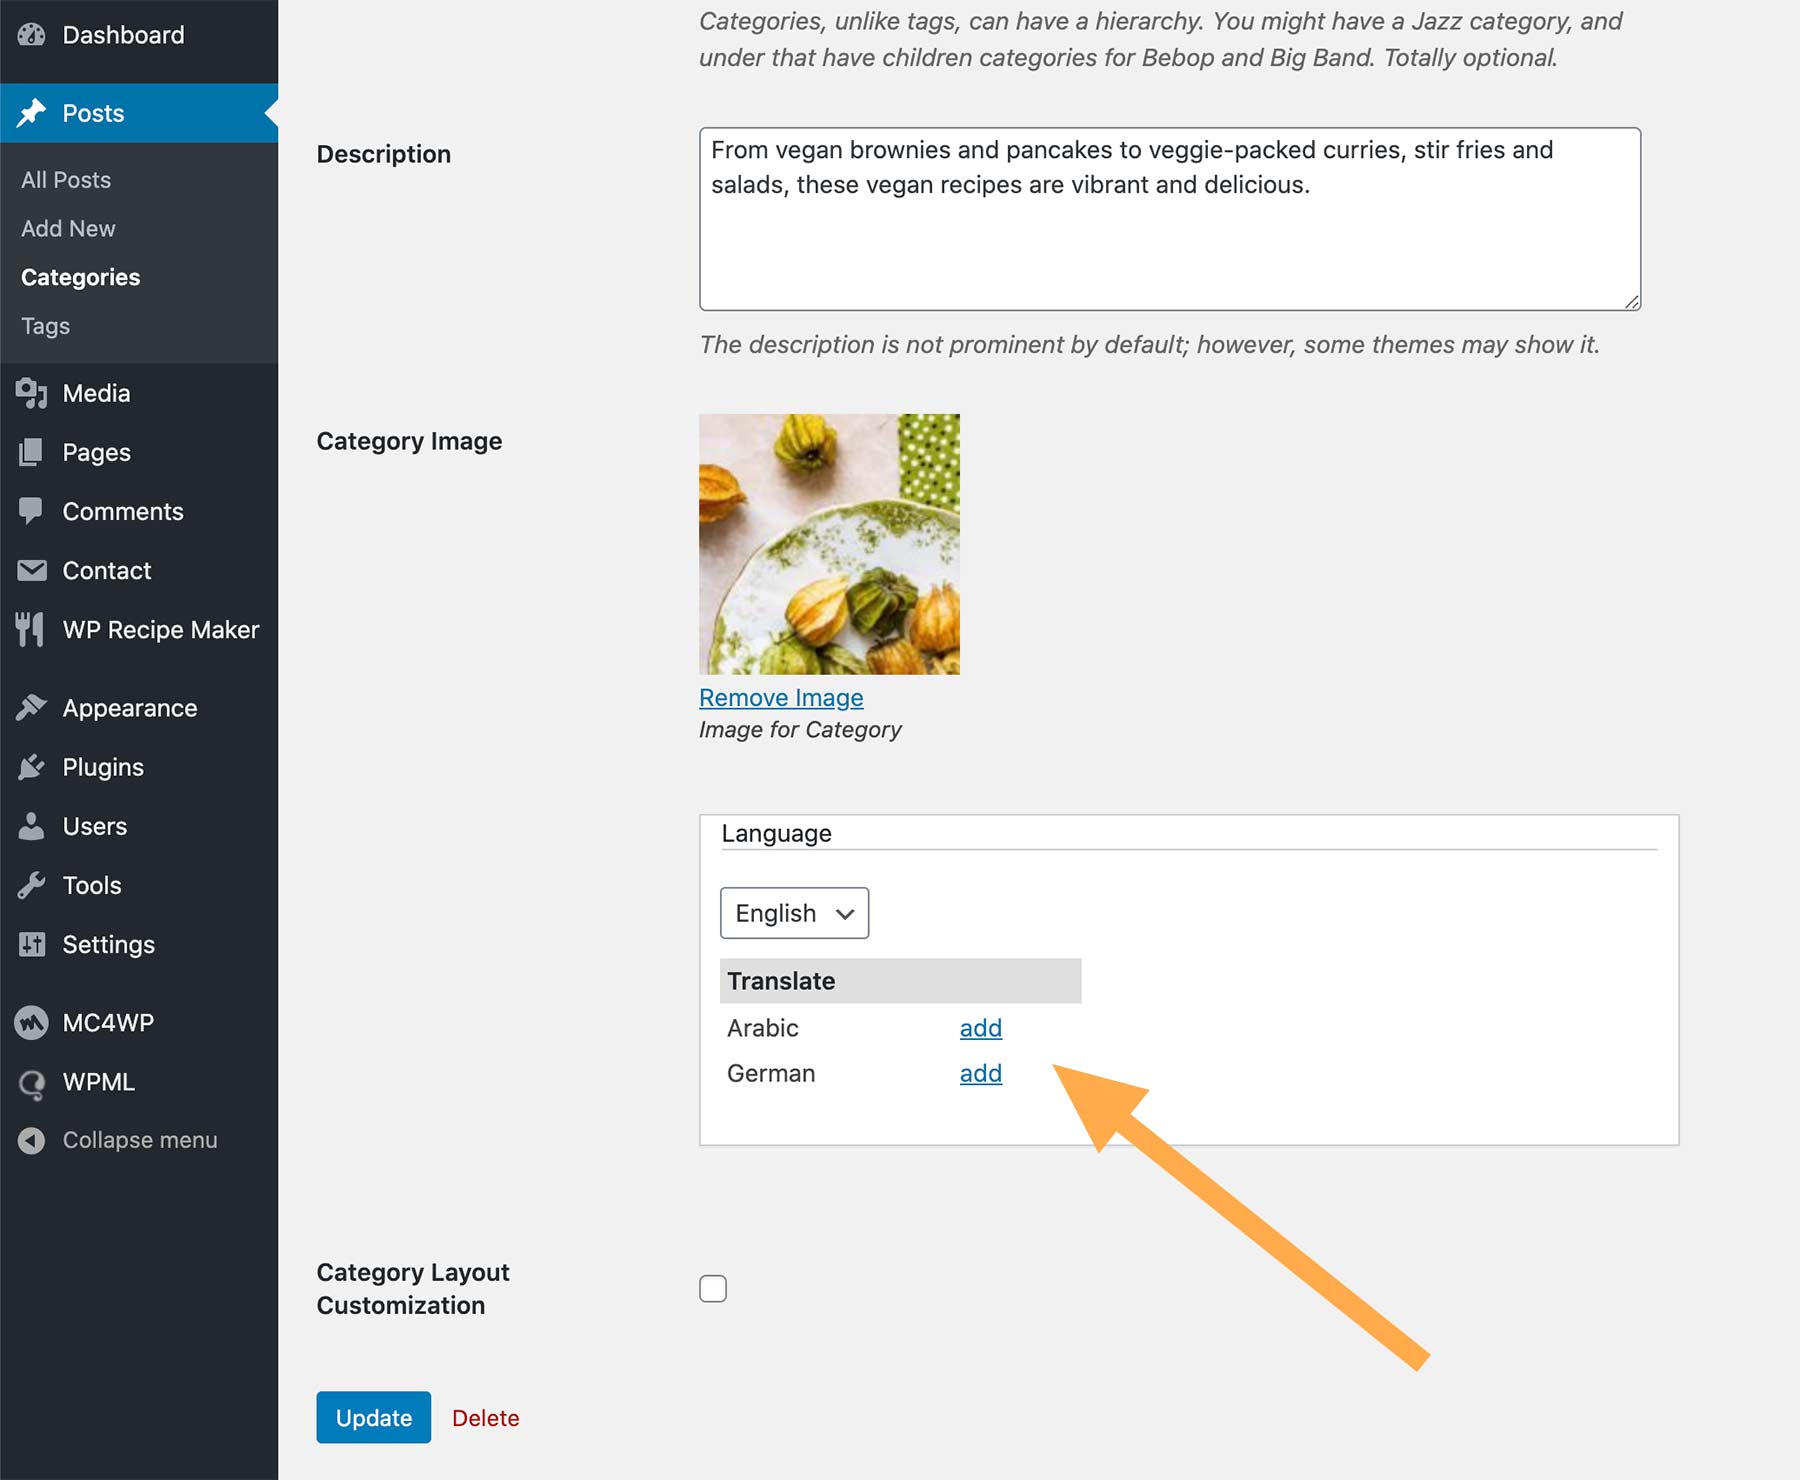
  3. Fill the Name and Slug fields with the category translation, and also choose the same category image for it, and then click on the Add New Category button.

TRANSLATING POST TAGS

Translating post tags is just as same as translating categories. The only difference is you only need to enter tag Name and Slug.

TAXONOMY TRANSLATION

You can also translate post categories and tags via WPML Taxonomy Translation.

  1. Navigating to WPML > Taxonomy Translation. Select Tags (or Categories) from the Select the taxonomy to translate drop-down menu. Then click on the “+” icon or the pencil icon to translate a tag (or a category).
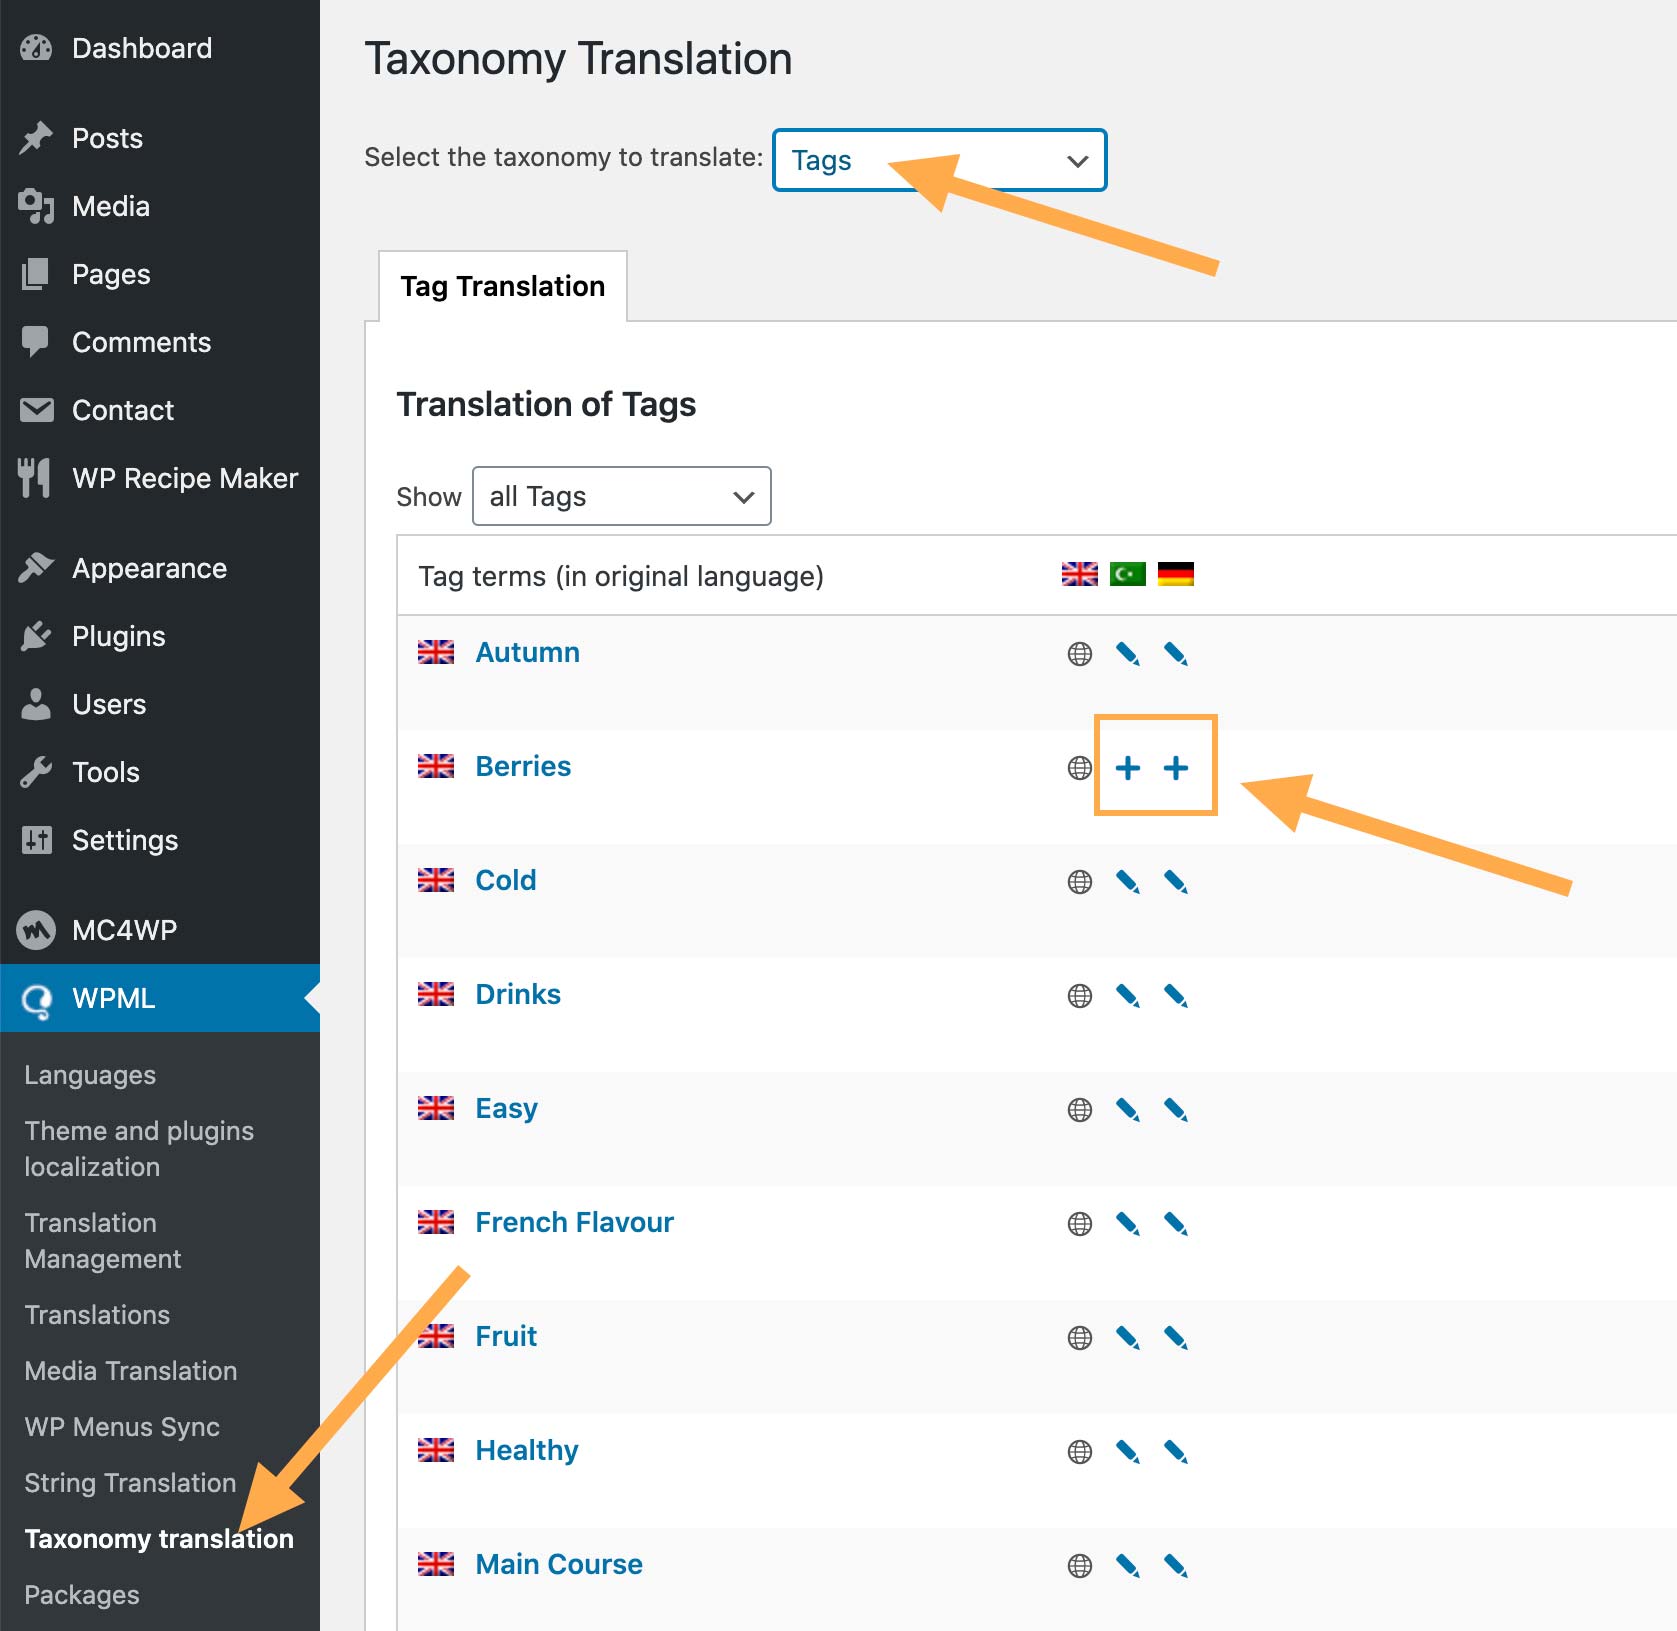
    Taxonomy Translation
  2. The Term Translation box will pop up. Enter the translation and click on “Save” button.
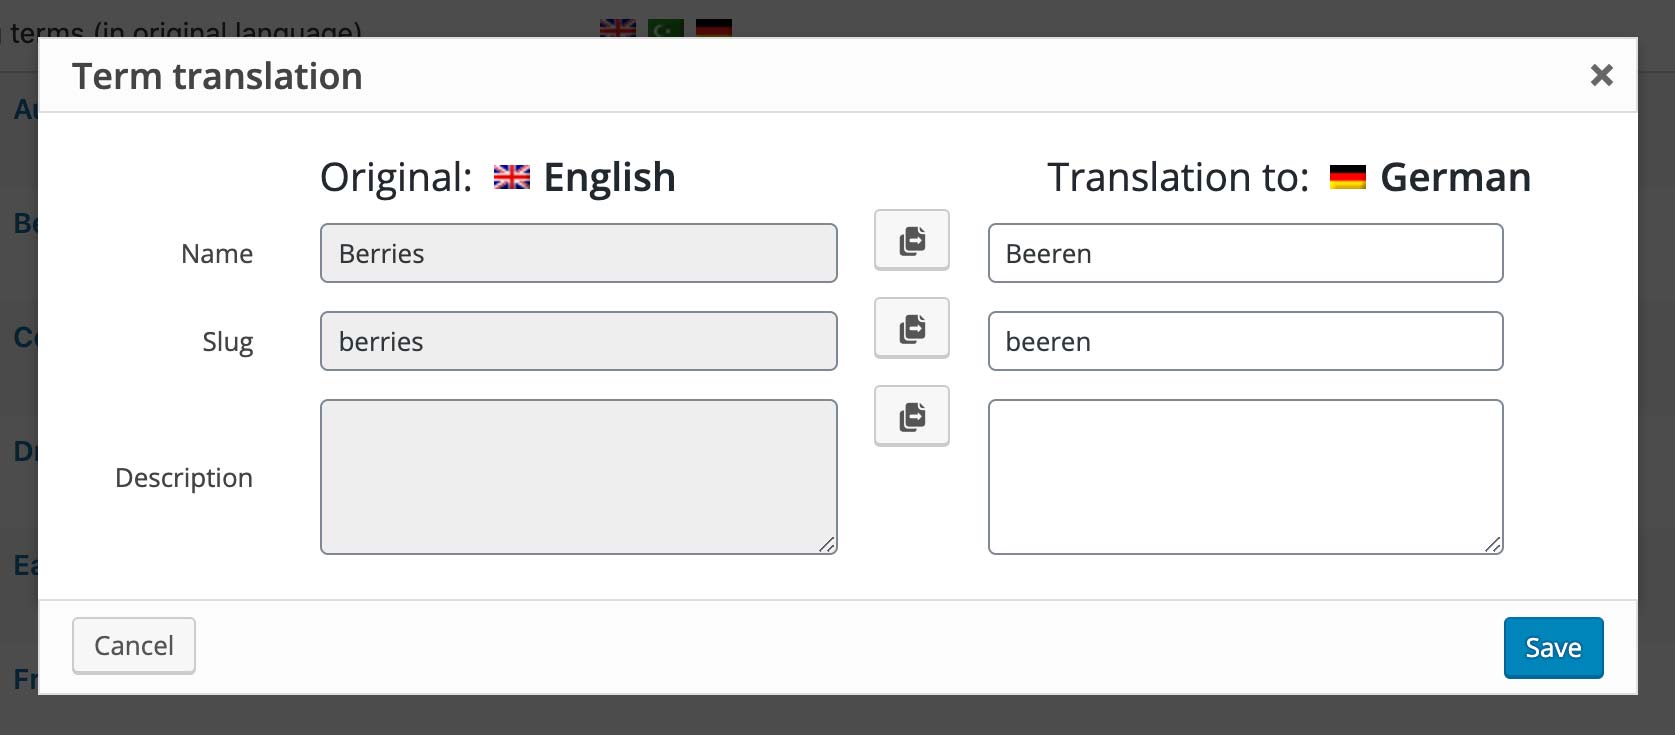
    Term Translation
Step 4 – Translating custom post types

To translate Custom Post TypesCustom Blocks & Site Headers, please follow the steps below:

  1. Navigating to WPML > Settings > Post Types Translation, find Custom Blocks & Header Builder, make sure they are Translatable.
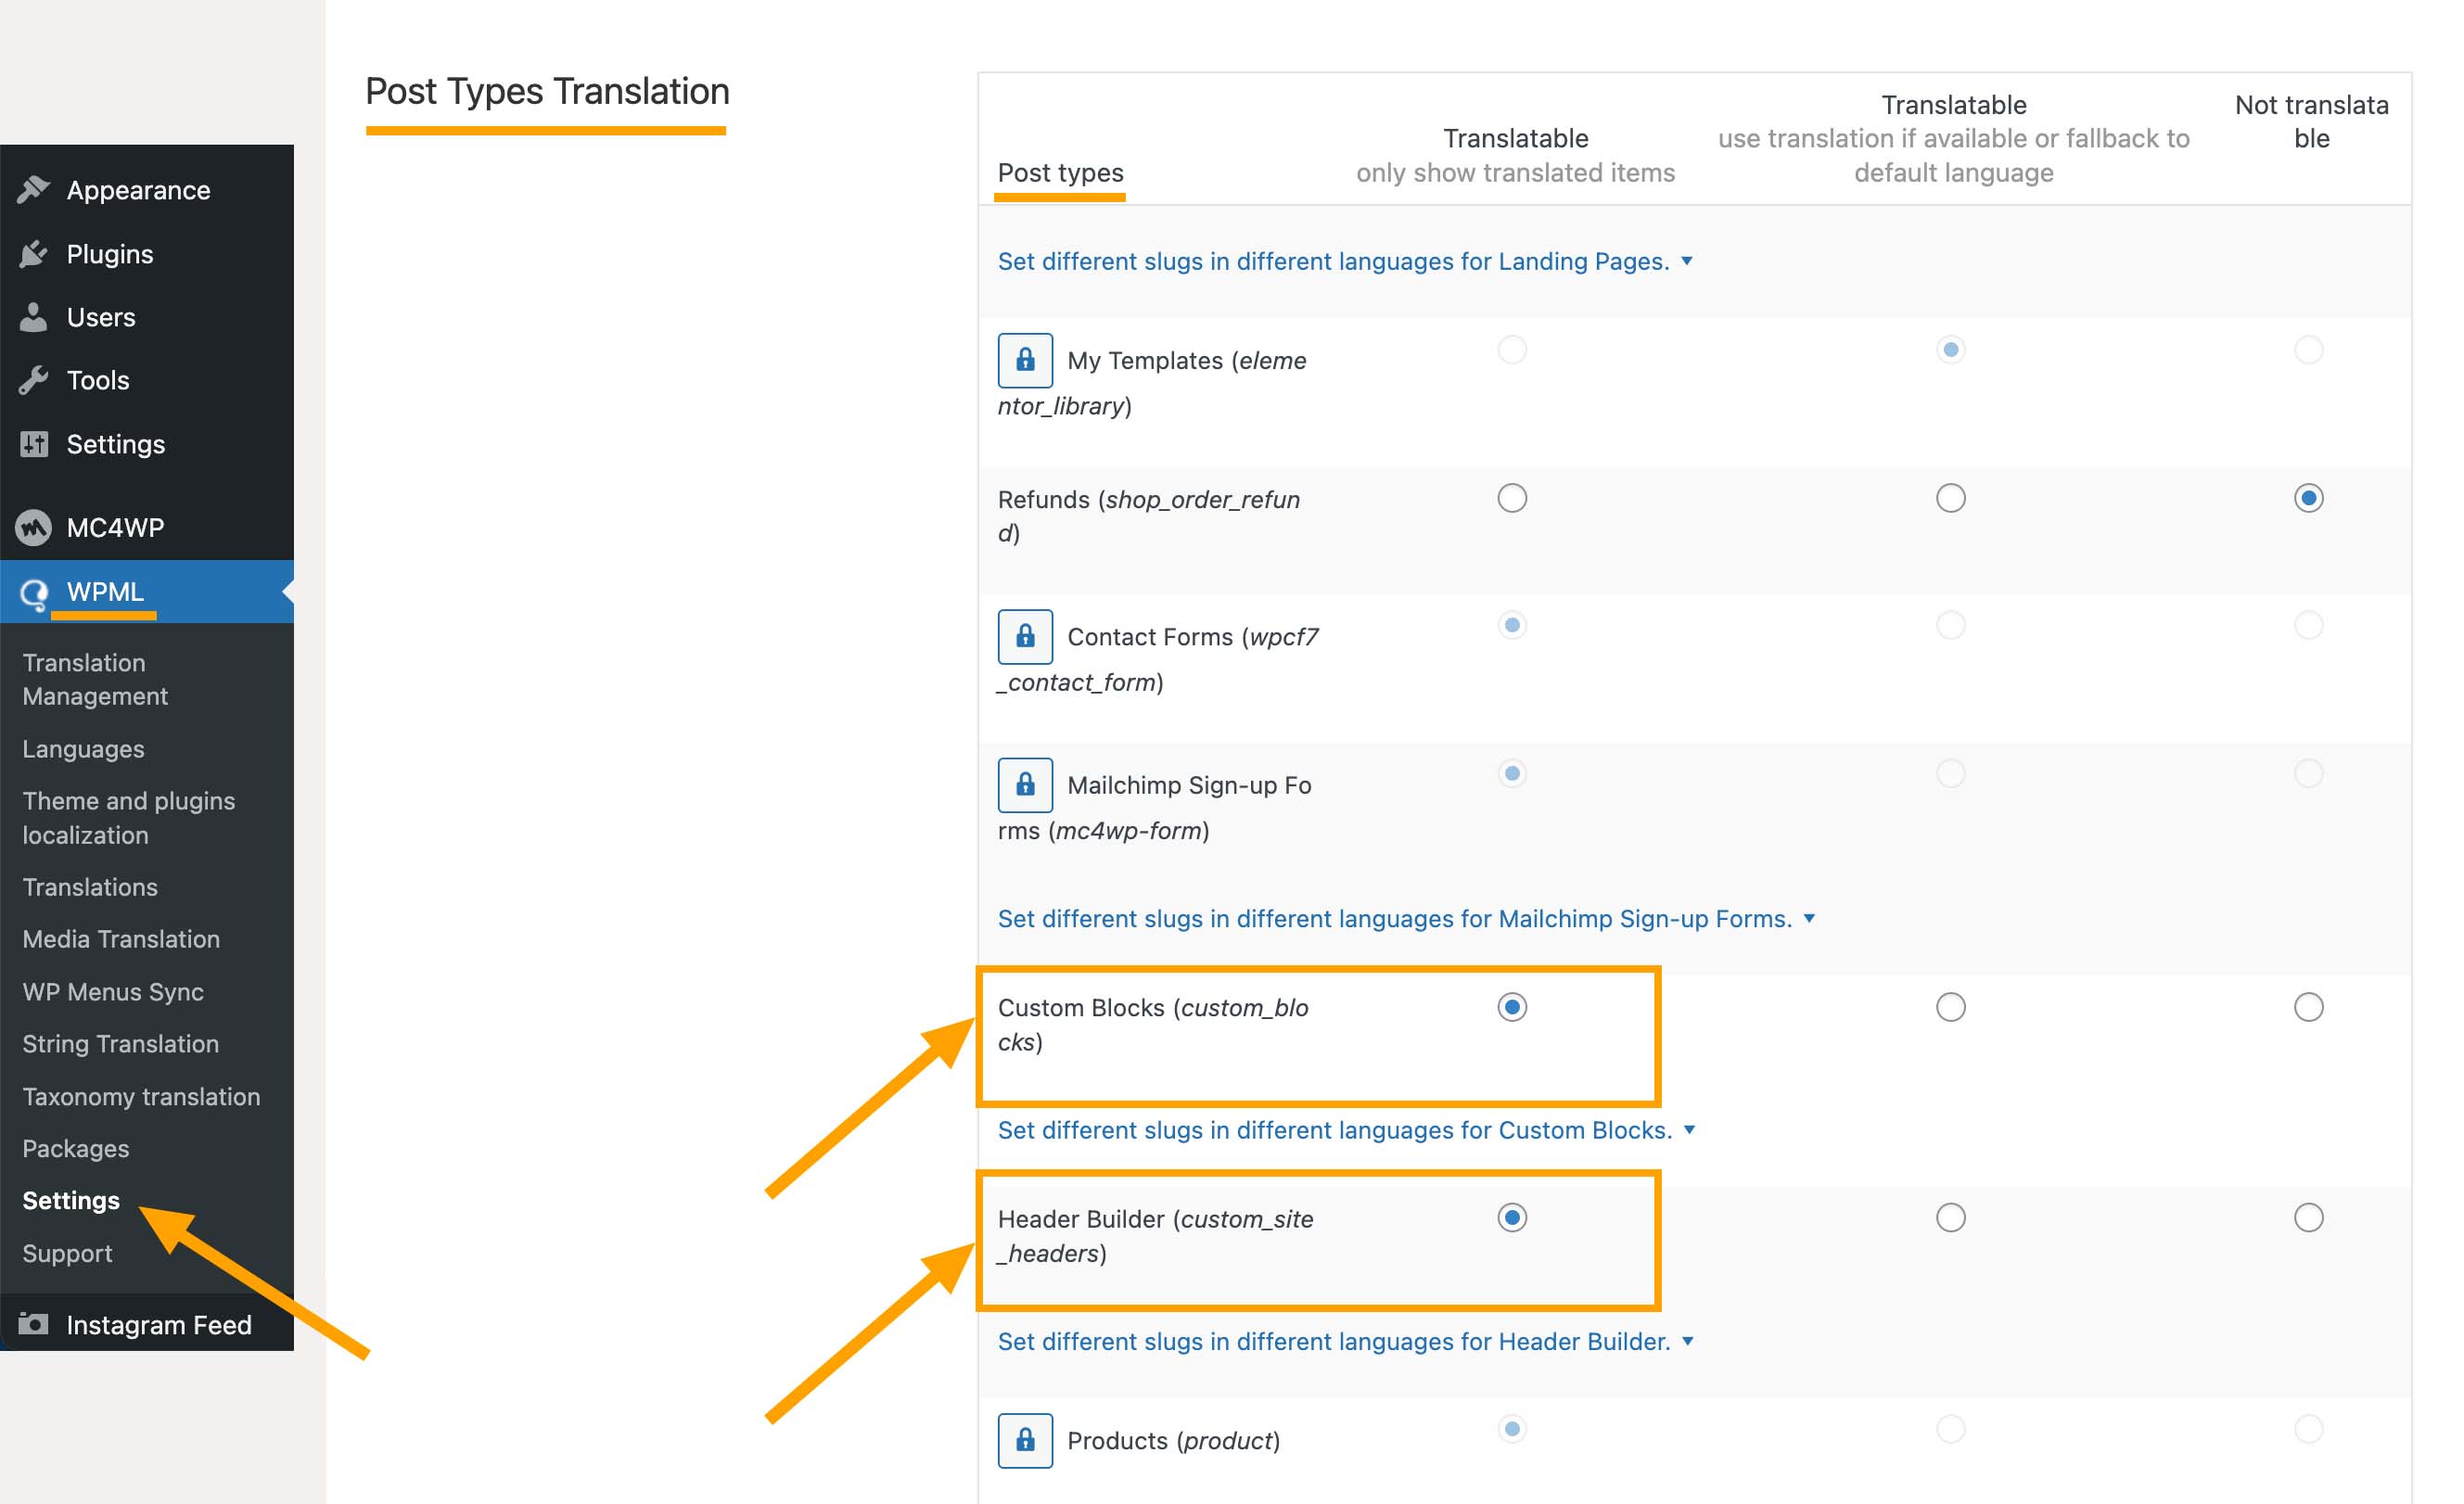
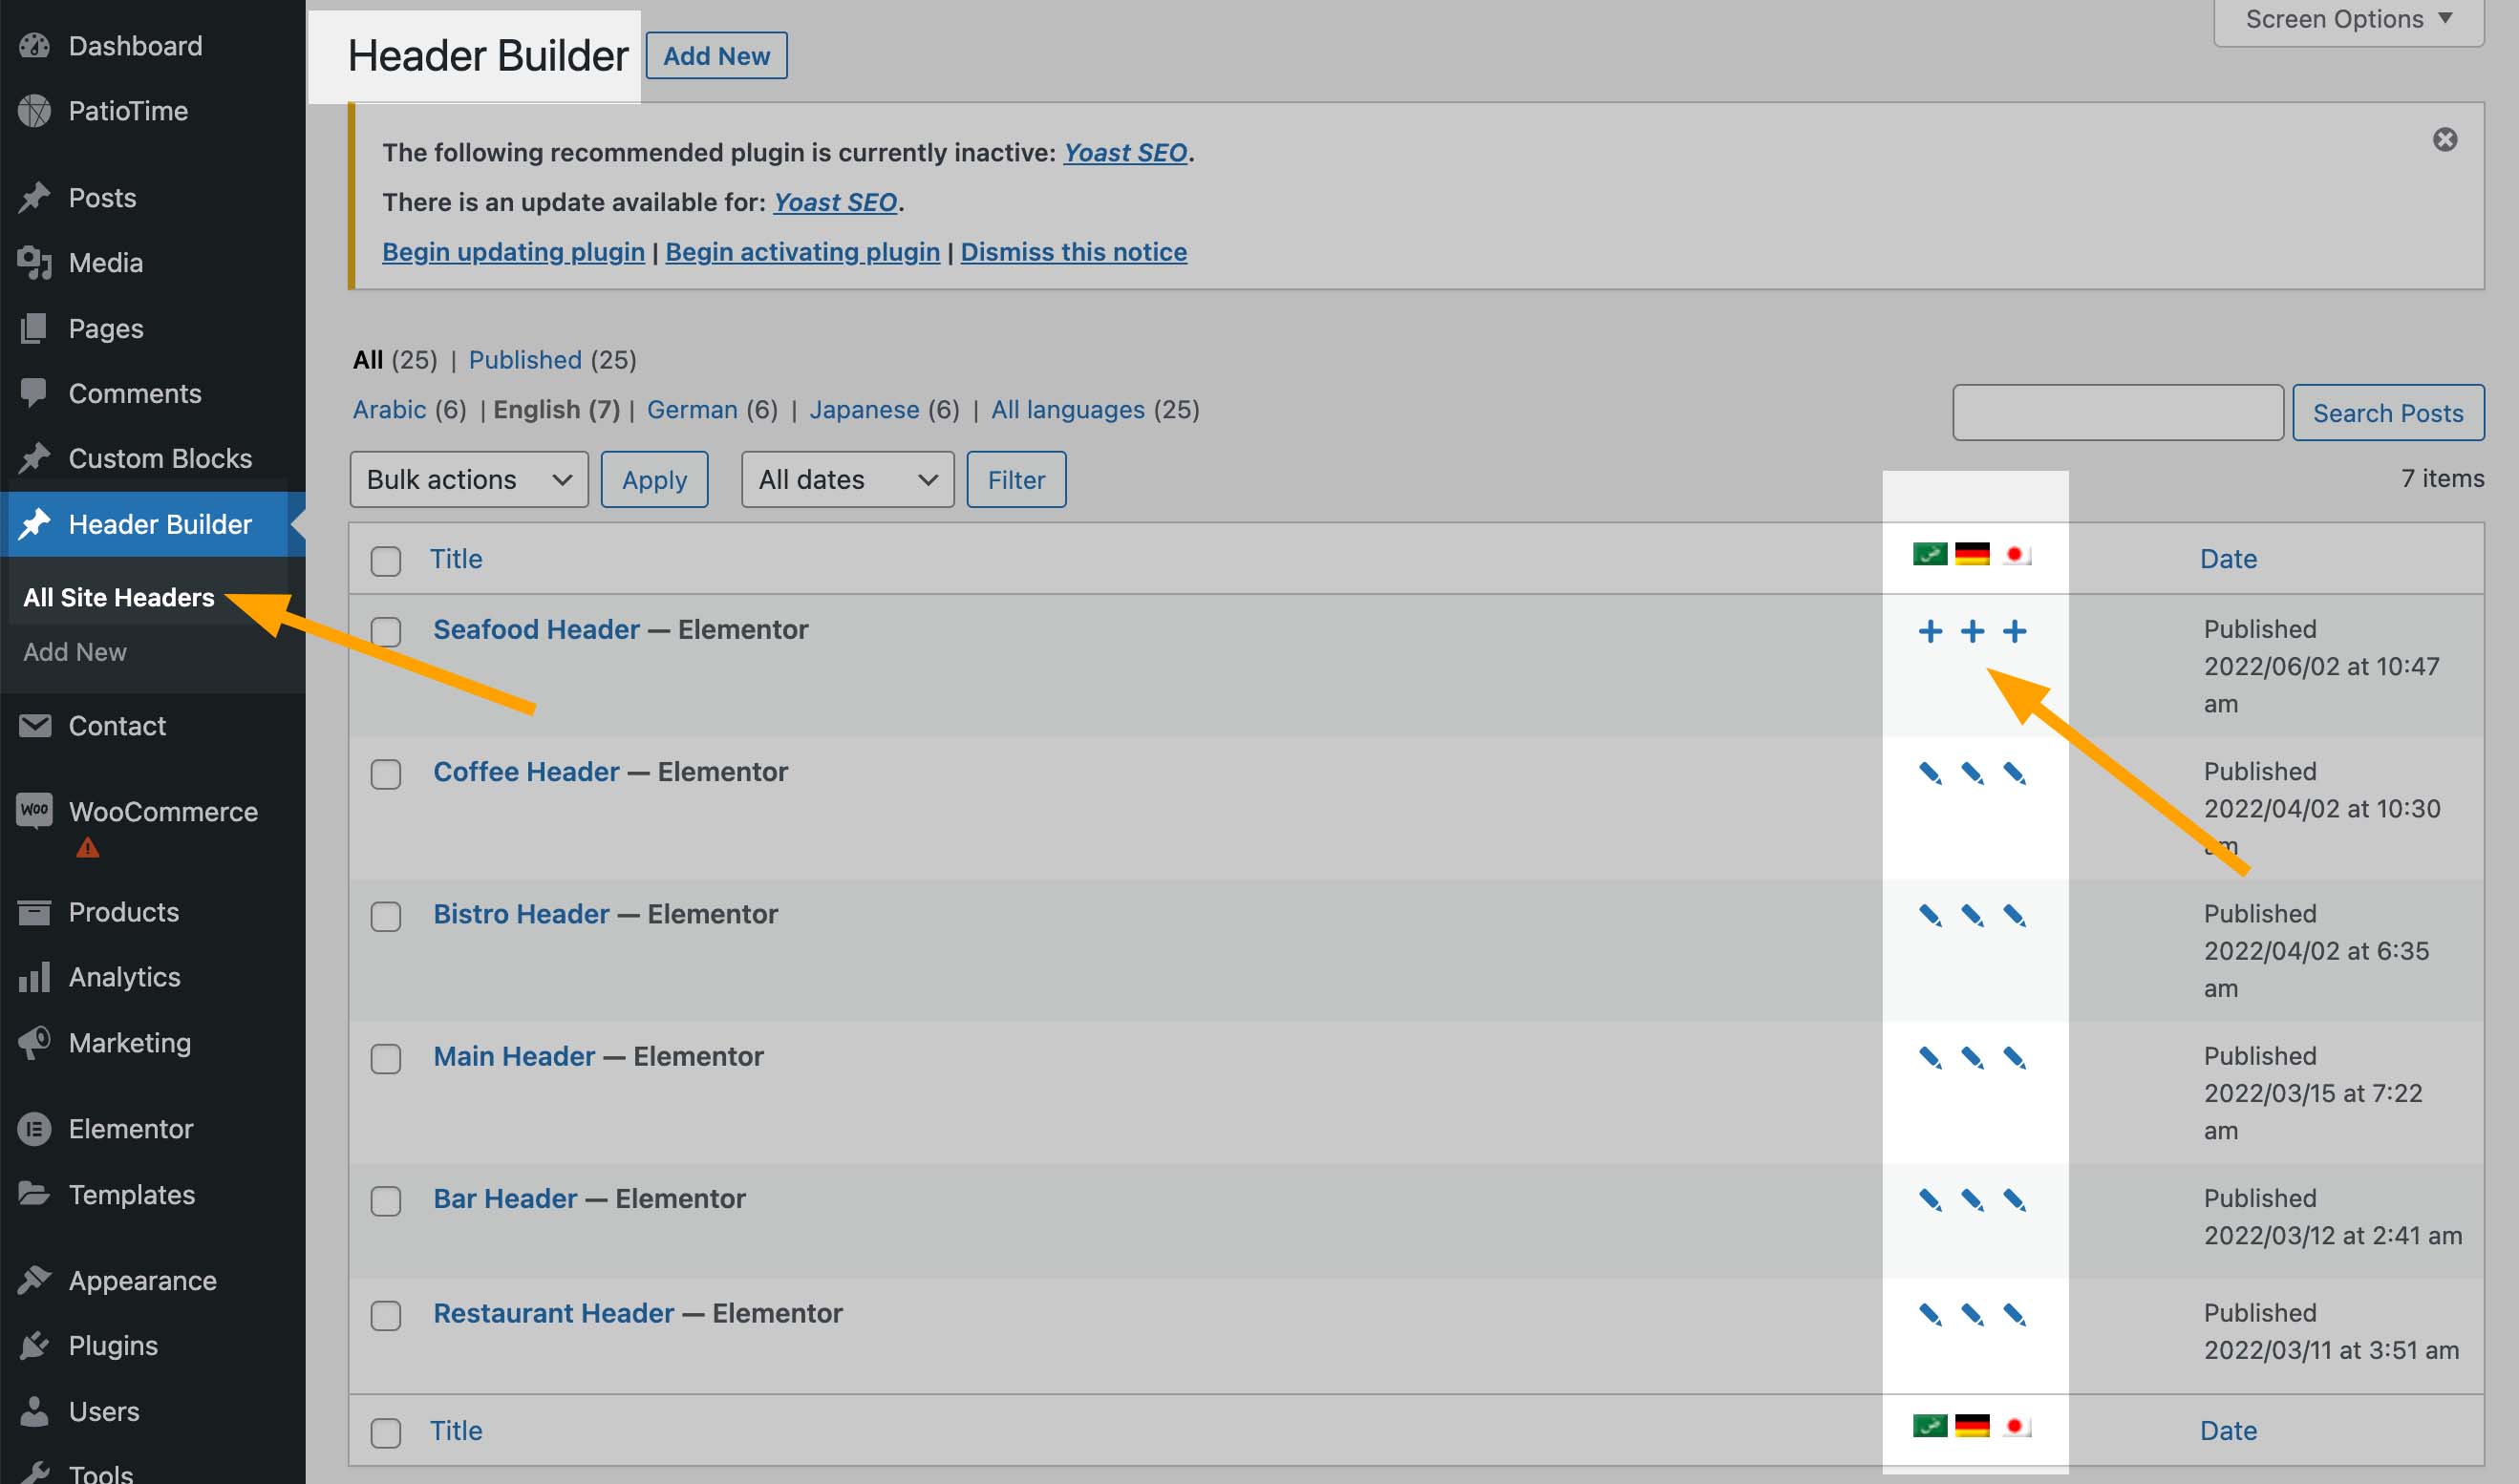
    Custom Post Types Translation
  2. Then you can navigate to Header Builder > All Site Headers, click on the “+” button of the language you are about to translate the site header to. For the translated pages or posts, the “+” icon will change to a pencil icon. Click on the pencil icon if you need to modify your translation.
    Custom Post Types – Site Header Translation
Step 5 – Translating texts coming from the theme & WordPress Core

WPML String Translation allows users to translate texts that are not in posts, pages, and taxonomies. This includes the site’s tagline, general texts in admin screens, widget titles, and many other texts. Therefore, the following texts need to be translated on the “String Translation” screen. (Read more about WPML String Translation.)

  • Theme Strings – They are strings written in the theme code (included in the .pot file), for example, “Join the Conversation” (Comments Section Title) on each single post or page.
  • Theme Options Strings – They are strings entered in the theme options (customizer). When customizing your site with PatioTime theme, you will be able to enter many custom text in the customizer. To translate any custom text you entered in the customizer you need to use “String Translation” screen of WPML.
  • Theme Dashboard Strings – The Restaurant Info & Opening Hours added via Patio.Time Dashboard.
  • Strings entered with WordPress core features – Such as the site title, the tagline, widgets.

By default, WPML doesn’t scan or load these translation files into the database. Because of this, you will not be able to find these strings on the WPML → String Translation page. If you want to translate or edit these strings, you first need to scan the translation files of the related theme or a plugin.

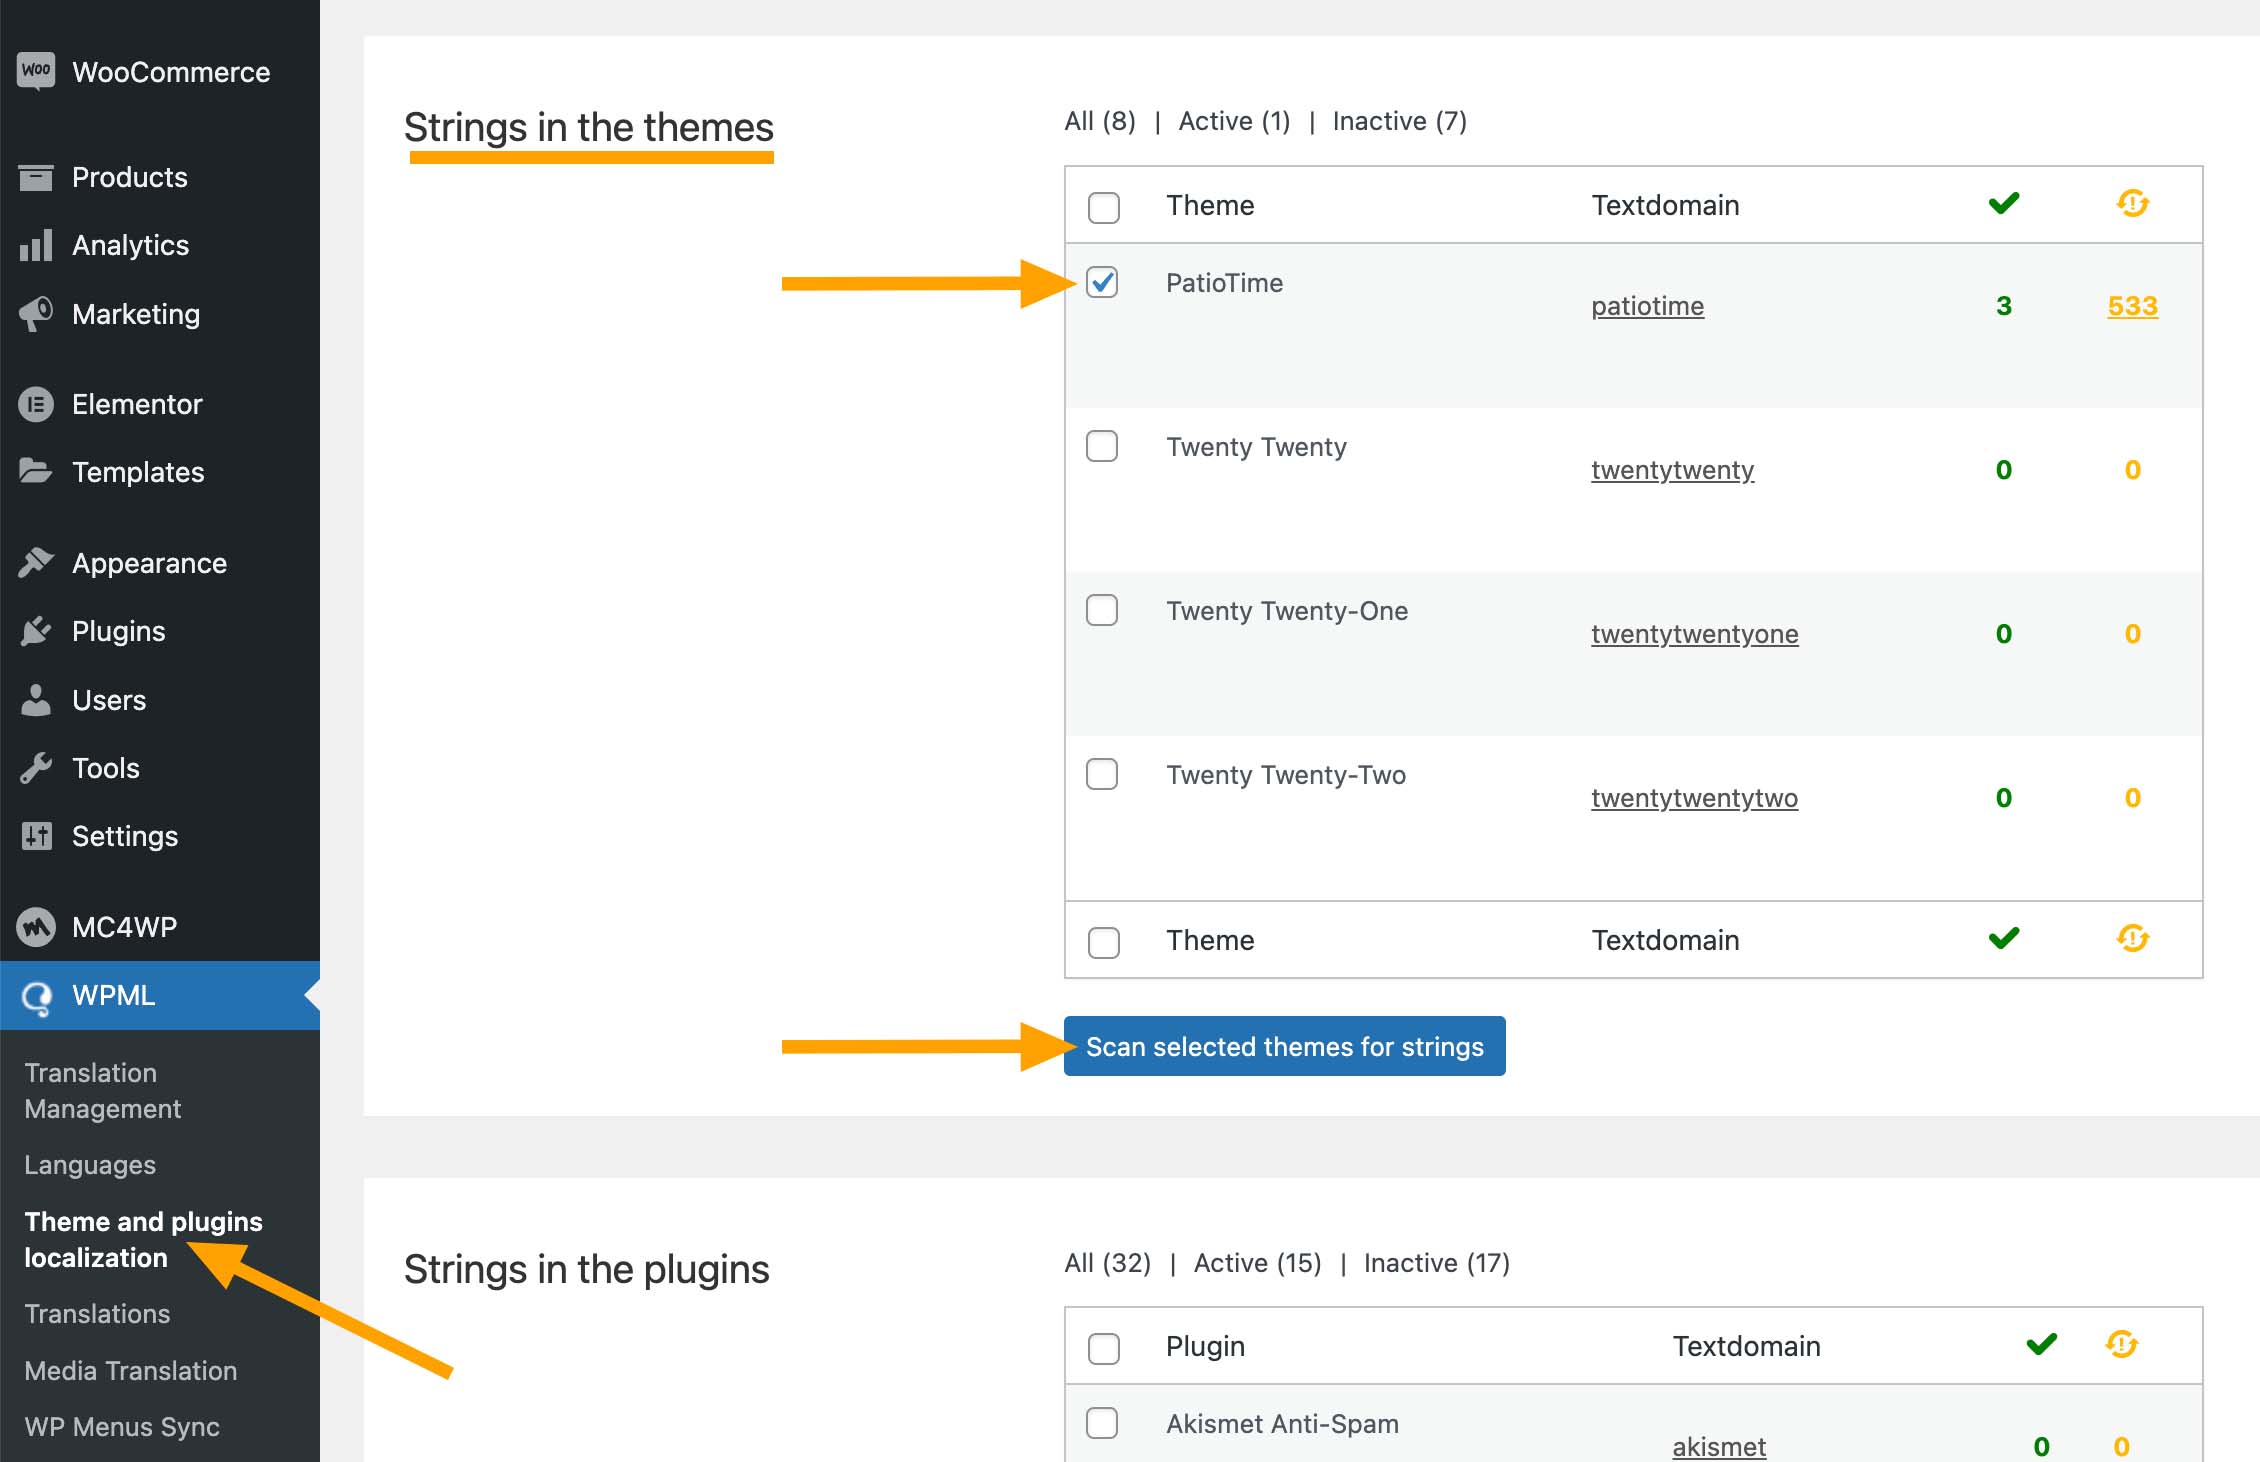
1 – Scanning the theme

To translate texts coming from the theme and plugins, you need to scan them first. Go to the WPML → Theme and plugins localization page and find Strings in the themes box. Select “PatioTime” and click the “Scan selected themes for strings button.

2 – Translating the texts

Please navigate to WPML > String translation page. Then you can:

  • Select “PatioTime” in the Select string within domain dropdown list.
  • If you have imported a demo, or you have changed any settings in the customizer, please select “admin_texts_theme_mods_patiotime” in the Select string within domain dropdown list to find the text added in the customizer.
  • Or, you can enter some keywords copied from the texts you want to translate into the Search for: field and search.

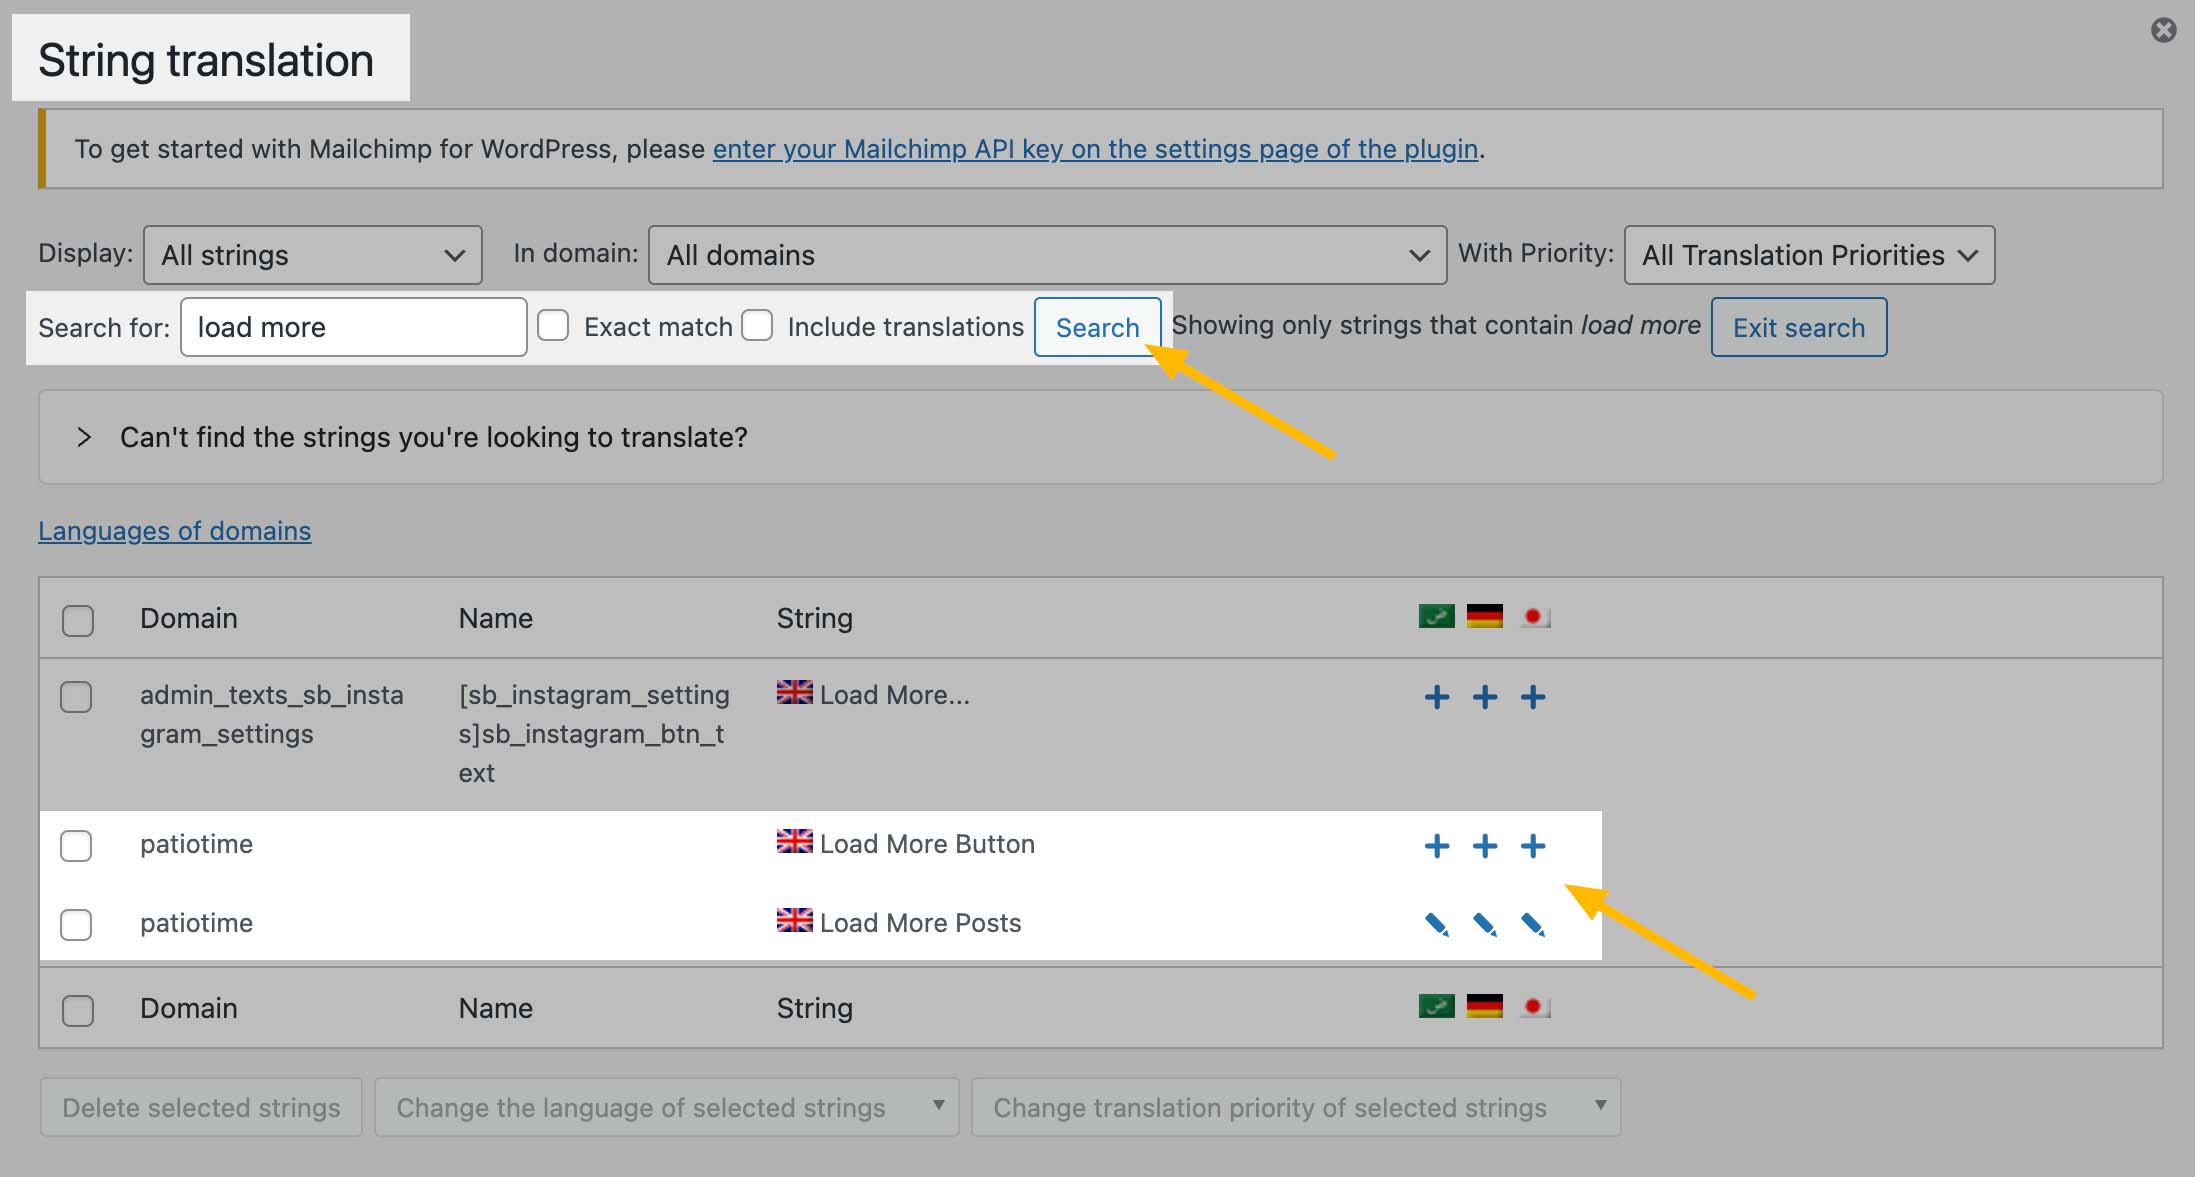
For example, let’s translate the “Load More Posts” button. The original text is entered in the customizer.

  1. Navigate to WPML > String translation. Enter “load more” and search. You will see the search result as shown below, click on the “+” button (or the pencil icon button) of the language you are about to translate (or modify the translation).
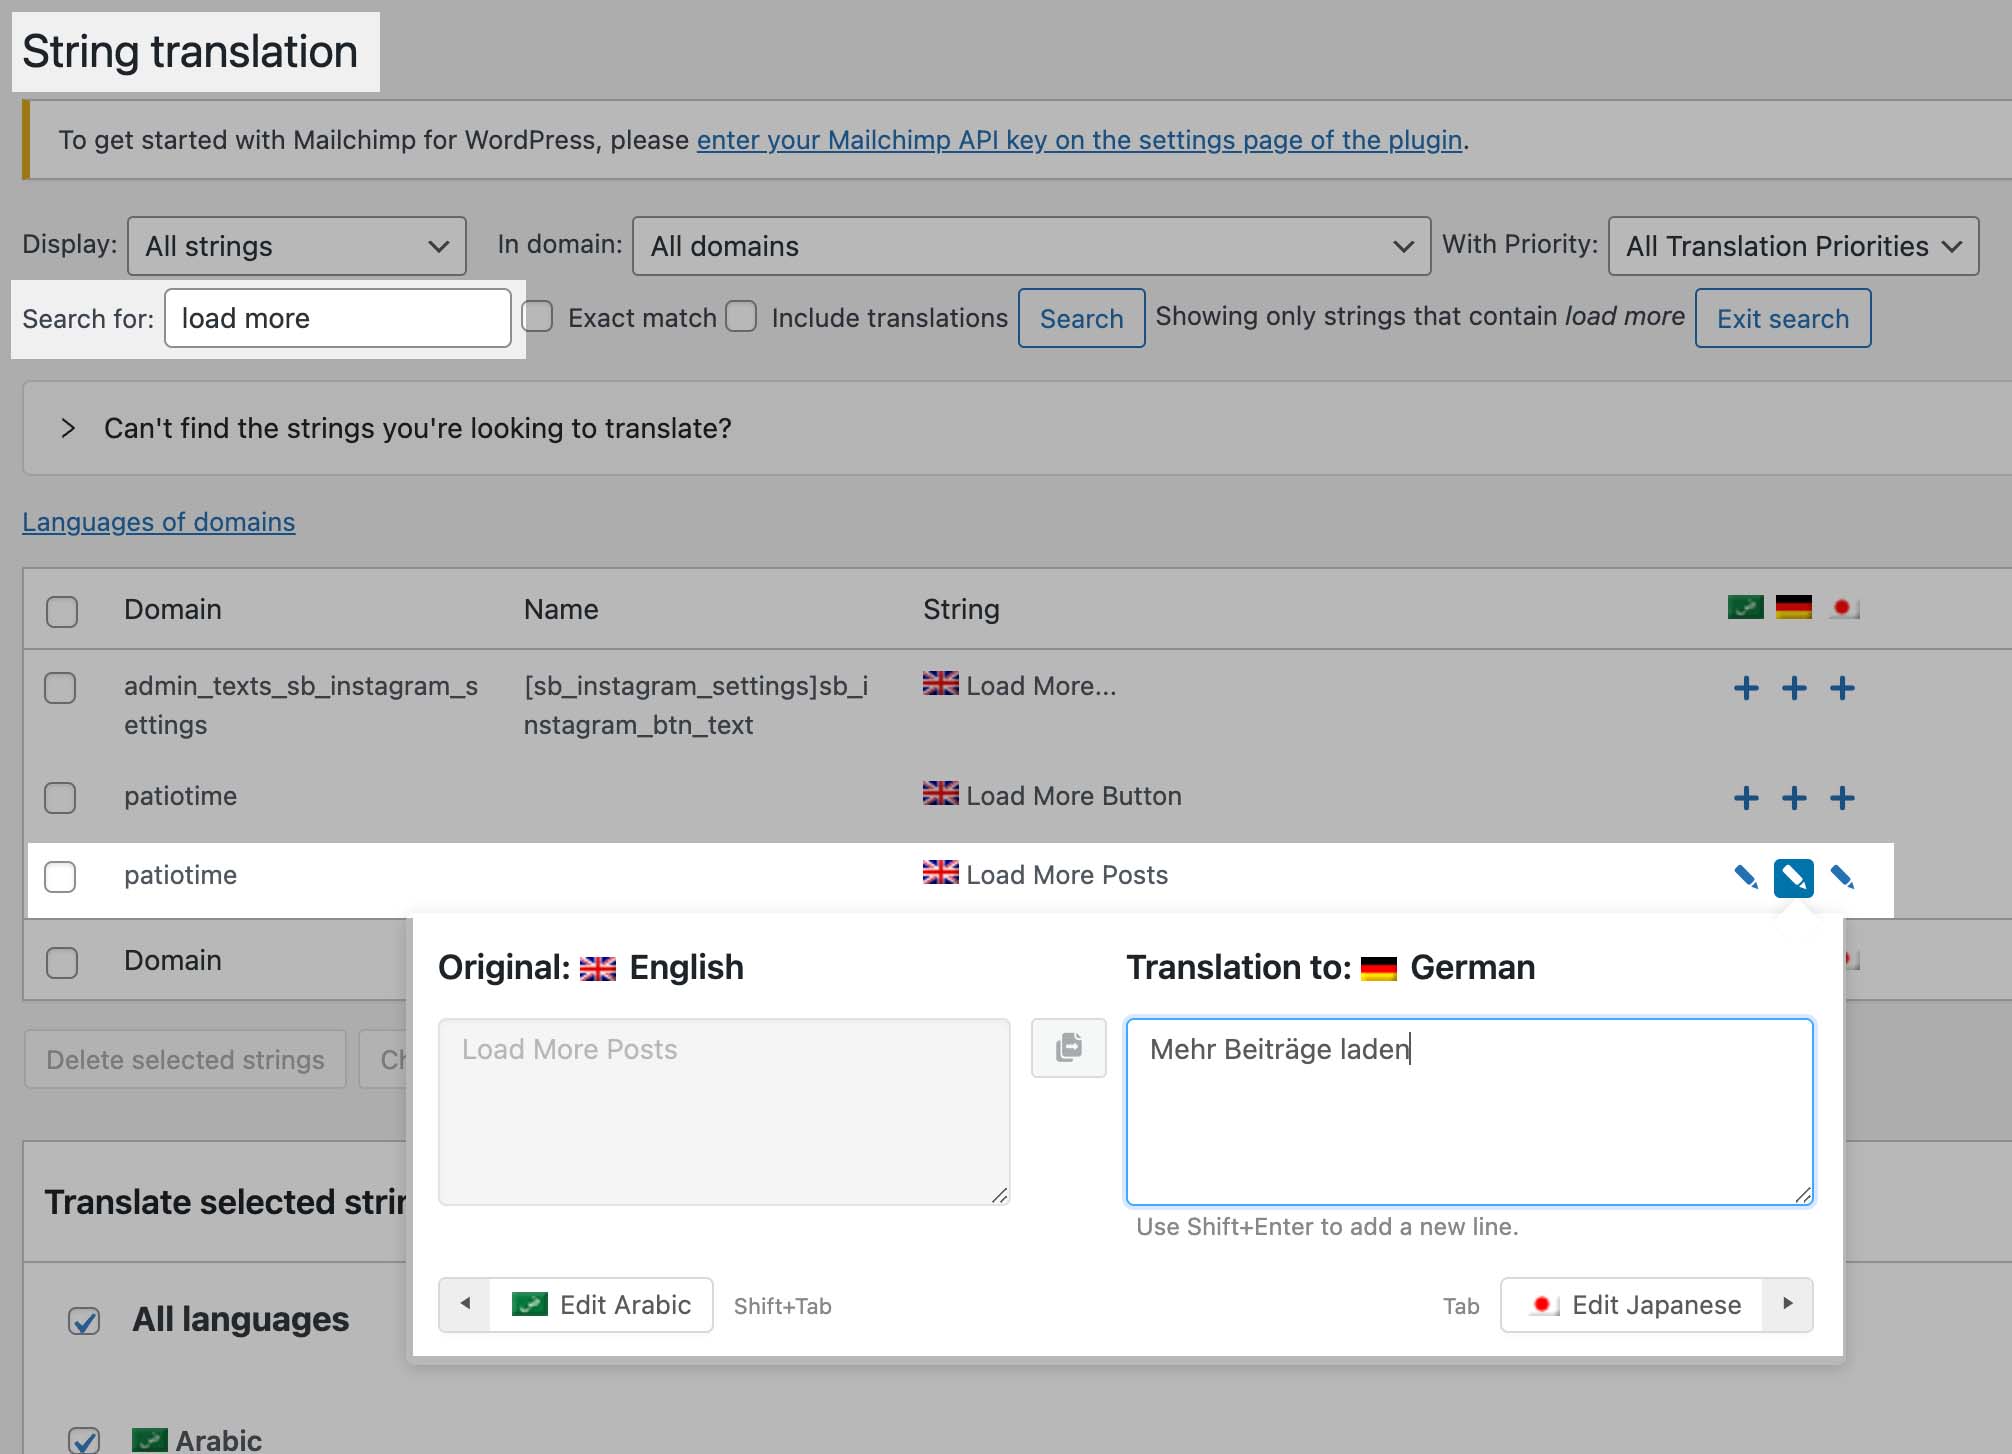
  2. Add your translated text. You can save your translation by hitting the Enter or Tab keys on your keyboard or simply clicking out of the window. The Tab key allows you to switch between languages without having to click.
Step 6 – Translating Newsletter Signup Form
  1. Installing an Add-on:
    Please download and install this add-on: MailChimp for WordPress Multilingual. Please go to WPML and log into your account, then please go to “Download” page to download the MailChimp for WordPress Multilingual add-on. And then upload it to your website, install and activate it just as you would any other WordPress plugin.
  2. Translating the form:
    Please read the WPML’s Offical Documentation: MailChimp for WordPress Multilingual.
Step 7 – Translating Menus

WPML lets you translate WordPress menus and create different menus per language. You can translate menus manually, or have WPML synchronize menu content. Please check Translating Menus for more details.

Step 8 – Translating widgets

WPML lets you easily translate your Widgets via the String Translation screen. This requires that the WPML String Translation module is installed. The module is available in the Multilingual CMS version.

Besides translating widgets, WPML allows you to display different widgets for different languages.

Step 9 – Language Switcher

A language switcher allows visitors to select the language in which they want to read your content. WPML lets you add a language switcher in different ways: in a menu, as a widget, or in the site’s footer. You can also use it to show links above or below your posts, offering them in other languages.

To add and customize language switchers, go to WPML → Languages in the WordPress dashboard, then you will find the following settings on this page:

  • Language switcher options
  • Menu language switcher
  • Widget language switcher
  • Footer language switcher
  • Links to translation of posts
  • Custom language switchers

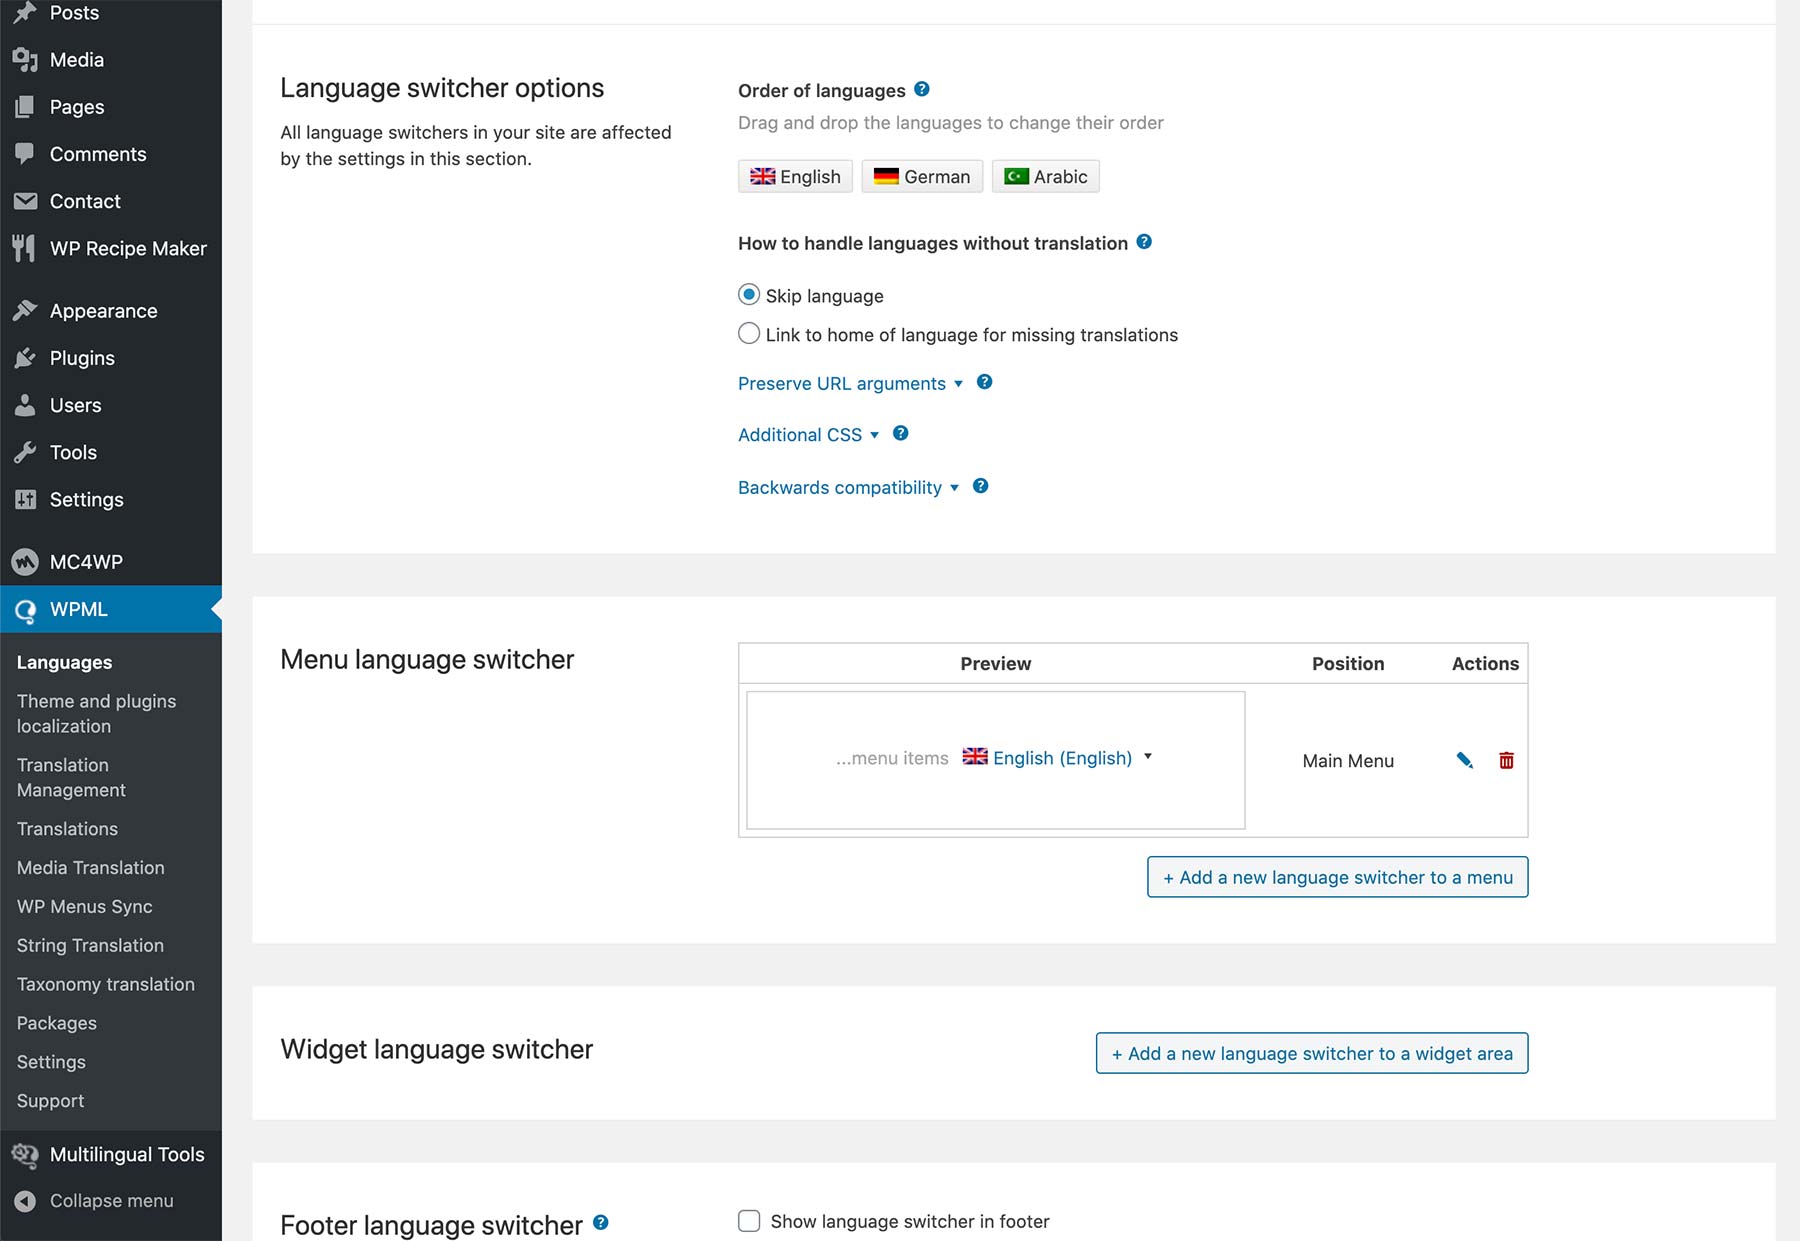
Each language switcher type has its own settings. This allows you full and independent control over what it includes and how it looks. When clicking on the “Pencil” icon, it will show a dialog box with settings for the menu language switcher.

Step 10 – Translating WooCommerce Elements

If you run an online store with WooCommerce on your website, you can also translate your store into multiple languages. WPML comes with the WooCommerce Multilingual addon which allows you to fully translate your online store, and run WooCommerce stores with several languages and currencies.

For the detailed instructions, please read Multilingual and Multi-Currency WooCommerce Sites Made Easy.

Need Help for WPML

If you need help with using WPML with PatioTime theme, please head over to WPML technical forum. Before posting about issues, we recommend that you review this quick checklist:

  • Make sure you have the latest versions of the theme and of the WPML plugins, and that they are all activated. These include WPML Multilingual CMS, WPML String Translation and WPML Translation Management.
  • Check that the problem does not appear if the WPML plugins are deactivated, and it does appear when only the core WPML plugins are activated.

Please always remember to search and read WPML official documentation for more details about how to use WPML.

Close
Close