To install Eaven theme, first you need a self-hosted WordPress site. Click the link below to go to WordPress download page,
there you will find useful information about installing WordPress.
If you are new to WordPress, we recommend reading some articles about basic knowledge of WordPress before you get started.
WordPress is a powerful system with a lot of features, knowing some basics about it will help you to manage your site easily.
To use Eaven theme, please make sure your server meets the following requirements:
WordPress 5.0 or higher
PHP 5.6 or higher
mysql 5.2 or higher
Minimum PHP Requirements
If you encounter any issue listed below, it is related to low PHP configuration limits:
Can't upload the theme to your site
Can't import a demo
"Are You Sure You Want to Do This" Error
White screen
and other similar issues
The solution is to increase those PHP configuration limits. Please log into your hosting cPanel and change them.
Or you can try to contact your hosting provider and ask them to increase those limits to a minimum as follows:
max_execution_time
30
max_input_time
60
memory_limit
256M
post_max_size
64M
upload_max_filesize
64M
Your Website Configuration
About PHP:
PHP Version - The minimum PHP version required for Eaven is 5.2, but we recommend using PHP 5.6 or above.
And WordPress recommends using PHP 7+ (please refer to this article: https://wordpress.org/about/requirements/ ).
For your security - PHP versions lower than 7.0 have reached the official end of their life cycle and may expose your site to security vulnerabilities. We strongly recommend that you no longer use the old PHP version,
please always update to the latest version (Supported Versions of PHP).
In most cases you cannot update the PHP version yourself and need to
contact your host about this. The upgrade process is an easy process and should be something your host can do for you without
impacting your website or charging you a fee.
WordPress Version - Although the minimum WordPress version requirement for running Eaven theme is 4.7,
we recommend always using the latest version of WordPress. There are many reasons why you should keep your WordPress updated (security, new features, bug fixes, speed,
compatibility). You may like to read this article.
2.2 Theme Installation
We assume that you already have a running WordPress site. Now let's install Eaven theme.
The First Step - Please find the installable theme file
You need to download the theme zip file from ThemeForest first. Go to Downloads on ThemeForest, and find Eaven.
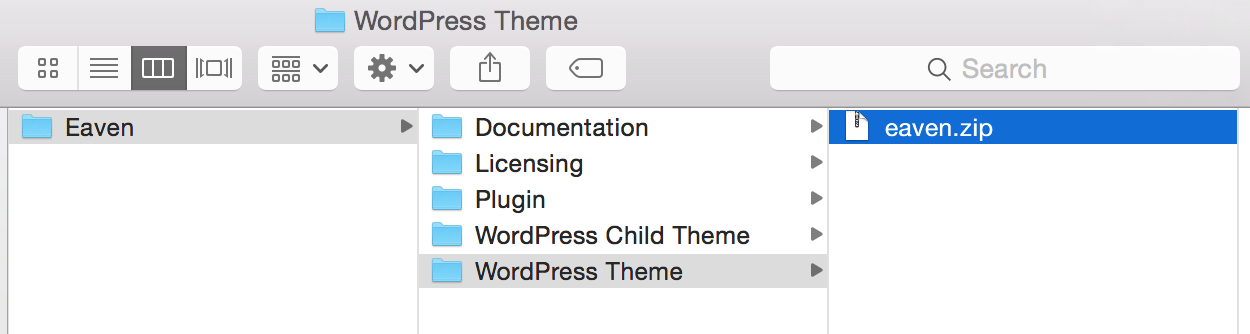
Download the files and find eaven.zip - that's what you need for installation.
If you downloaded the entire package, please unzip it, in the "WordPress Theme" folder, find eaven.zip.
Or, you can download the Installable WordPress File Only - which is eaven.zip.
Find the installable theme file - eaven.zip
Please do not upload the zip file of the entire package (which contains "All files and documentation") for installation.
Or you will see "The package could not be installed. The theme is missing the style.css stylesheet" error message. If you see
this error message, please unzip the file you tried to upload and then find "eaven.zip" file in it.
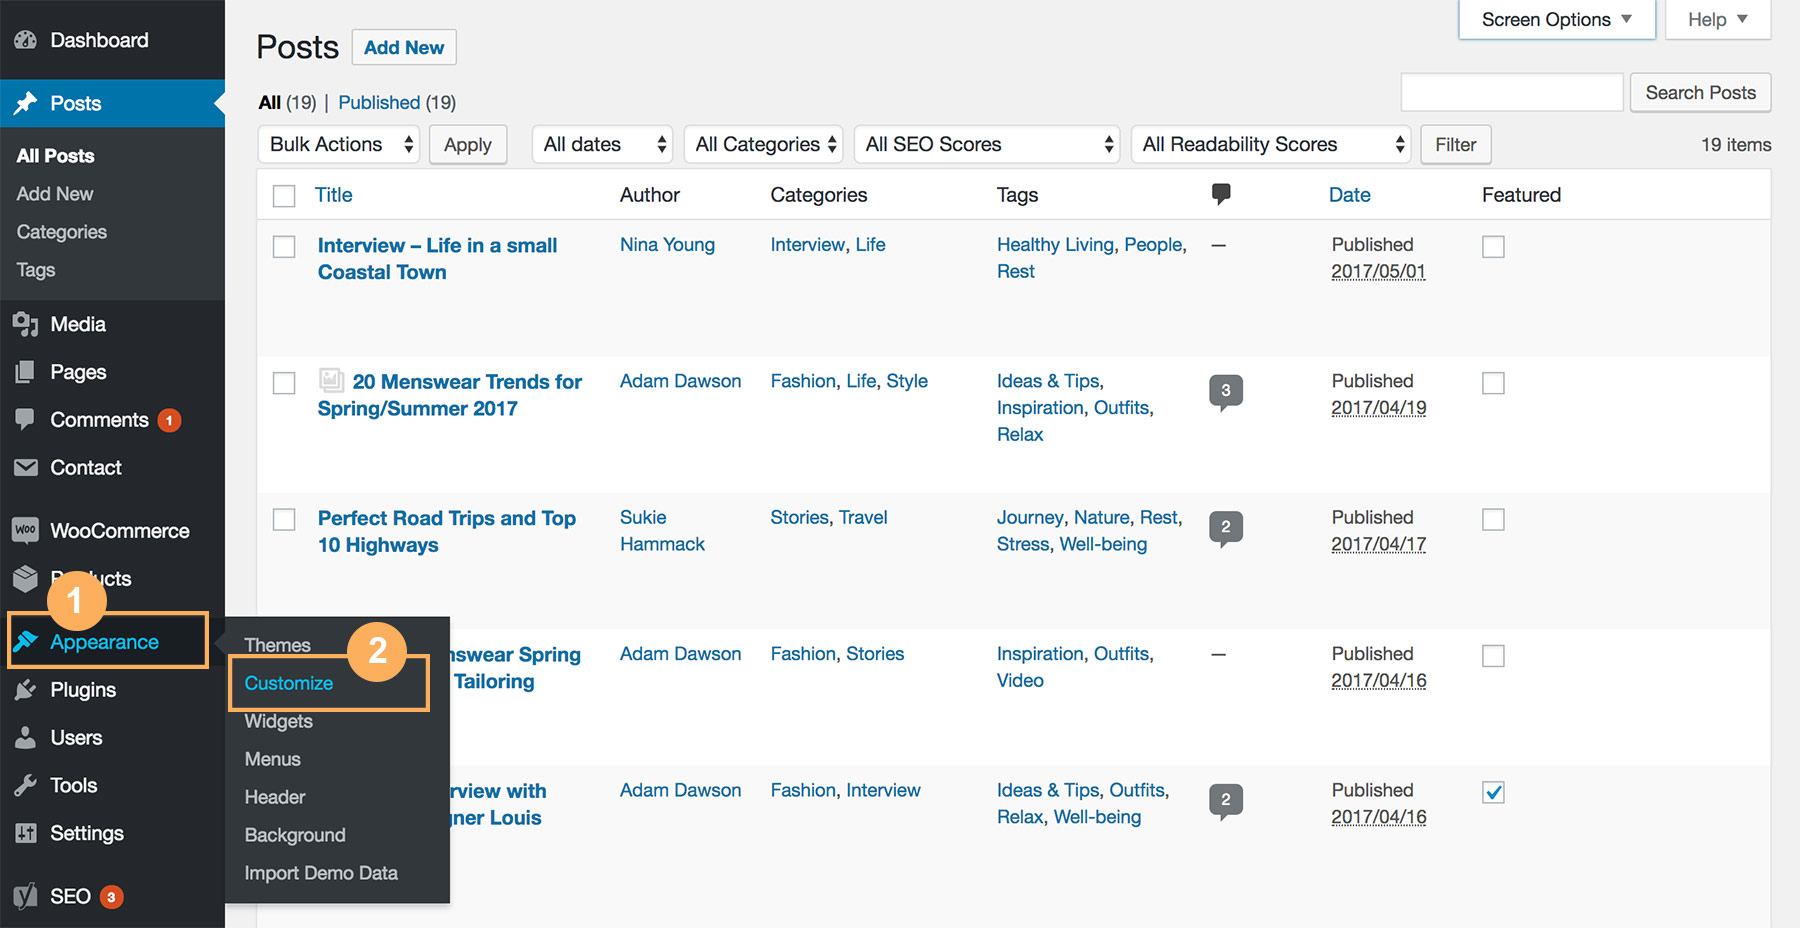
On your website admin panel, go to Appearance > Themes > Add New > Upload Theme.
Choose eaven.zip you just downloaded.
Install and activate it.
You will see the notice “This theme requires/recommends the following plugins…”, please click on those links and follow instructions to install those plugins.
Done.
Installing the theme via FTP
If you can't install the theme via WordPress admin panel, you can try to install it via FTP.
Find the file - eaven.zip, unzip it.
Upload the unzipped folder to your FTP > WordPress site root > wp-content > themes.
Go back to your site admin panel > Appearance > Themes, activate Eaven theme.
You will see the notice “This theme requires/recommends the following plugins…”, please click on those links and follow instructions to install those plugins.
Done.
Please note: If you are going to write custom code for the theme, then please check this section.
2.3 Install Required Plugin
As mentioned above, when installing & activating Eaven theme, you will see the notice "This theme requires the
following plugin: Eaven Extension". It is the Eaven Theme function extensions - including these features: post like, post sharing,
gallery slider, Instagram feed and more.
Why do you need to install the required plugin?
Because of WordPress code standards and ThemeForest requirements: "Themes execute
the presentation and styling of content, while plugins handle content creation and functionality." Therefore, some features must be
included in the required plugin but not included in the theme itself.
Please follow the steps below:
After Installing Eaven theme, activate it, then you will see a note box, it says: "This theme requires the following plugin:
Eaven Extension." Click on "Begin installing plugin" link.
After clicking on "Begin installing plugin" link, it will go to "Install Required Plugins" page
(or you can get to that page via Appreance > Install Plugins),
then click on "Install" link below "Eaven Extension".
Then activate "Eaven Extension".
Install and Activate Eaven Extension
If you need to find "Eaven Extension" zip file, please:
Please download the entire package which contains "All files and documentation", unzip it to get a folder and open it, then go to "Plugin"
to find "eaven-extension.zip".
2.4 Recommended Plugins
As mentioned above, when installing & activating Eaven theme, you will see the notice "This theme recommends the
following plugins…". Those plugins are not required to use the theme, but will extend the theme basic functionality.
All those plugins are hosted on the official WordPress repository and are made by other authors. You don't need to install
and activate all of them, just choose those you will use on your site.
After Installing Eaven theme, activate it, then you will see a note box, it says: "This theme recommends the following plugin:
…" Click on "Begin installing plugin" to install it.
After clicking on "Begin installing plugin" link, it will go to "Install Required Plugins" page,
tick the boxes of the plugins you will need on your site, then choose "Install" from "Bulk Actions"
drop down list and click on "Apply" button. (You can install the required plugin and recommended plugins at one time.)
Then don't forget to activate those plugins.
The recommended plugins are:
Contact Form 7 - To create a contact form and add it to your page.
MailChimp for WordPress - To create a subsribe form and can add it to content area, widget areas and site footer.
To make sure images on your site always look sharp and clear on all devices, the recommended width of images is at least 1600 px
when it is supposed to be a full-width image.
Images will be scaled and saved into different sizes after you upload them. If your website already has some images before switching to Eaven theme,
you will need to regenerate these images into the new sizes. Please use this plugin: Regenerate Thumbnails.
Otherwise, the theme will use the original images when the proper image sizes cannot be found, which may slow down your website performance.
You can set image sizes via dashboard > Settings > Media.
Recommended media sizes for Eaven theme:
Thumbnail size - Max Width: 150, Max Height: 150
Medium size - Max Width: 300, Max Height: 300
Large size - Max Width: 1024, Max Height: 1024
Full size - 1920 x 1280 (3:2)
After you change the media size settings, when you upload new images they will be scaled and saved into the new sizes. But for the
existing images, you can use this plugin to regenerate the new sizes: Regenerate Thumbnails.
2.6 Theme Basic Settings
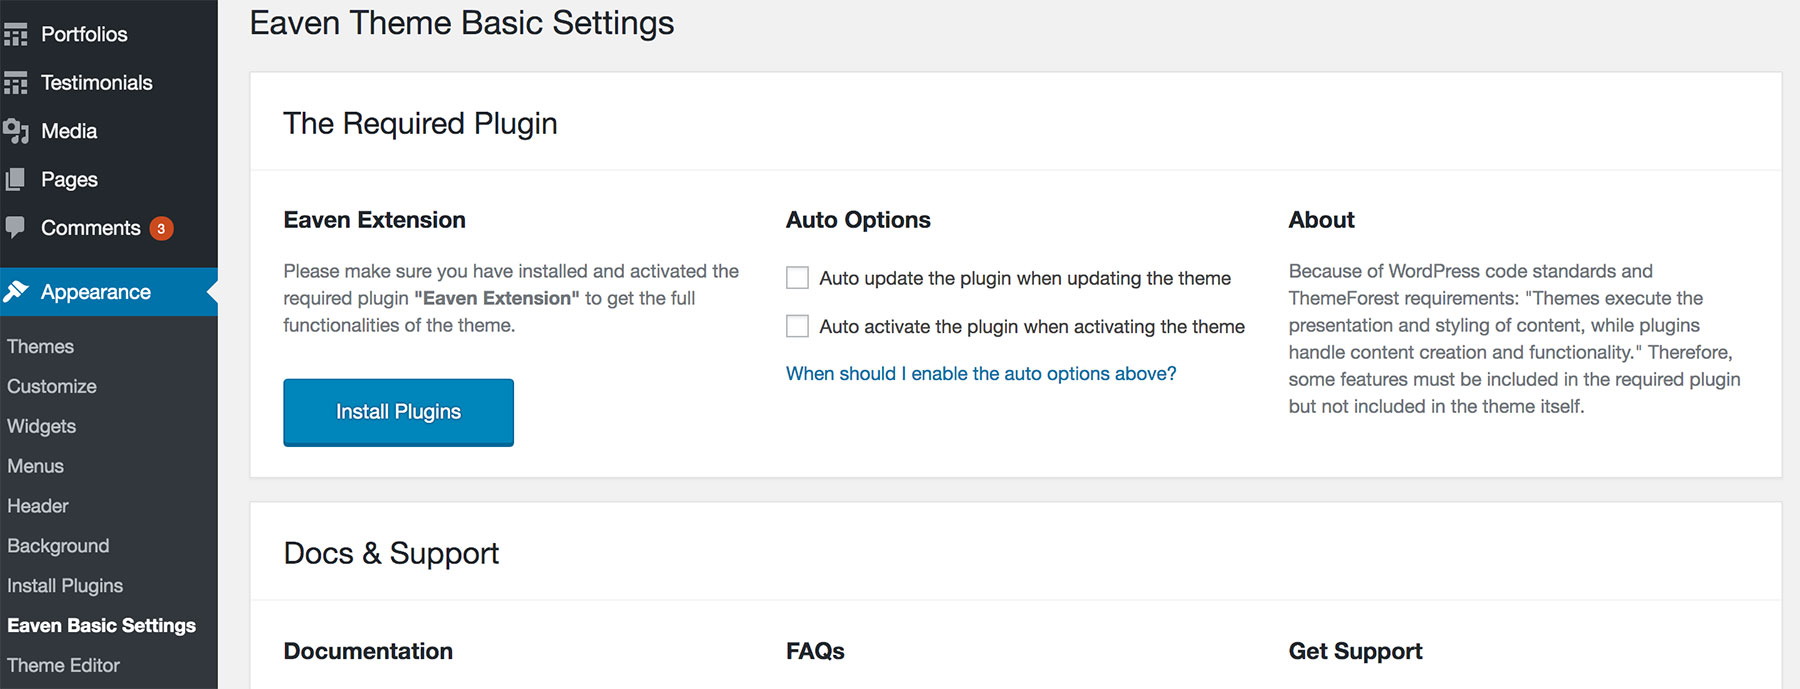
After installing and activating the theme, please go to Appearance > Eaven Theme Basic Settings, there you will find some basic settings for the theme.
The Required Plugin
Theme basic settings for the required plugin.
In this panel, you will find some basic information about the required plugin "Eaven Extension". And there are 2 options:
Auto update the plugin when updating the theme
Auto activate the plugin when activating the theme
When there is a newer version of the theme, after updating the theme itself, you usually need to update the required plugins to
ensure maximum compatibility with the theme. However, in rare cases, some users may forget to update the plugin after updating the theme,
and then some problems will occur.
In addition, some users may switch themes, they may forget to activate the required plugin after switching back to Eaven theme,
and then they will find that some features no longer work.
In order to avoid the above situations, we recommend checking both options.
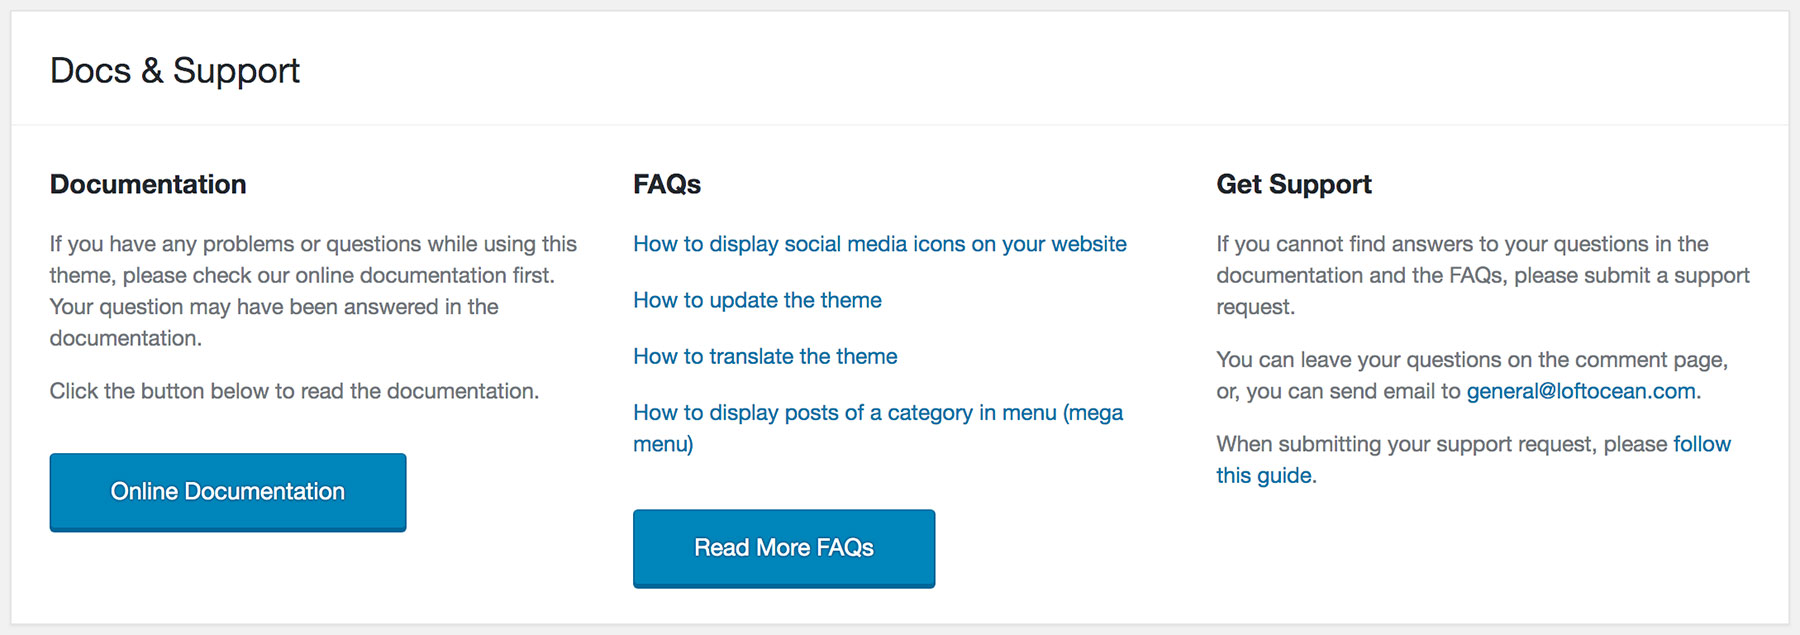
Docs & Support
Doc links & Support Guide.
In this panel, we provide the link to the online documentation so that users can easily access the documentation,
without having to save the URL to the browser.
3. Updating
When updating Eaven theme, please follow the following 2 steps:
Step 1 - Update the theme first;
Step 2 - Then, please also update the Required Plugin: "Eaven Extension". (See details here)
3.1 Update Theme
Auto Update with Envato Market Plugin
We recommend Envato Market plugin. It can install WordPress themes and plugins purchased from ThemeForest & CodeCanyon by
connecting with the Envato Market API using a secure OAuth personal token. Once your themes & plugins are installed WordPress
will periodically check for updates, so keeping your items up to date is as simple as a few clicks.
You will see this note while installing Eaven theme, please click it to install and activate Envato Market plugin.
Activate Envato Market plugin
If you cannot find the note on your site admin panel – you can download the plugin from its official download page:
https://envato.com/market-plugin/.
And then upload it to your site and install it.
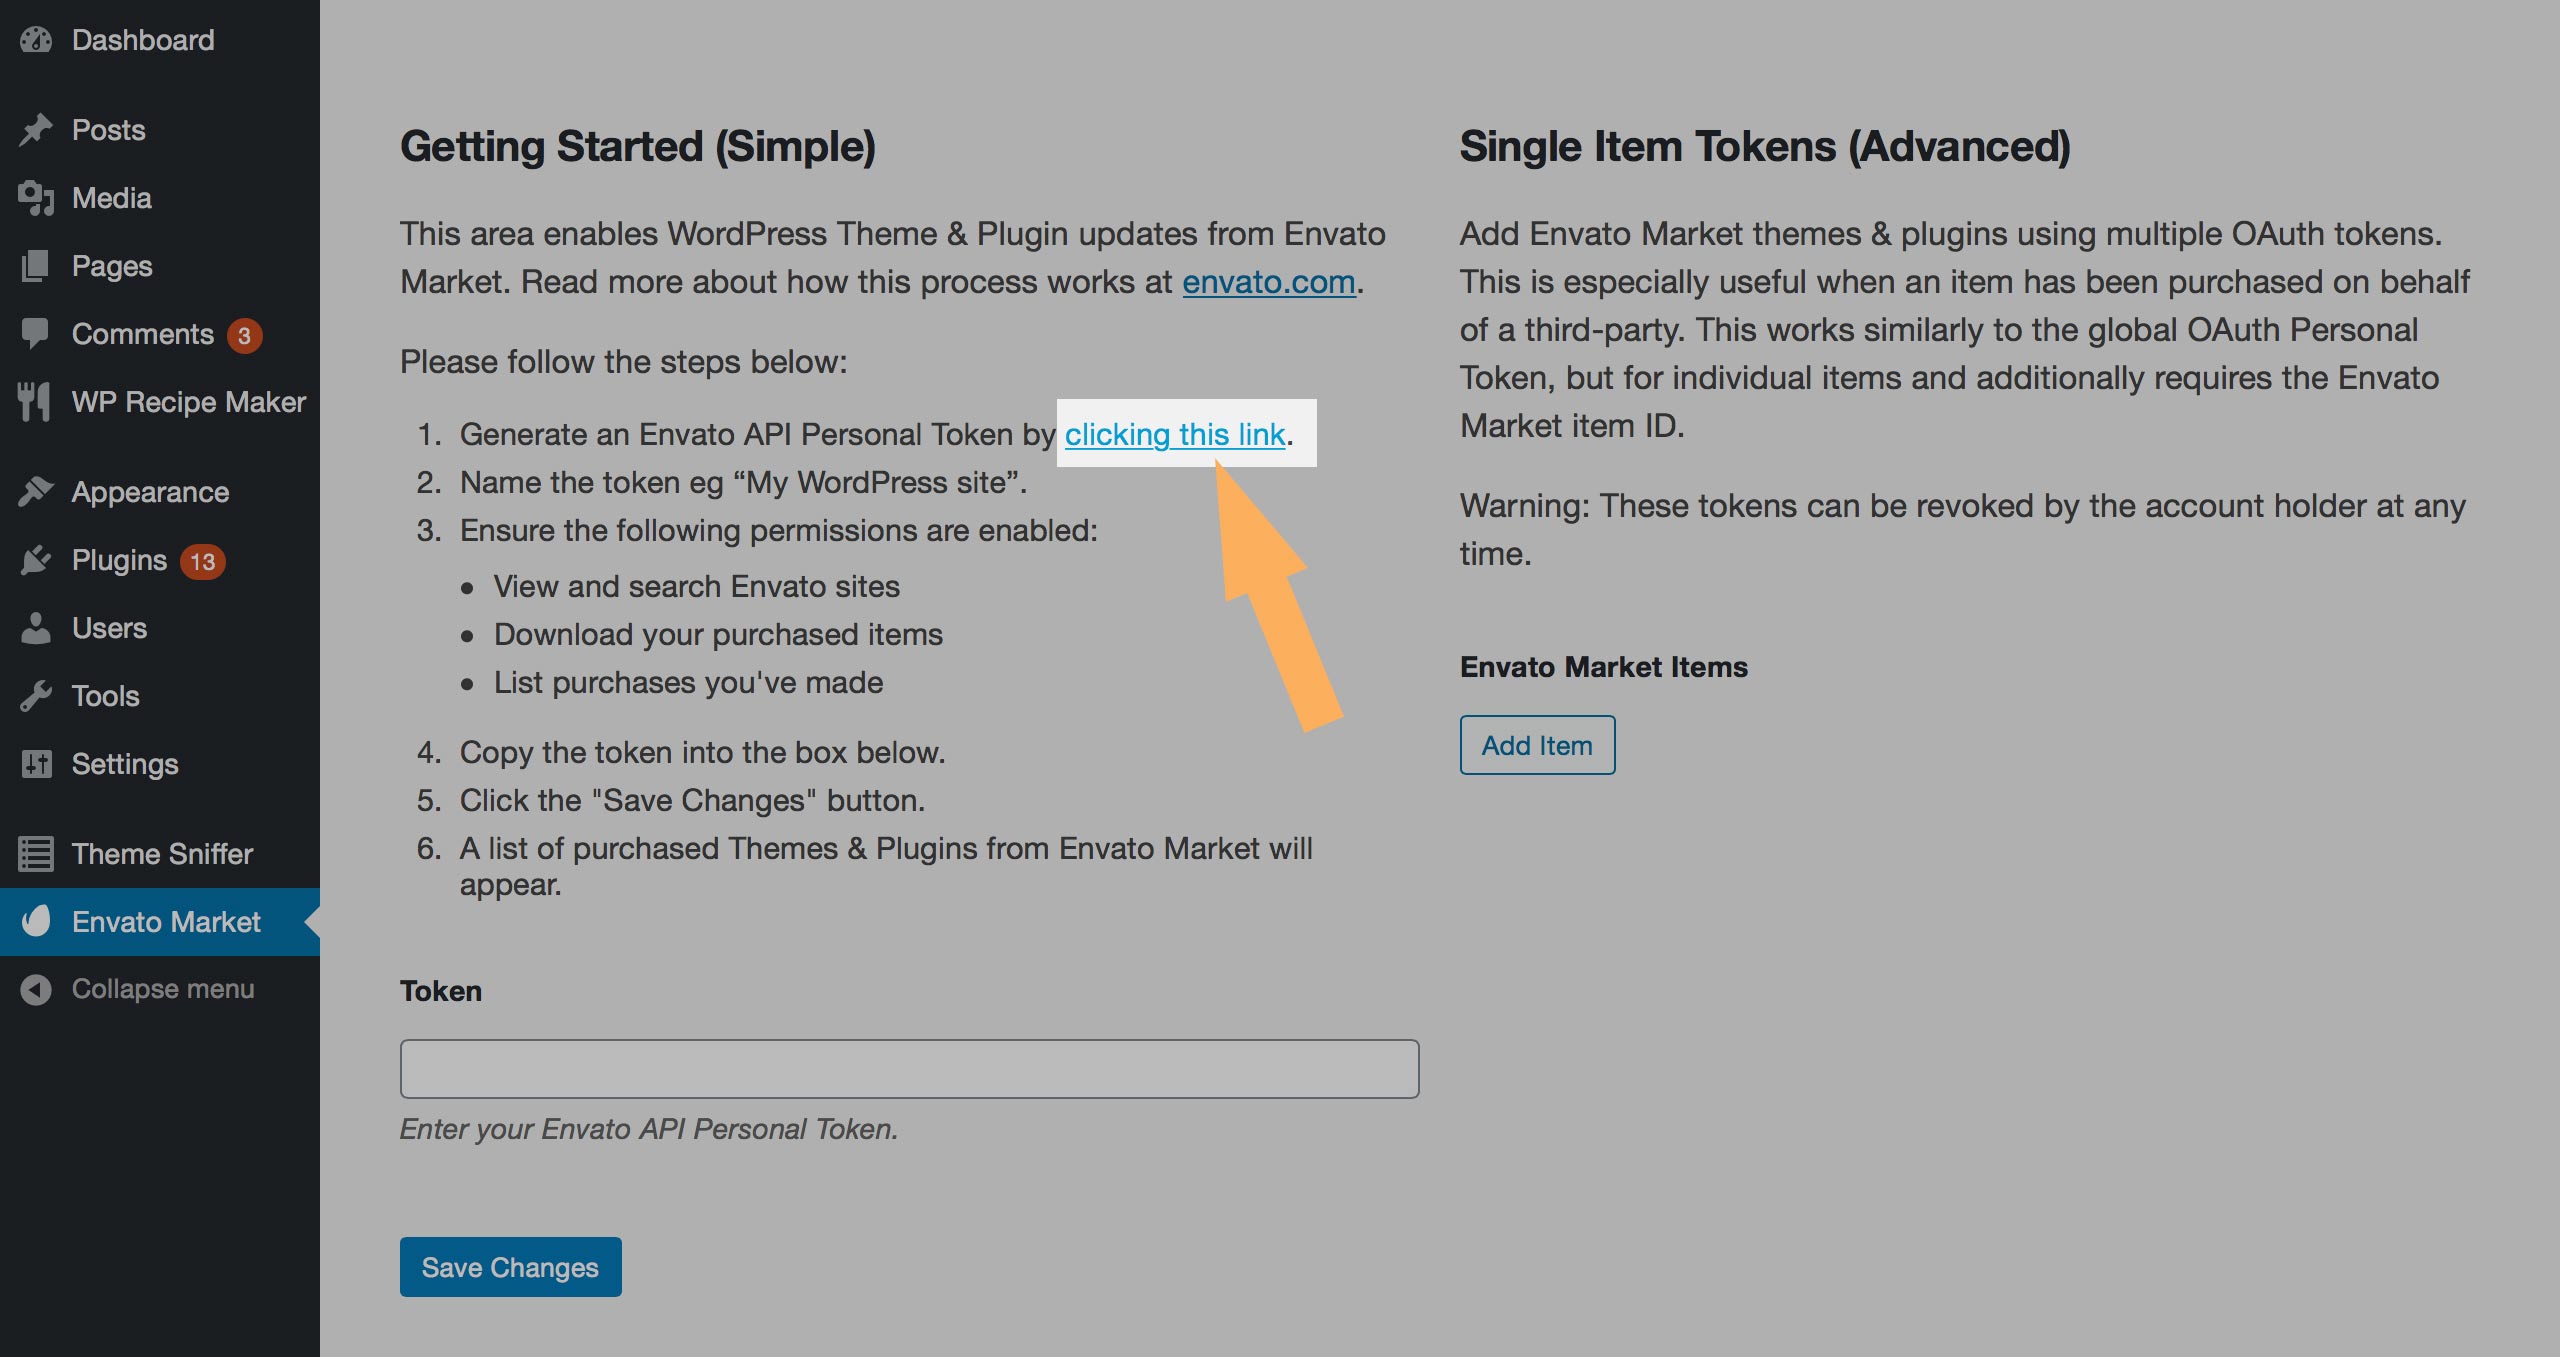
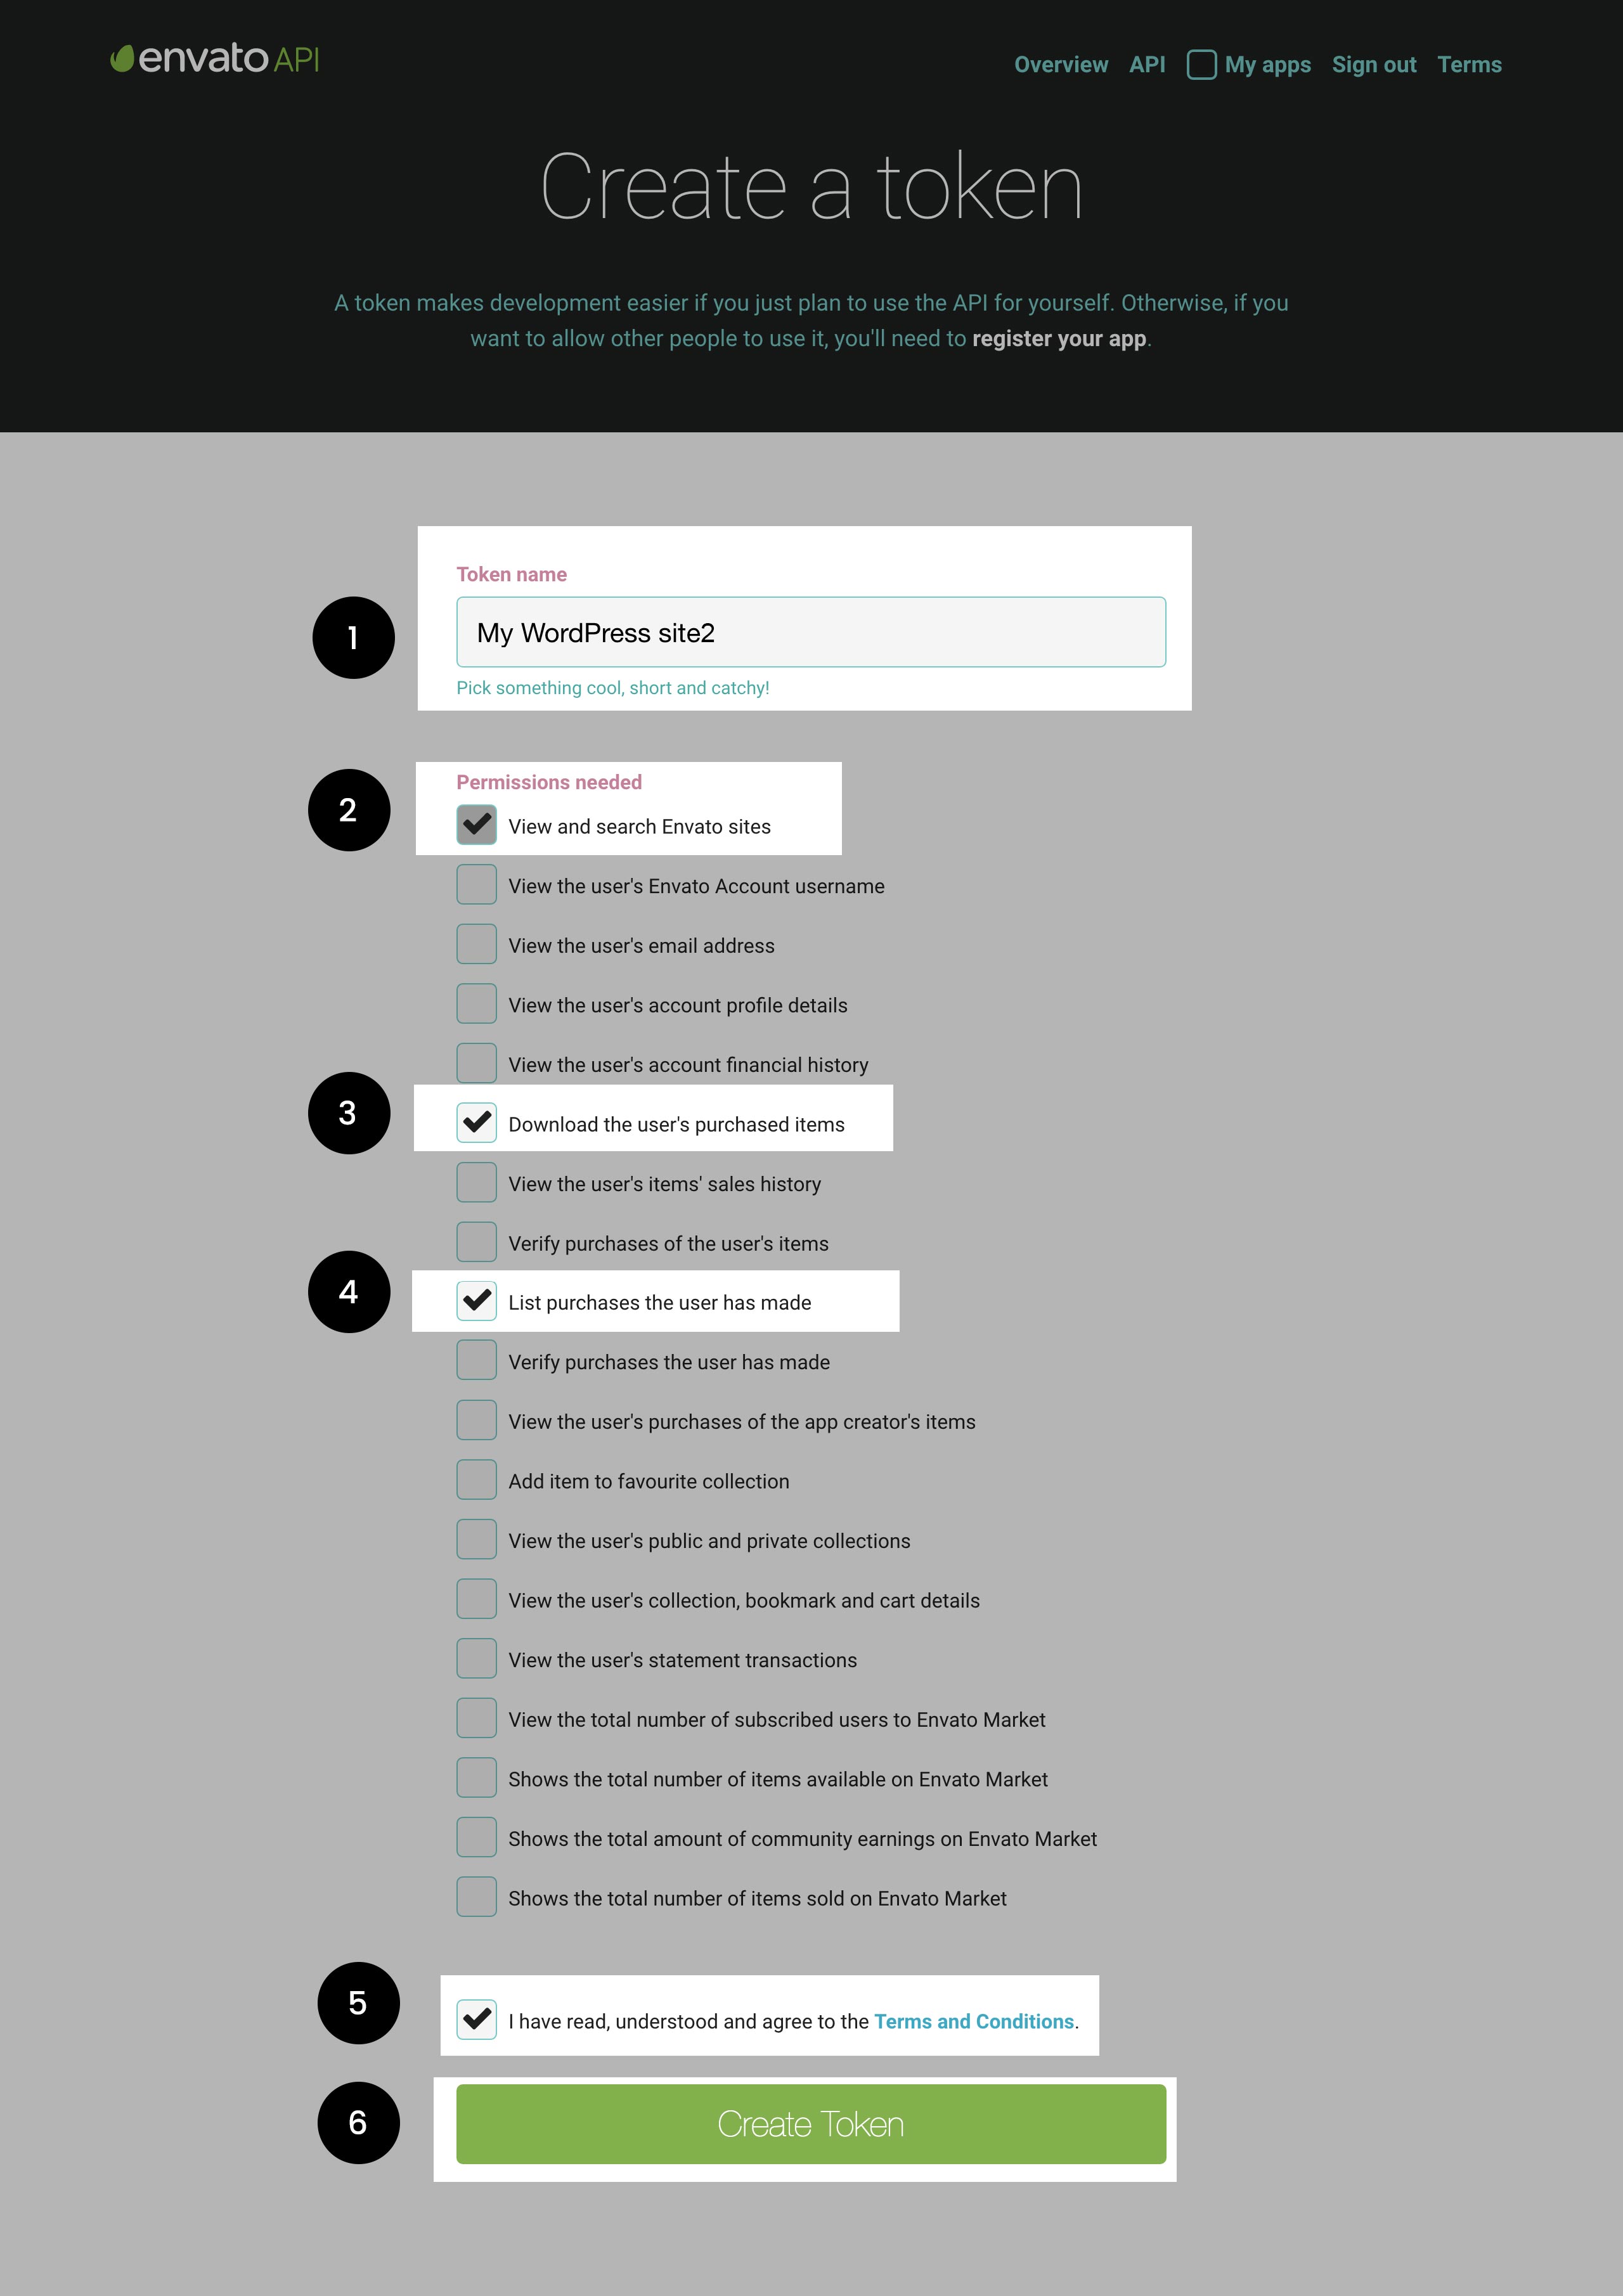
Then go to Envato Market > Settings, click on the link to generate a personal token, and then insert it below,
then save changes.
Click on the link to generate an Envato API Personal Token
When generating your personal token, please use the same Envato account you used when purchased the theme, and make sure you have checked the following 3 permission options:
View and search Envato sites
Download your purchased items
List purchases you’ve made
Generating Envato API Personal Token.
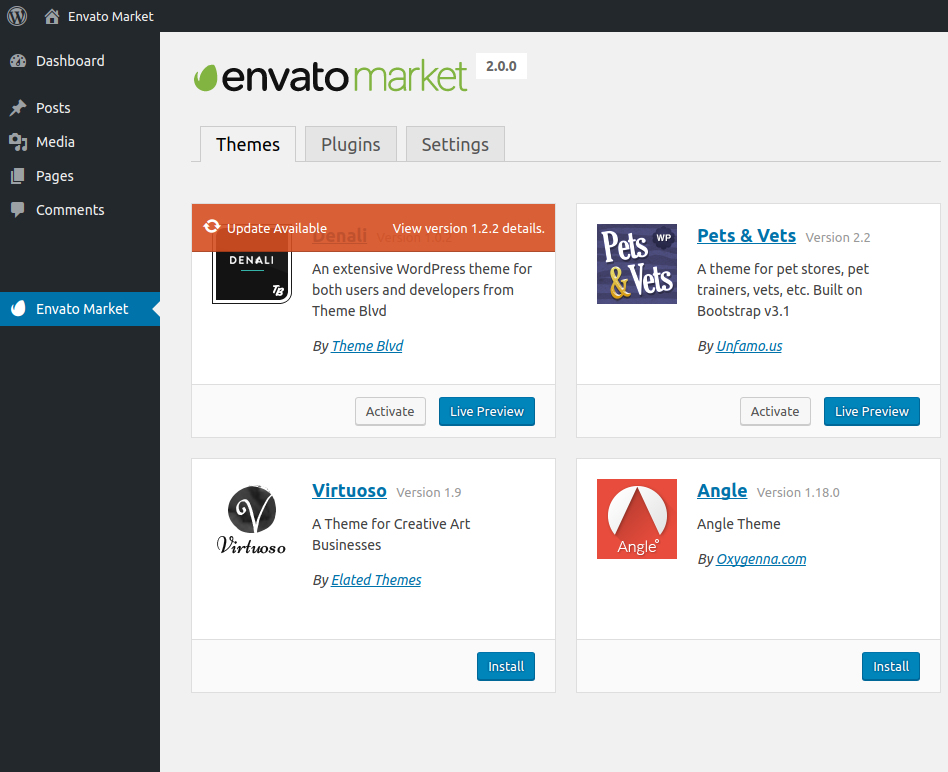
Once the Envato API connection is made from the Settings page, a list of available Themes will be shown. This will list all WordPress Themes that have been purchased through the Envato Market / ThemeForest.
The page may look like this:
Items purchased from Envato will display on the page.
If there is a newer version for a theme or a plugin, it will show a notice, and you can update the item by clicking on the link
Update Available.
Since the plugin checks for updates periodically, if you don't see the update notification, please wait for a while.
Please follow steps below when you need to update Eaven theme manually on your site:
Download the zip file of the latest version of Eaven from ThemeForest.
Extract the zip file and find eaven.zip.
Extract eaven.zip and locate the eaven folder
Log into your website via FTP, get into the theme folder (wp-content/themes/eaven), and upload the contents of the local eaven folder
to replace the old content in the eaven folder on your website.
3.2 Update Required Plugin
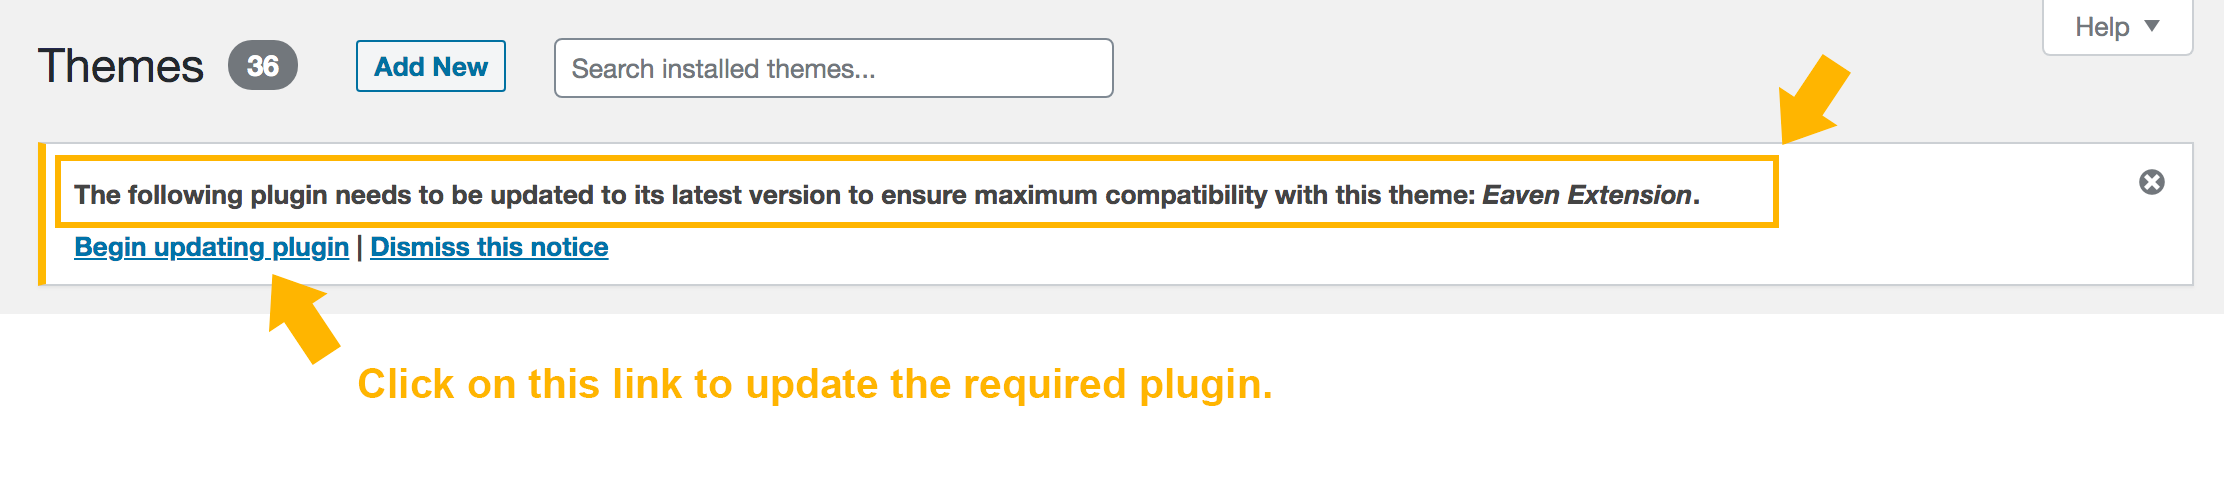
When updating Eaven theme, if you also see this note:
"The following plugin needs to be updated to its latest version to ensure maximum
compatibility with this theme: Eaven Extension."
1. Please click on "Begin updating plugin" link to update the Eaven Extension plugin as well.
Notification - update the required plugin
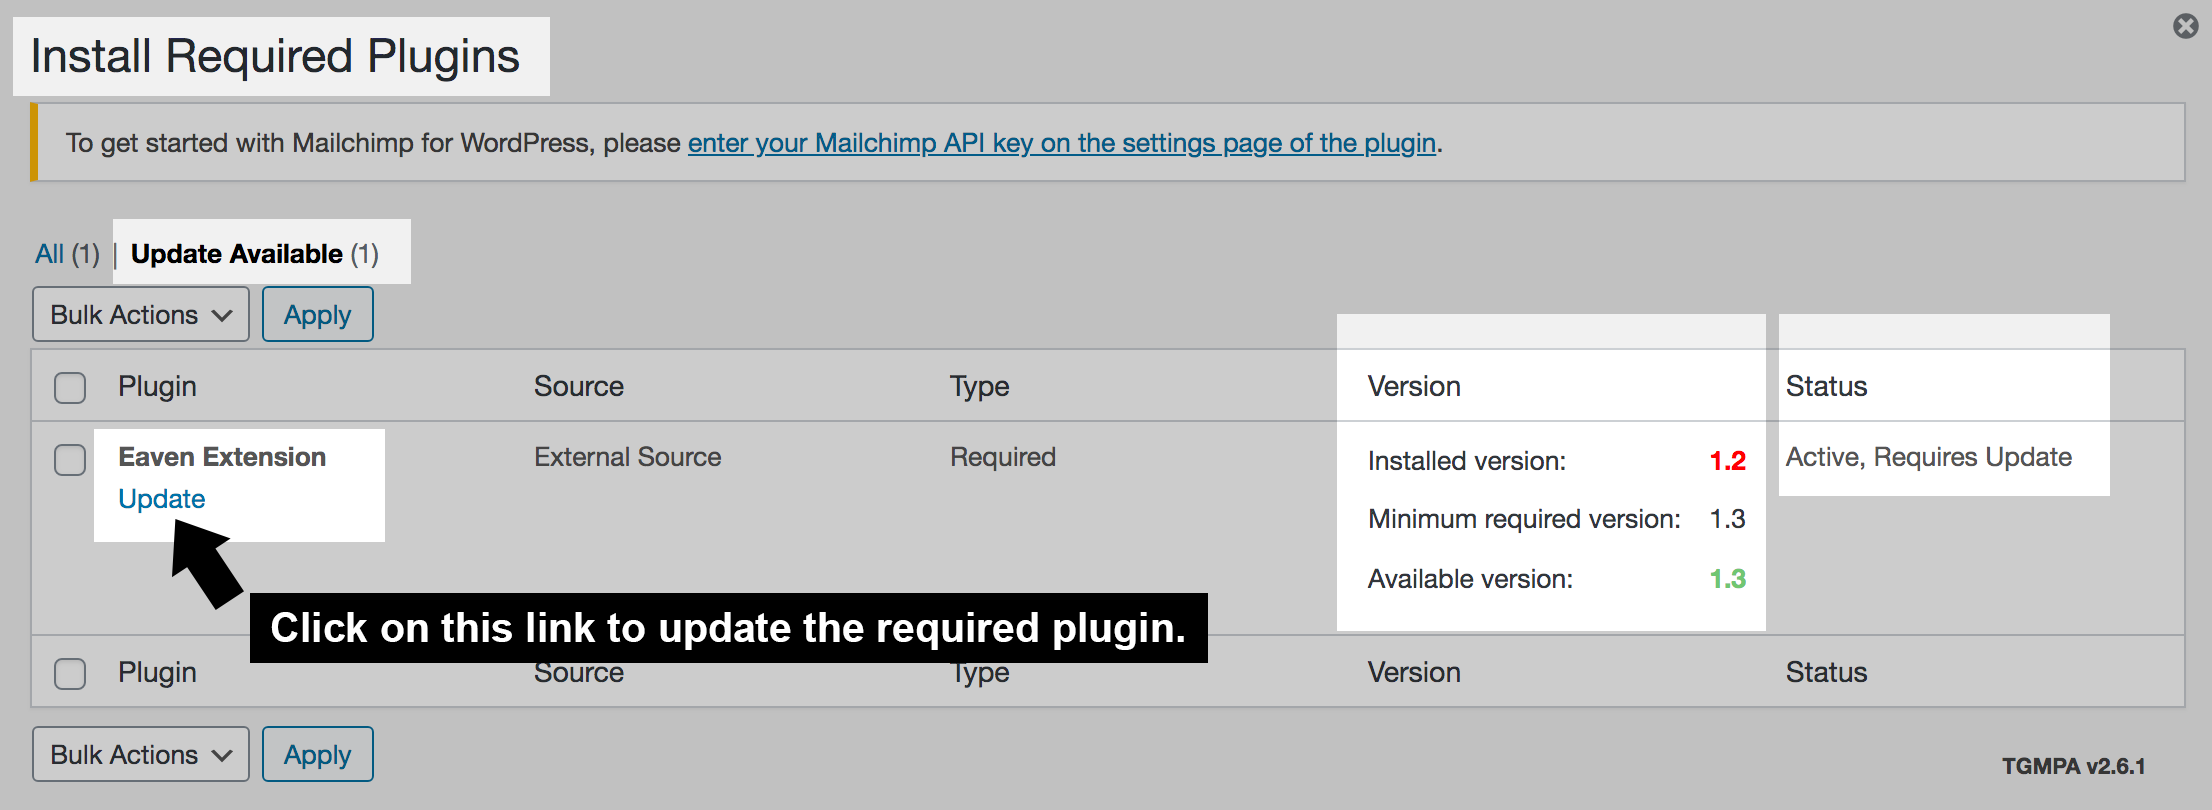
2. After clicking on the "Begin updating plugin" link, please click on the "Update" link below "Eaven Extension".
Update the required plugin
3. After the plugin updated, please click on the "Return to Required Plugins Installer" link.
4. You may see the plugin's status "Installed But Not Activated". If so, please click on the "Activate" link to reactivate the required plugin.
Importing a demo to your site is optional for using Eaven theme. It is for easy start - when you have a fresh WordPress installation,
you can import some dummy content and predesigned layouts & styles to your site,
then you can replace with your own content, and tweak some layouts and colors.
To import the demo content, please make sure you have installed and activated the following plugins:
And the other recommended plugins. You can deactivate some of these plugins later if you don't need them. (How to install recommended plugins.)
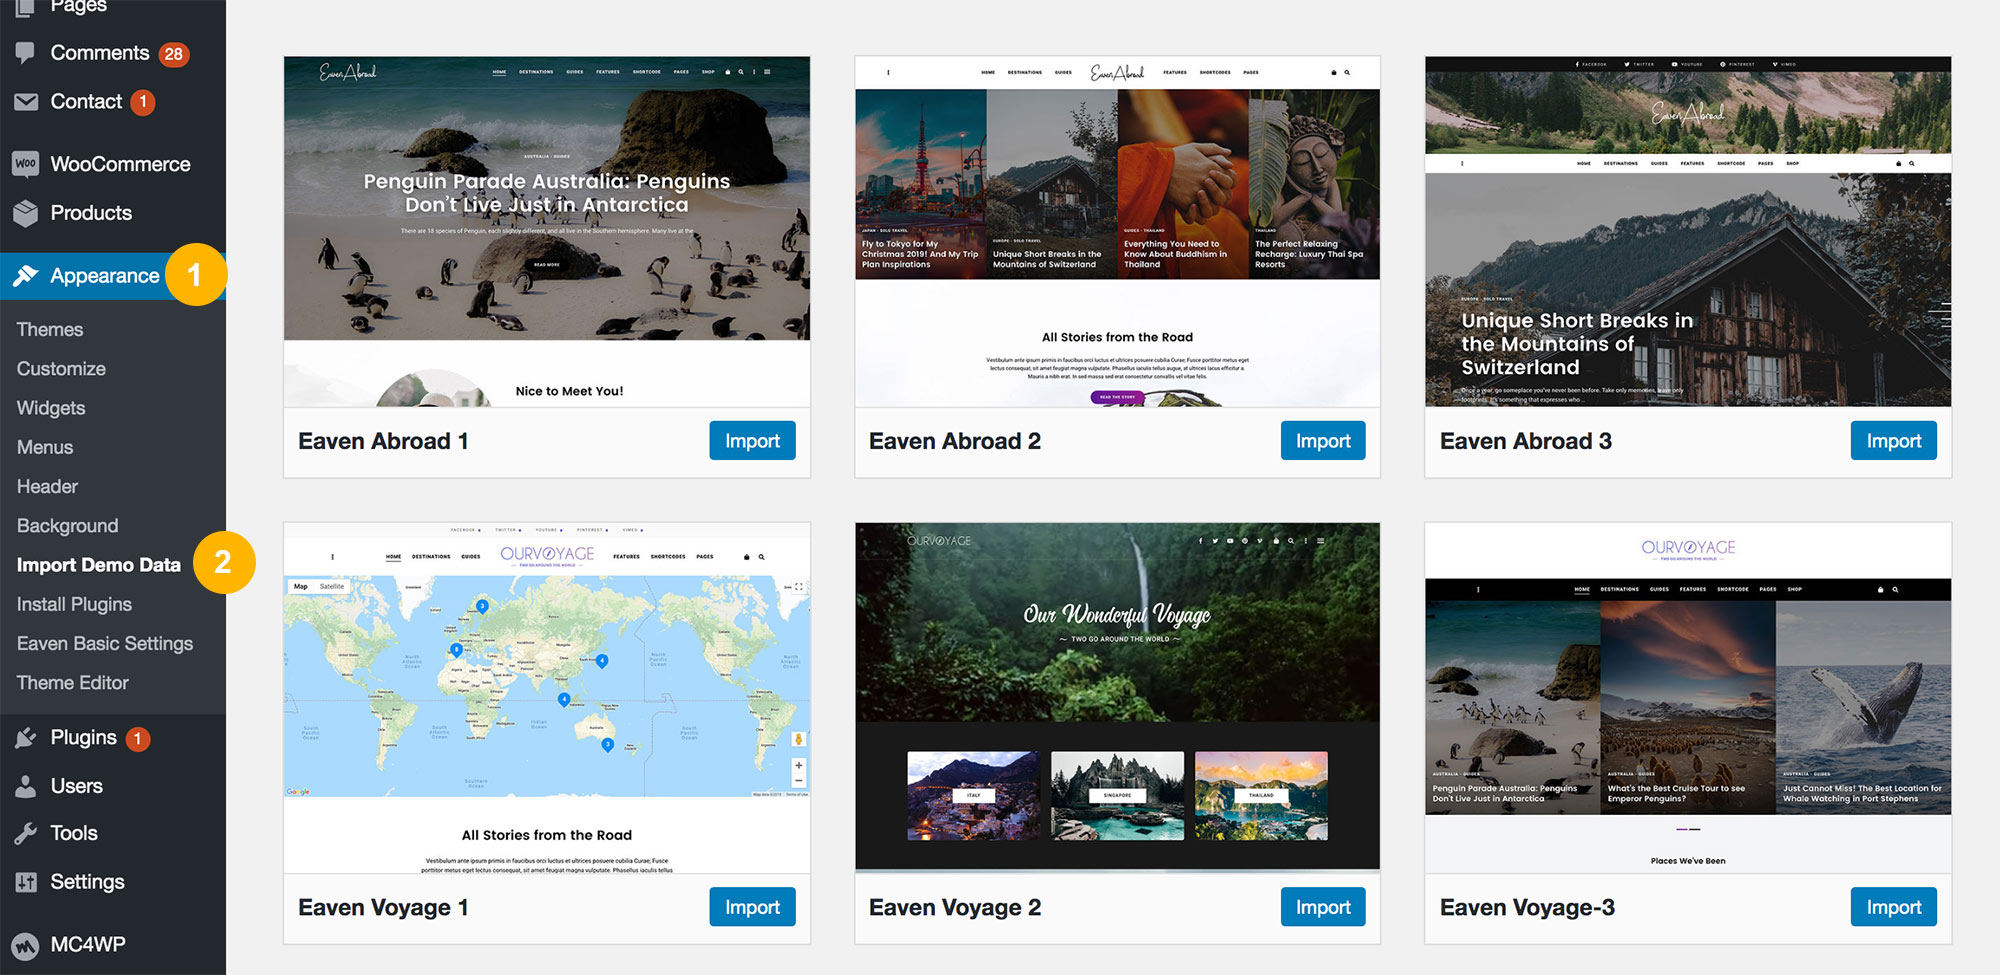
After installing Eaven theme and required/recommended plugins, refresh the page, you will see Import Demo Data under Appearance in the left sidebar.
Click it, then you will see the available demos. Choose one demo, click on the Import button.
Choose a demo to import data.
It can take a couple of minutes, please wait.
Images in the demo data:
There are many (large) images on the preview demo sites. Importing the demo data may fail if the network is not in good condition or if the user’s website is poorly configured.
To ensure that the demo data can be successfully imported into the user’s website as soon as possible, we use an image placeholder
(a small image with background color) in the demo import data. After importing a demo, you can upload your own images to replace these image placeholders.
If the homepage doesn't look like the theme:
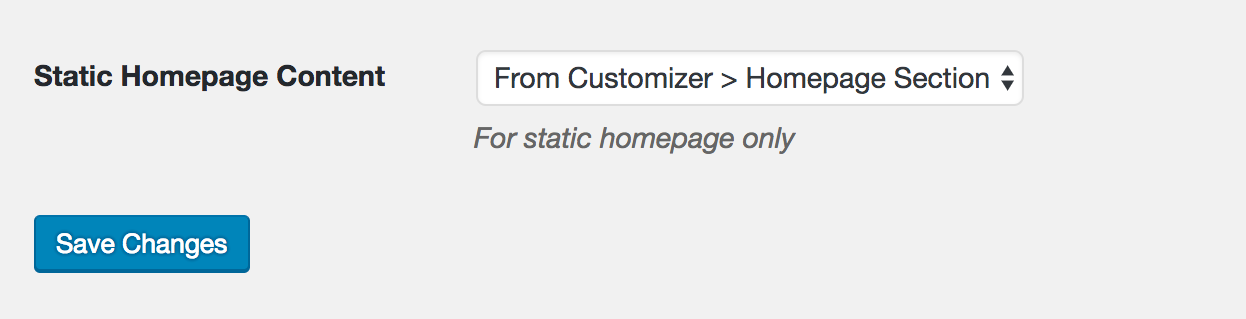
After importing a demo, if the homepage doesn't look like the homepage of the preview demo site, please check your homepage settings: On your website dashboard,
please go to "Settings" > "Reading" panel, scroll down to find the option "Static Homepage Content", and then select "From Customizer > Homepage Section"
in the drop down list (please refer to this chapter of the documentation). Then please save the changes, refresh your homepage to see if the problem has been resolved.
Please note: Don't import multiple demos to the same site, it will create duplicate data.
When importing finished, please follow the steps below:
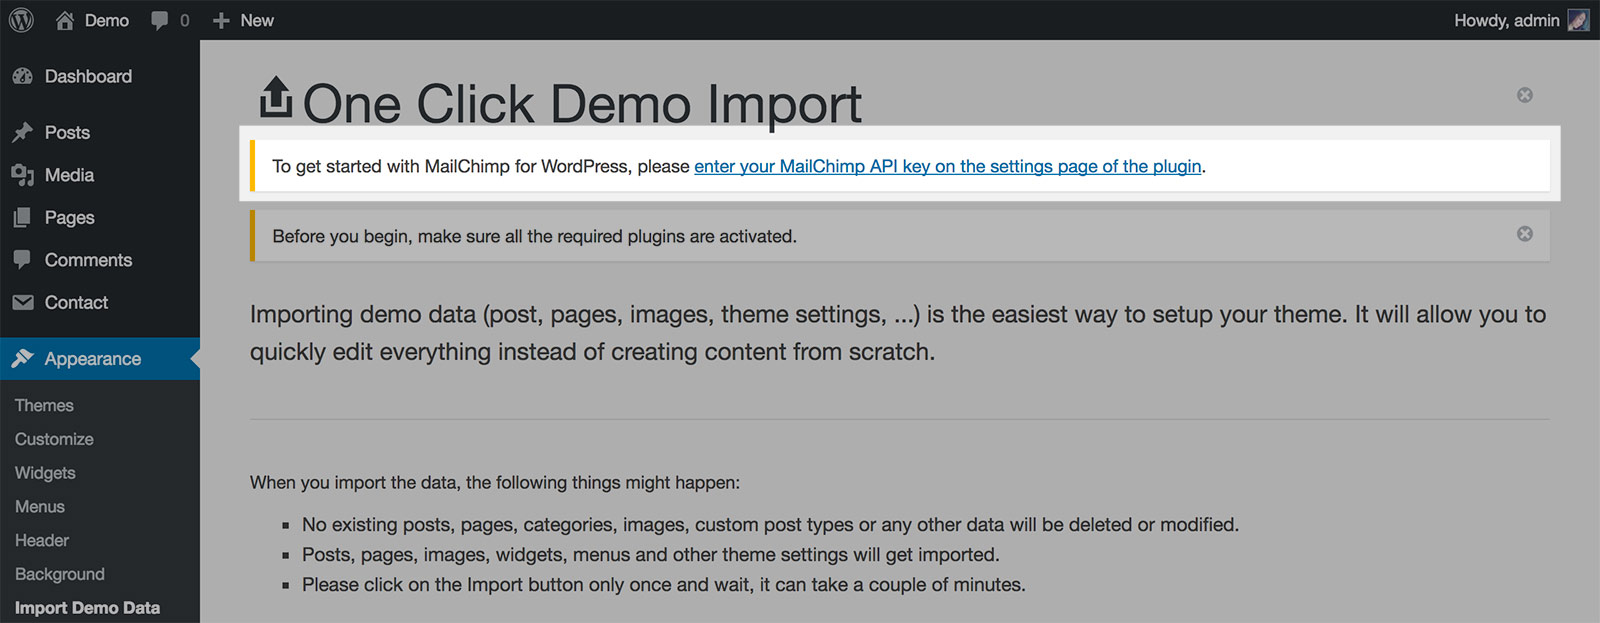
On the demo import page, you will see there is a note:
Demo Import - Setup MailChimp for WordPress
If you want to build the subscription form with the plugin MailChimp for WordPress, click on the link to get to the settings page of the plugin,
then enter your MailChimp API key, and create a form. Please read more in this section.
If you also need an online shop on your site, please install and activate WooCommerce plugin. You can add your products from scratch or import some
dummy data. Please find more information in this section.
If you encounter issues while importing a demo
It happens rarely, but if you have issues while importing a demo, please check the documentation Import Issues
written by the author of the plugin One Click Demo Import (which we are using for demo importing feature in the theme).
Error: Internal Server Error (500)
If you see this error message after clicking on import button, this usually indicates a poor server configuration, usually on a cheap shared hosting
(low values for PHP settings, missing PHP modules, and so on). Please see this article
to know how to fix it.
5. Homepage / Front Page
By default, WordPress shows your most recent posts in reverse chronological order on the front page of your site.
When working with Eaven theme, your site homepage can be set up as a page with more than one type of content:
not just the most recent posts, but also posts slider, posts from selected categories, products list, call to action, newsletter signup form, and more.
We call it "Multi-content Homepage".
So when using Eaven theme, your site structure can be any one of the following 4 types:
Simple Blog
Multi-content Homepage + Blog
Multi-content Homepage Only (without Blog)
Static Homepage + Blog
Please follow the steps below to set up your homepage.
Simple Blog
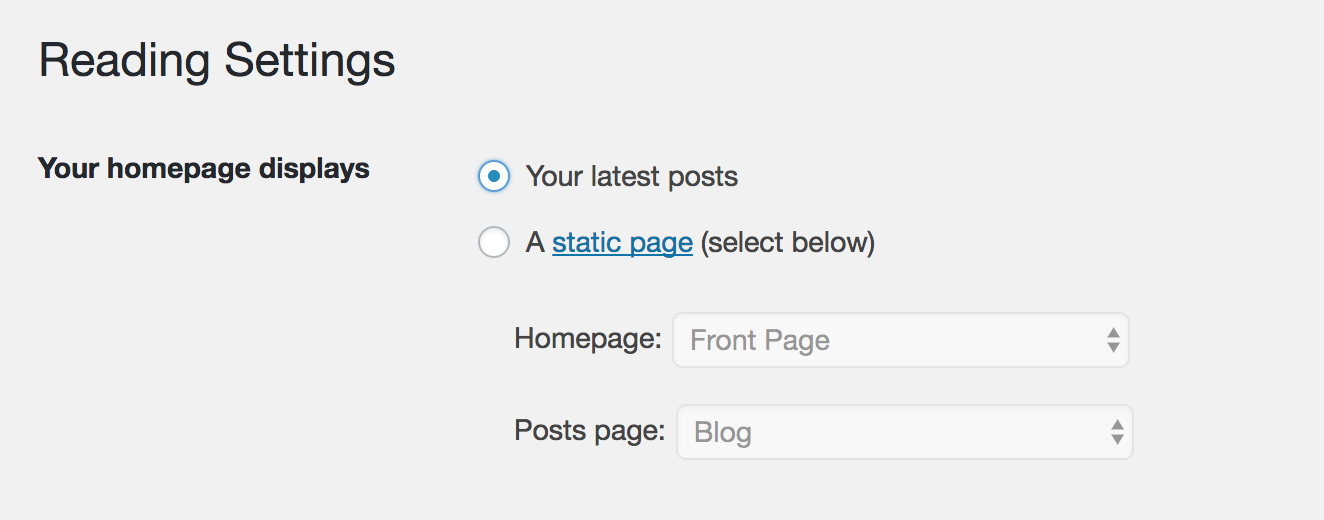
On your site admin panel, go to Settings > Reading panel, find the option Front page displays,
choose Your latest posts.
Front page - displays latest posts
Then go to Appearance > Customize > Home Page panel. There are 2 content blocks added by default:
Fullwidth Featured Area
You can display a slider of selected posts here, or 3 selected posts in block layout. Or you can add some custom content here.
Latest Posts List
You can change layout of your latest posts archive.
By the way, you can also add more content blocks to your homepage to make it more than a simple blog page. You might like to check Home Widgets to know
more details.
Multi-content Homepage + Blog
Your site will have a multi-content front page, plus a blog to manage posts.
On your site admin panel, go to Pages > Add New. Create 2 pages, for example, "Front Page" & "Blog".
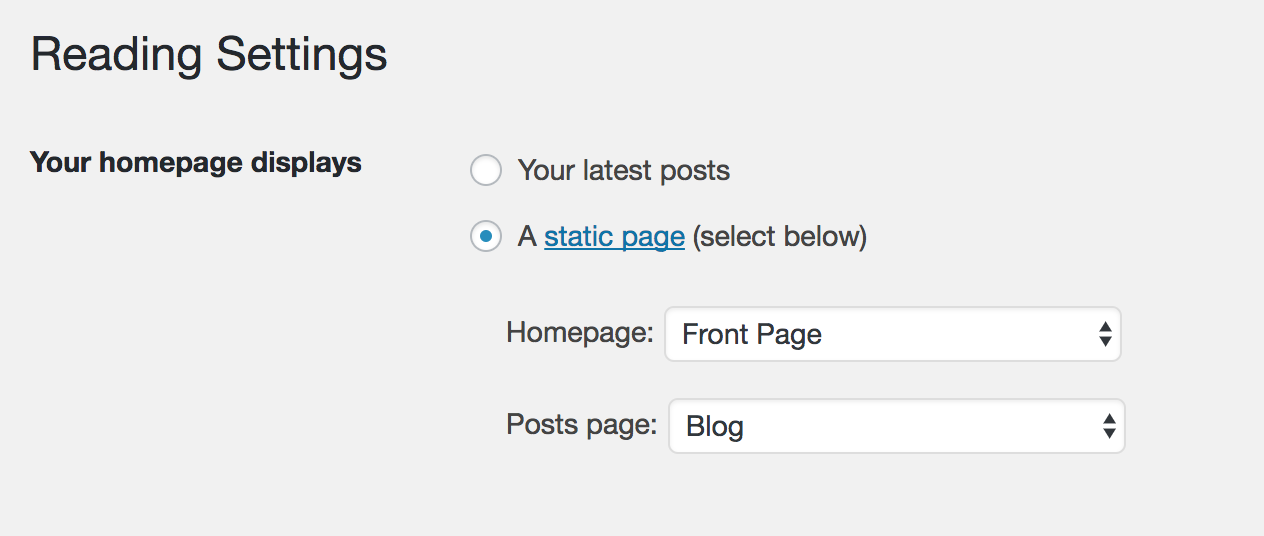
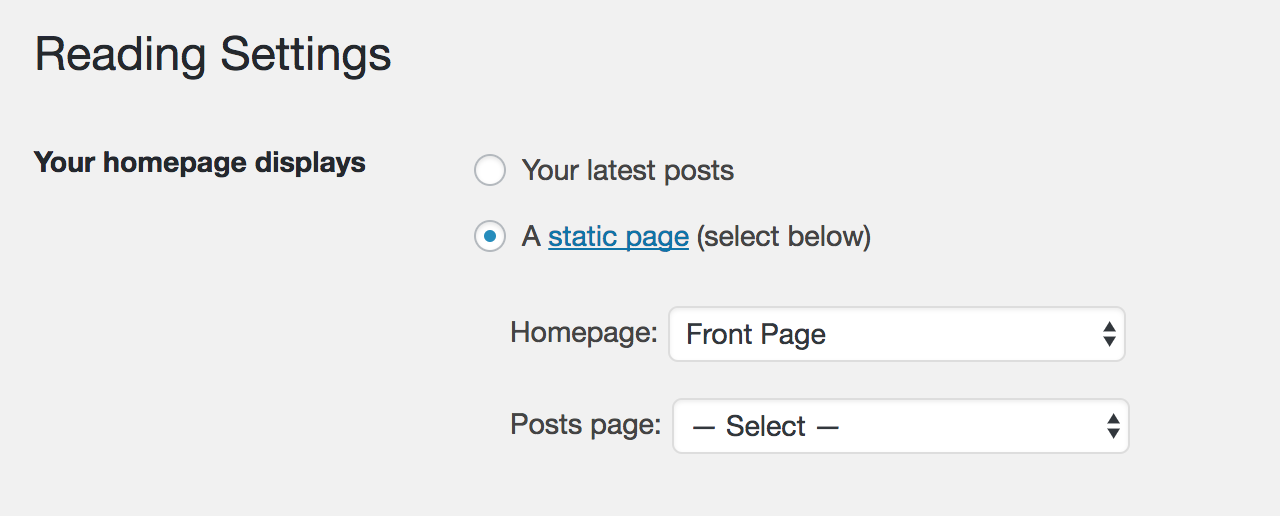
Then go to Settings > Reading panel, find the option Front page displays,
choose A static page. In the drop down menu for Front Page select "Front Page".
In the drop down menu for Posts page select "Blog".
Front page - Static Front Page
Also in the Settings > Reading panel, scroll down to find the option "Static Homepage Content",
choose "From Customizer > Homepage Section" in the drop down list.
Static Front page content - from customizer
Then go to Appearance > Customize > Home Page panel to customize your homepage. You might like to check Home Widgets to know
more details.
Also in theme customizer, go to Archive Pages > Blog Page to customize your blog page.
Please note: a static blog page can only display the latest posts.
Multi-content Homepage Only (without Blog)
On your site admin panel, go to Pages > Add New. Create a new page, for example, "Front Page".
Then go to Settings > Reading panel, find the option Front page displays,
choose A static page. In the drop down menu for Front Page select "Front Page".
In the drop down menu for Posts page, leave it blank.
Front page - Static Front Page - No Blog
Also in the Settings > Reading panel, scroll down to find the option "Static Homepage Content",
choose "From Customizer > Homepage Section" in the drop down list.
Static Front page content - from customizer
Then go to Appearance > Customize > Home Page panel to customize your homepage. You might like to check Home Widgets to know
more details.
Static Homepage + Blog
Your site will display a static front page as an introduction or welcome, plus a blog to manage posts.
On your site admin panel, go to Pages > Add New. Create 2 pages, for example, "Front Page" & "Blog".
Then go to Settings > Reading panel, find the option Front page displays,
choose A static page. In the drop down menu for Front Page select "Front Page".
In the drop down menu for Posts page select "Blog".
Front page - Static Front Page
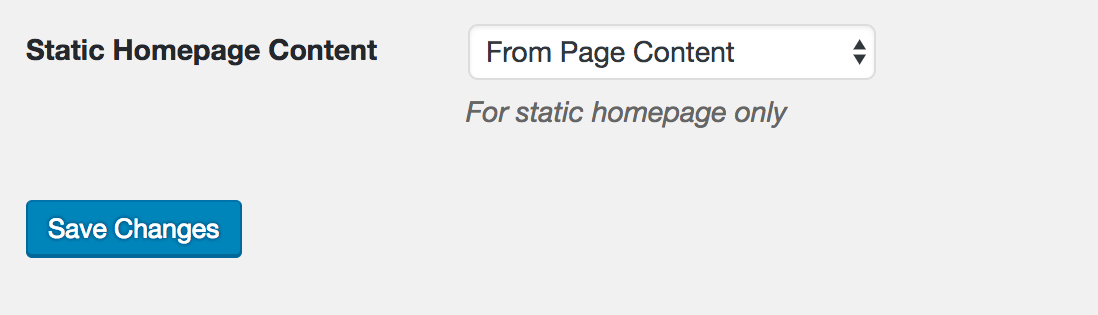
Also in the Settings > Reading panel, scroll down to find the option "Static Homepage Content",
choose "From page content" in the drop down list.
Static Front page content - from page content
On your site admin panel, go to Pages > All pages, find "Front Page" and edit it. Content you entered for this page will show on your
site homepage.
To manage the blog page, please go to Appearance > Customize > Archive Pages > Blog Page to customize your blog page.
Please note: a static blog page can only display the latest posts.
Fullwidth Featured Area
When your site homepage is not a static homepage, you can use the theme built-in feature to display a Fullwidth Featured Area
on your homepage. The Fullwidth Featured Area will be placed below the site header, and above the latest posts list (and other Home Widgets).
Please go to Appearance > Customize > Home Page panel, you will find the Fullwidth Featured Area section. You can choose to:
Display a slider of selected posts;
Or, you can add some custom content here.
Featured Posts Slider
If you choose to display a slider, you can pick some posts from one group ("Posts" only, "Pages" or any other custom content is not supported):
If you choose Custom Content, then you will be able to add your custom text and media in the content editor, including inserting shortcodes for your custom slider
created by a third-party slider plugin (such as Revolution Slider, or Smart Slider, and etc).
Latest Posts Area
Your latest posts will be displayed in this area. And you can change the following settings:
Sidebar Layout - If you choose "Left/Right Sidebar", then a sidebar will show in the "Latest Posts Area".
Section Title
Section Title Style
Posts Layout - There are 14 layouts:
Standard
Grid 2 Columns
Grid 3 Columns
First Full Block + Grid 2 Columns
First Full Block + Grid 3 Columns
Masonry 2 Columns
Masonry 3 Columns
First Full Block + Masonry 2 Columns
First Full Block + Masonry 3 Columns
Block 1 Column
Block 2 Columns
Block 3 Columns
Block 4 Columns
Drop
Post Excerpt – Show or hide excerpt.
Choose to show or hide "Read More" button
Post Meta – You can choose which post meta to show in posts archive.
Number of Posts displayed Per Page
Home Widgets
There is an additional section between the "Fullwidth Featured Area" and "Latest Posts Area" on the homepage:
Content Area Before Latest Posts. In this area, you can add different types of content
(only for Multi-content Homepage" - find out more) by adding
Home Widgets.
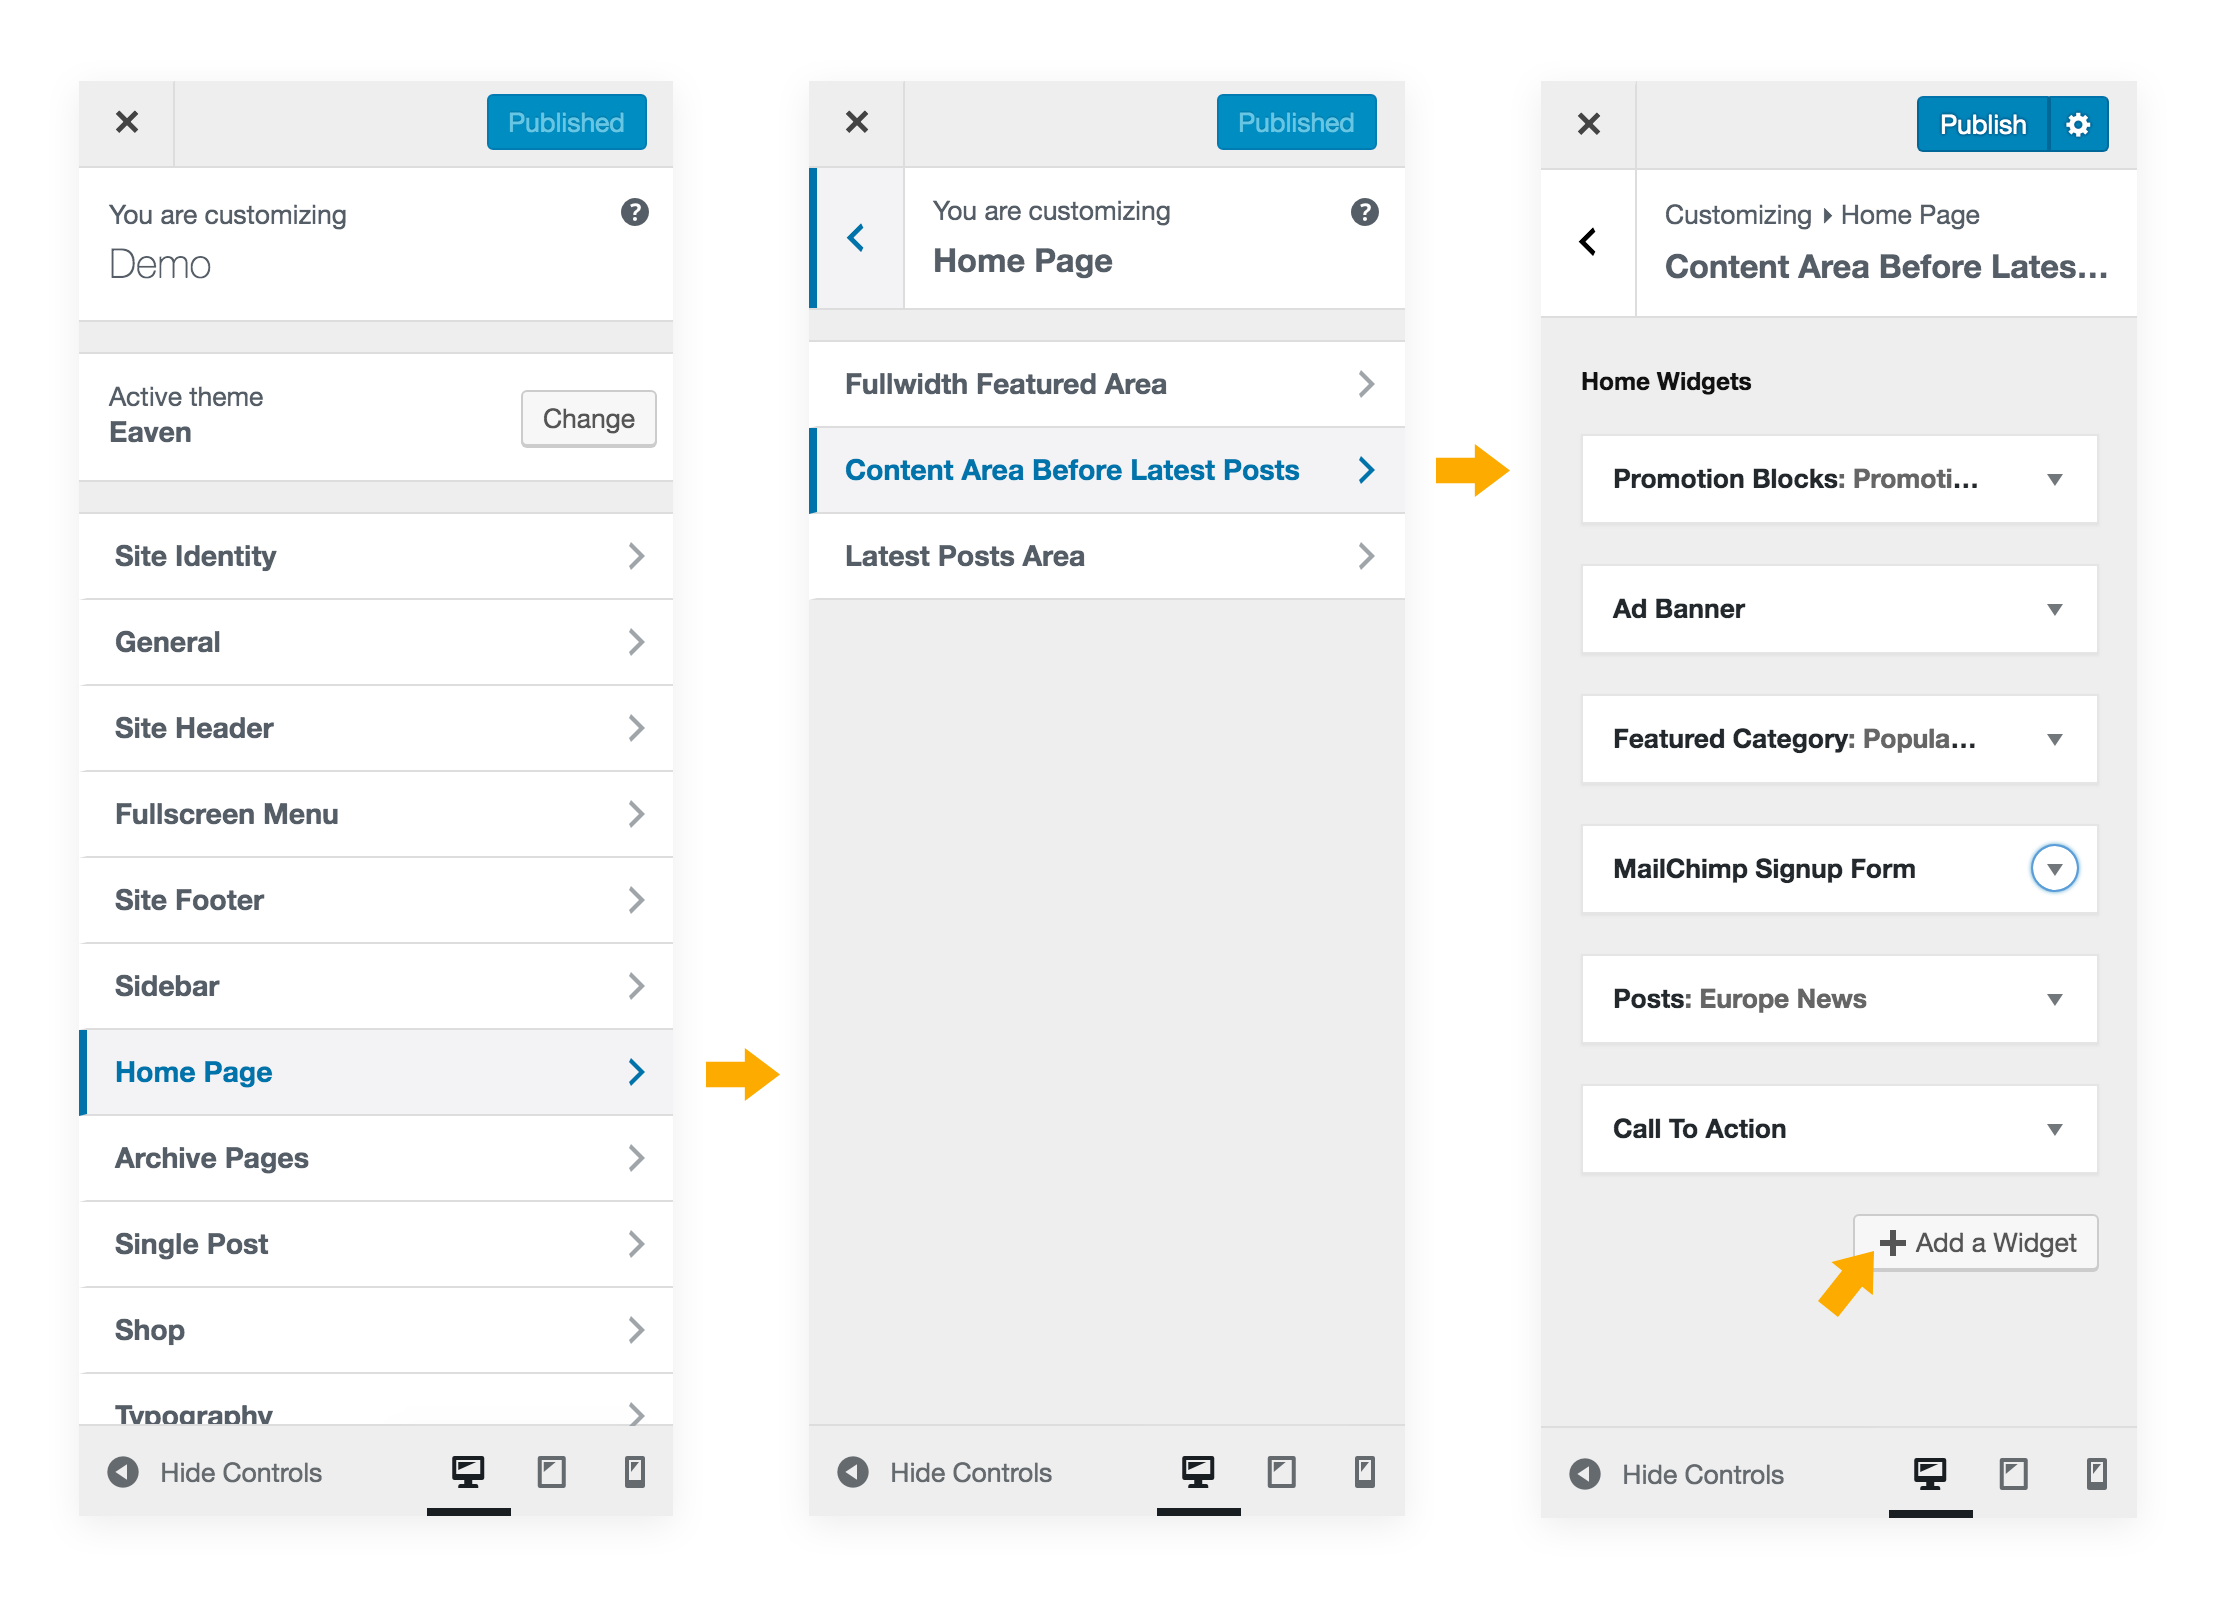
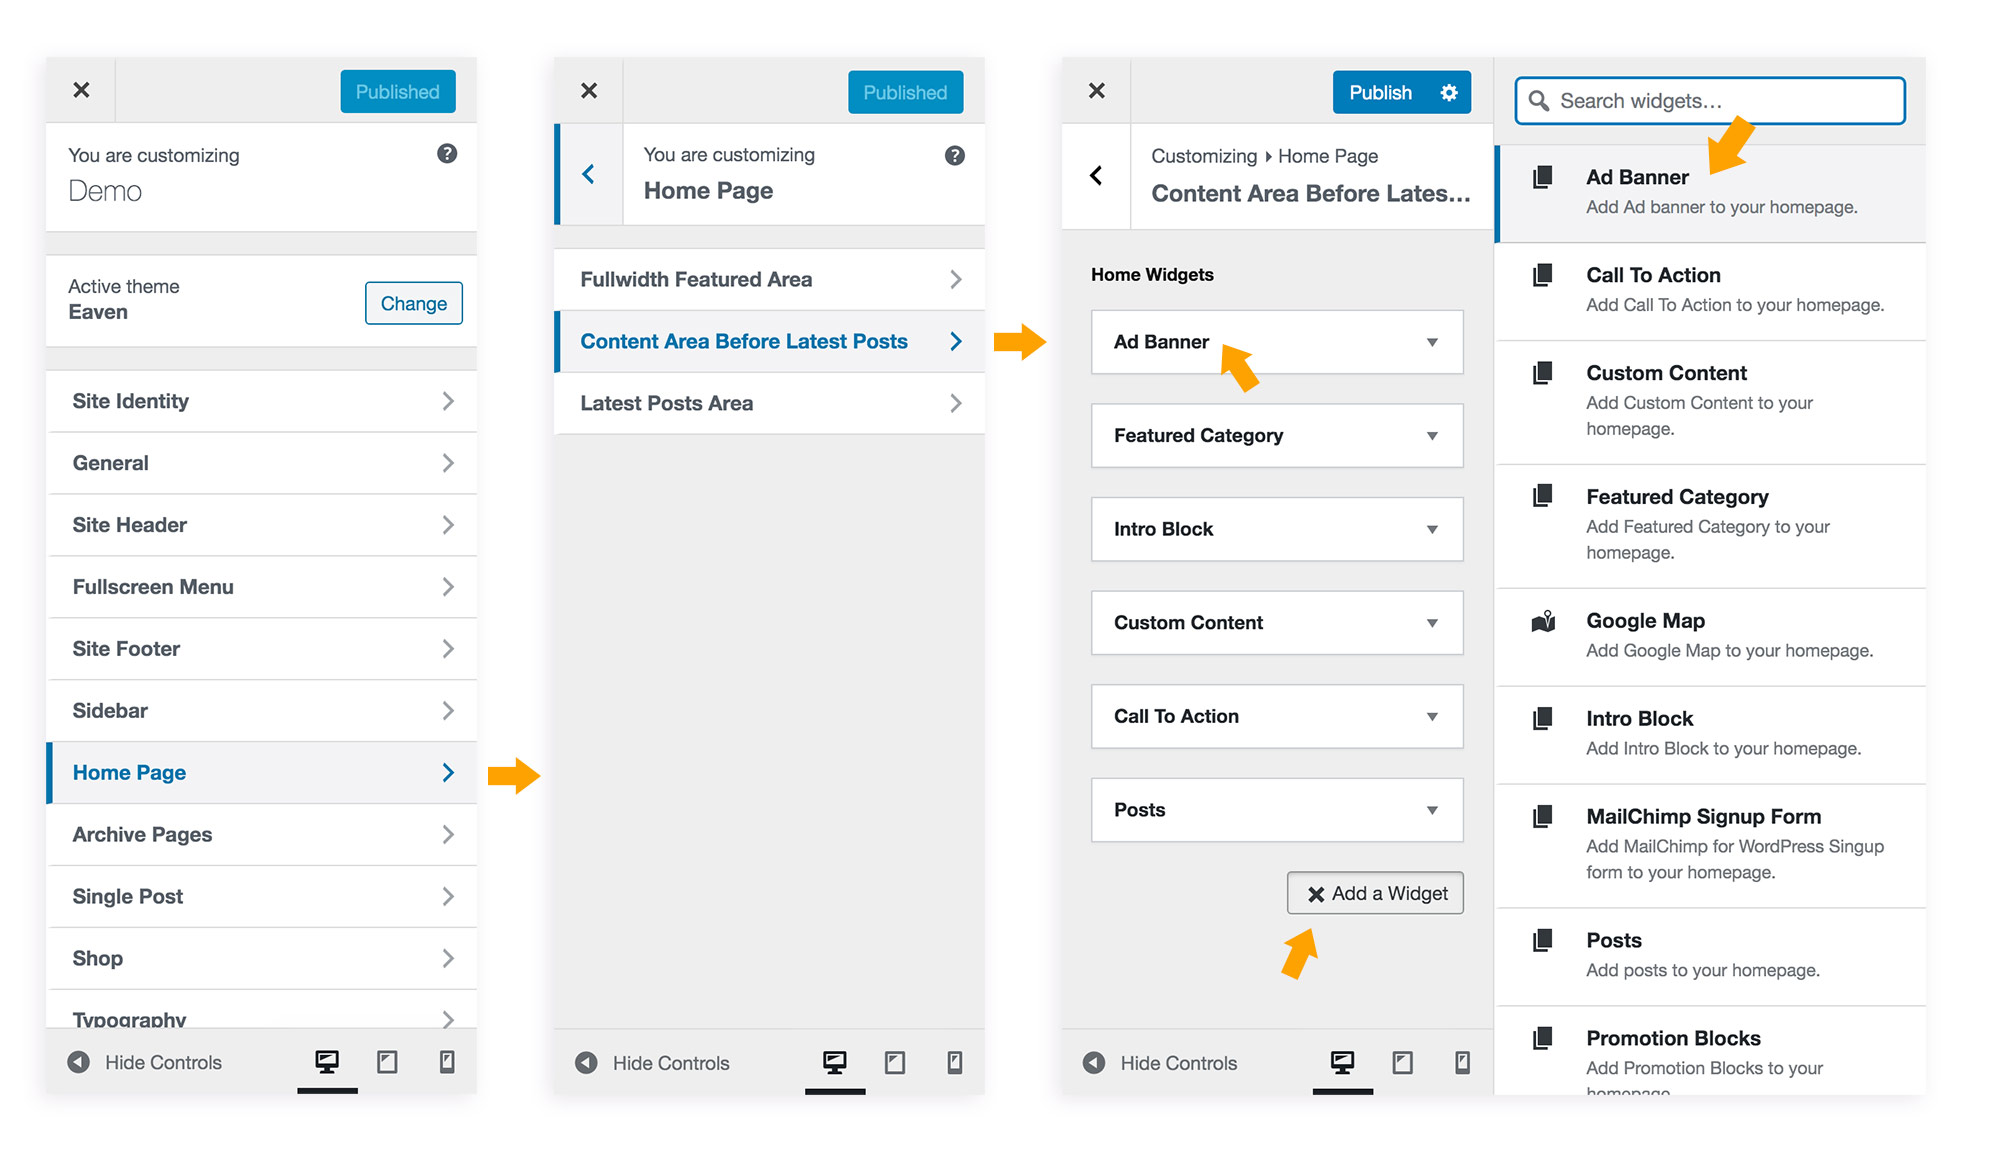
Please go to Customizer > Home Page > Content Area Before Latest Posts > Home Widgets, click on the button "Add a Widget",
then click on a home widget to add it to your homepage. And you can drag and drop to reorder them, click on each widget to expand its settings panel to tweak content
and style.
If you don't see this sub section in the customizer, please make sure you have installed and activated the required plugin "Eaven Extension".
(Check this chapter)
Add home widgets before the latest posts on home page
Currently there are 9 different home widgets:
Posts
Featured Category
Google Map (New added since v1.2)
Ad Banner
Call to Action
Custom Content
Intro Block
Promotion Blocks
MailChimp Signup Form - need to install & activate the plugin "MailChimp for WP"
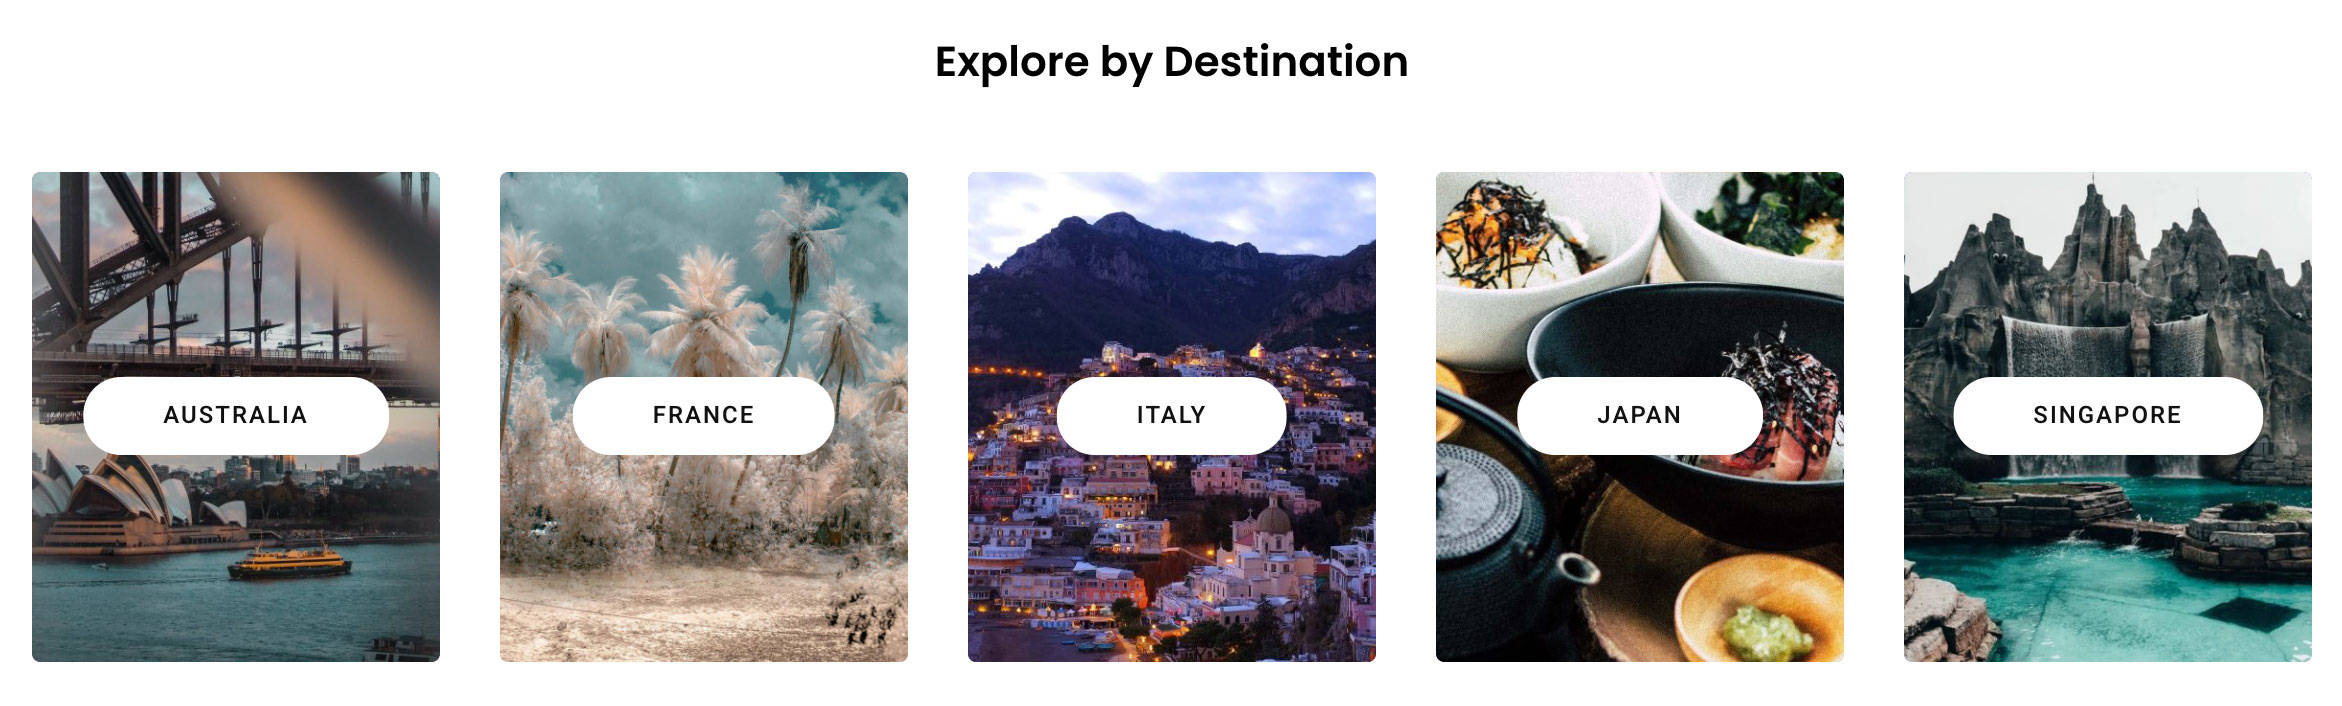
Home Widget - Featured Category
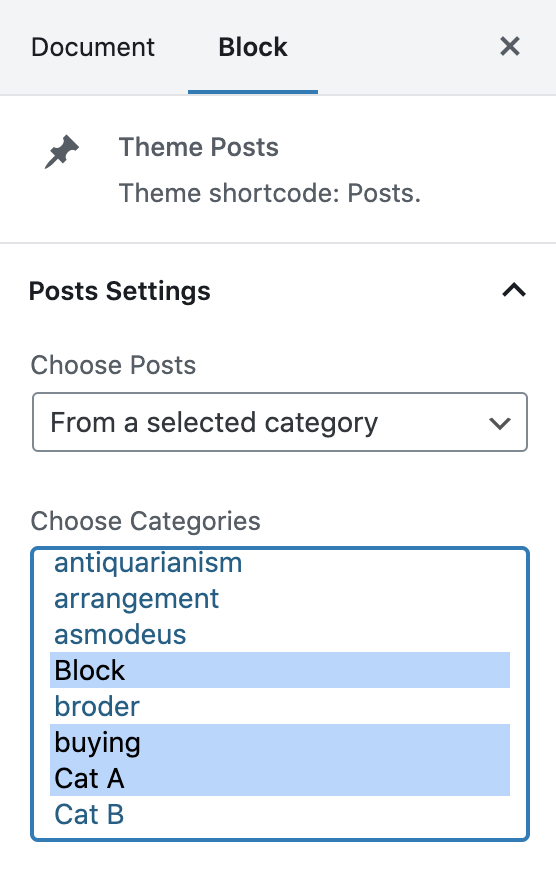
With this home widget, you can select some categories and display on the homepage. (You can select as many categories as you like.)
Home Widget - Featured Categories
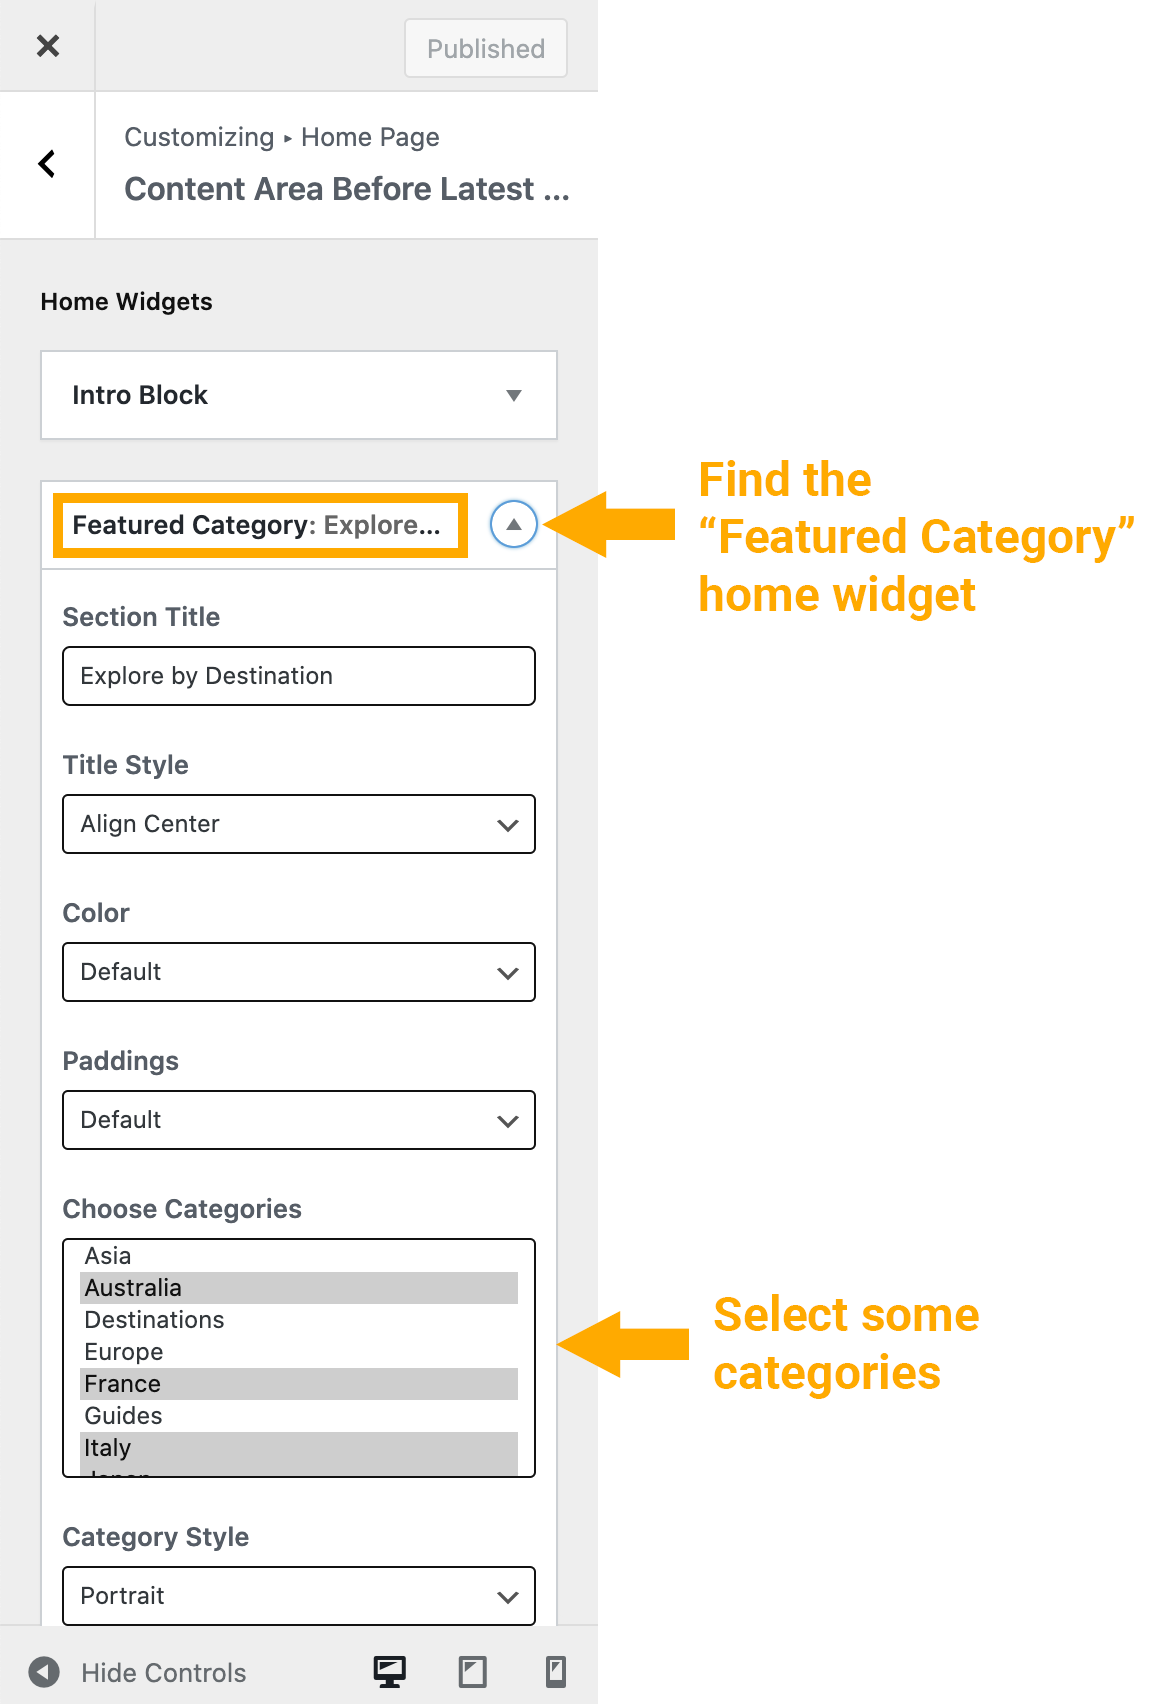
The options of this home widget:
Home Widget - Featured Categories Settings
Section Title - Enter a title for this widget/section.
Color - Select "Custom", then you can change:
Color Scheme - switch between "Light" and "Dark".
Custom Background Color - choose another background color.
Paddings - Select "Custom", then you can change the padding top & padding bottom.
Choose Categories - All post categories will be listed in the box. Please select some from the list.
To select multiple items in this box:
If you are using Mac, please press and hold the "Command" key on your keyboard and click the categories.
If you are using Windows, please press and hold the "Ctrl" key on your keyboard and click the categories.
Please note: WordPress will not display empty categories by default.
Therefore, please make sure the selected category contains at least one post.
Category Style - Landscape / Portrait / Stripe.
Category Layout - Choose the column layout (3/4/5 columns) for the categories.
To add the Category Image to each category, please read this chapter: Edit a Category.
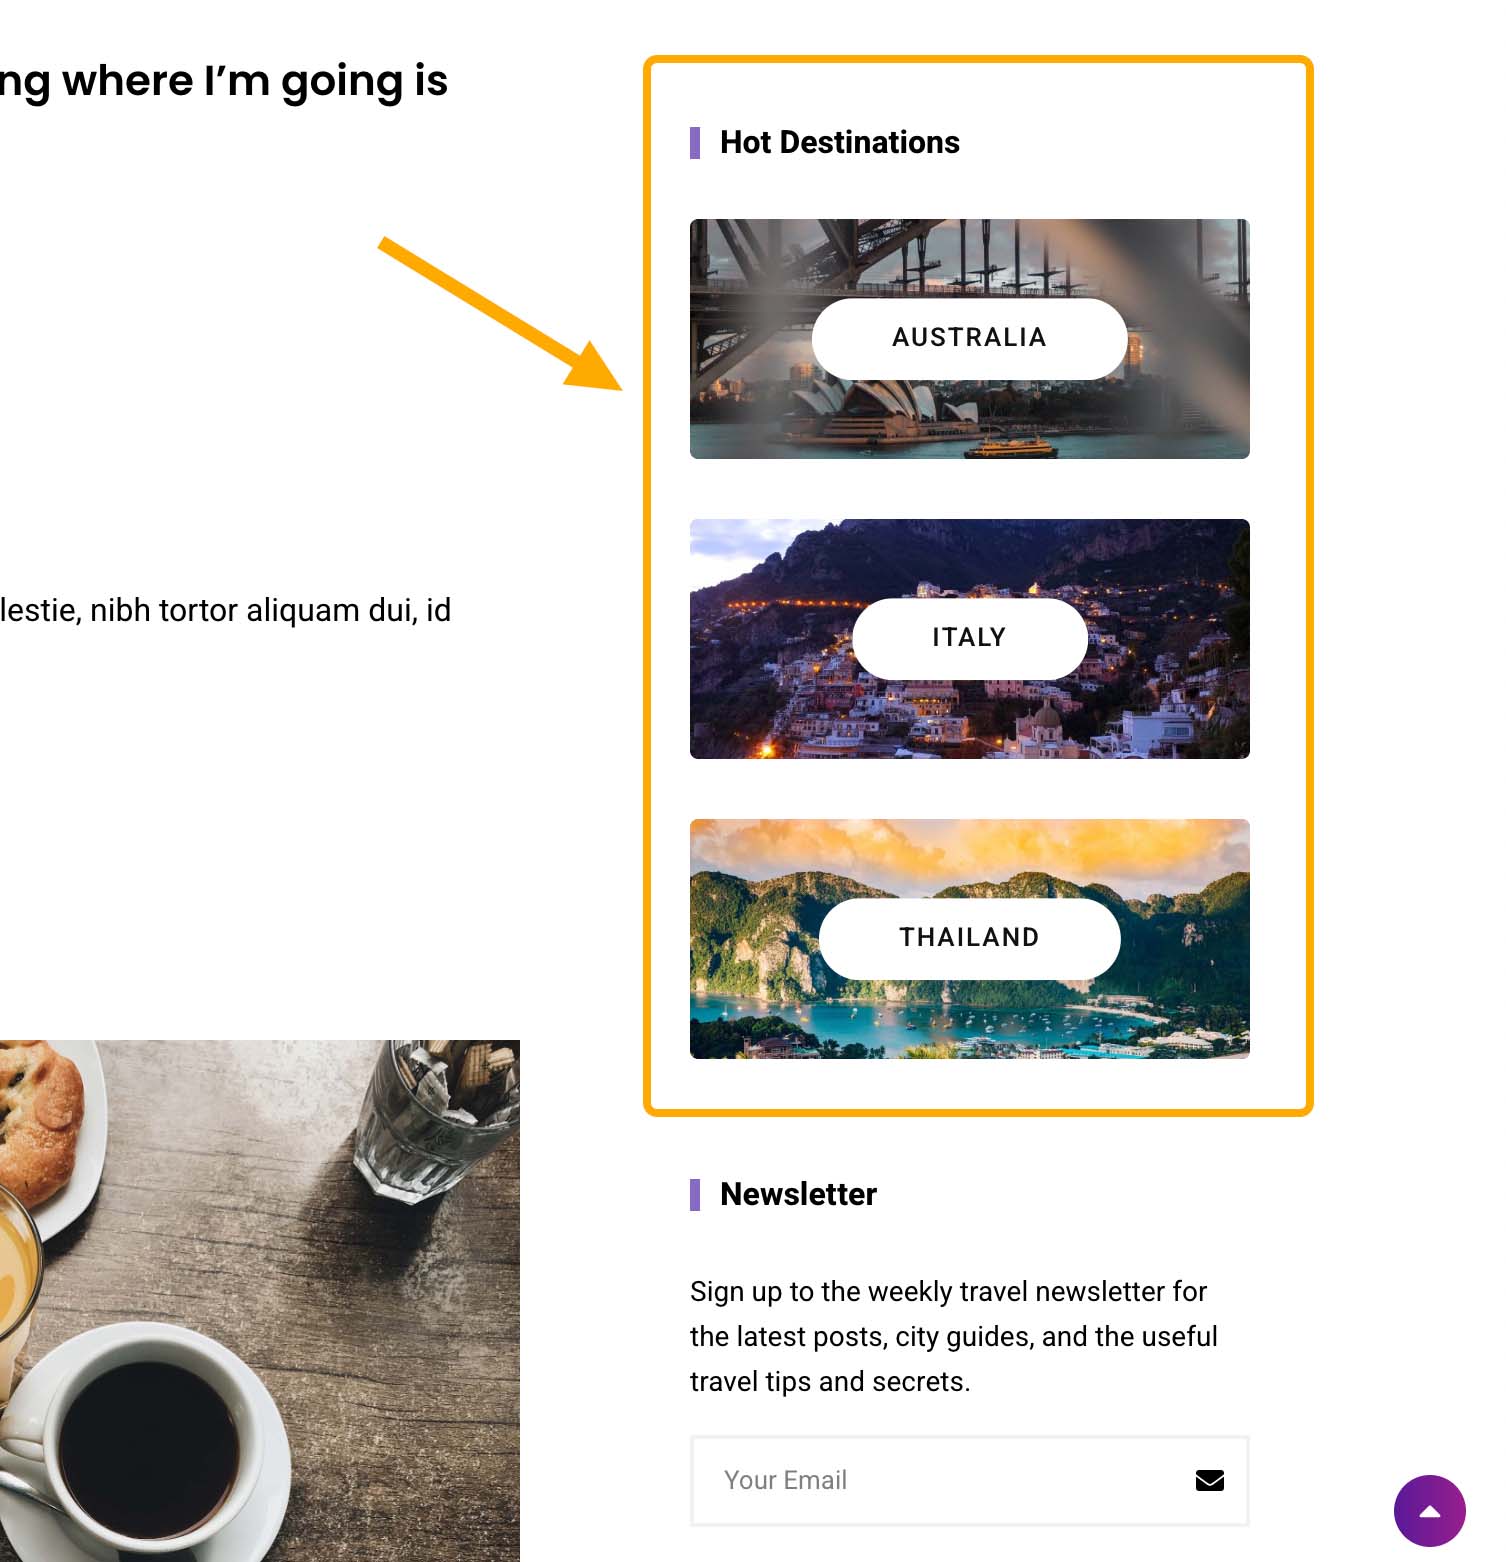
If you'd like to display some selected categories in the sidebar:
Featured Categories in Sidebar
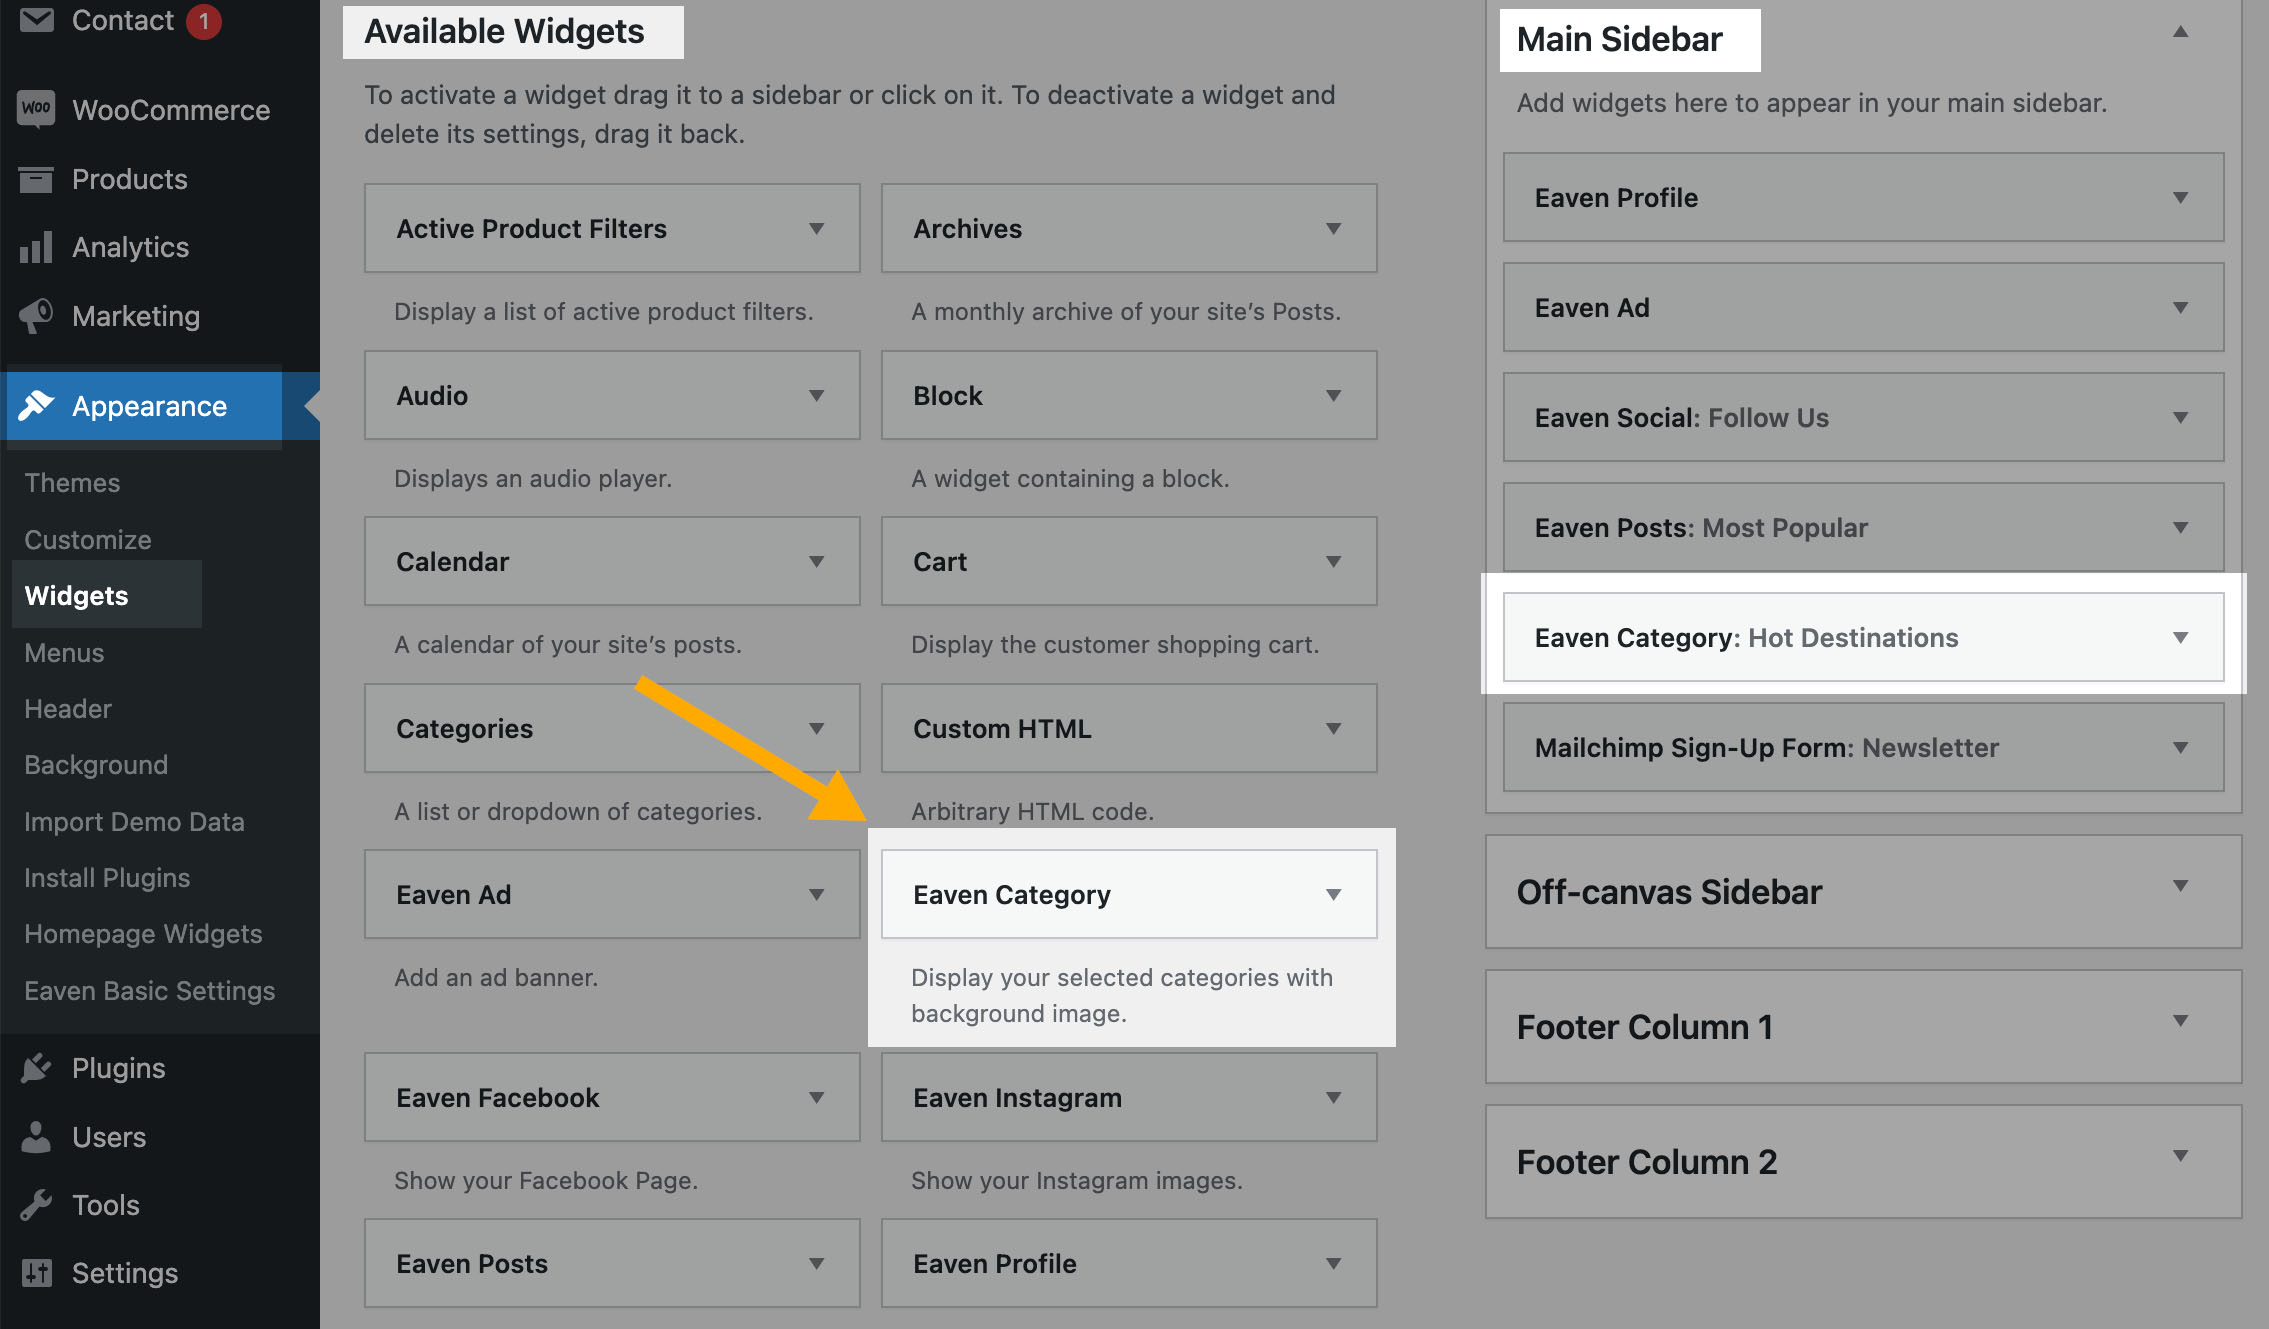
Please navigate to dashboard > Appearance > Widgets > and find Eaven Category and add it to the sidebar. And then you can select some categories. To select multiple items in this box:
If you are using Mac, please press and hold the "Command" key on your keyboard and click the categories.
If you are using Windows, please press and hold the "Ctrl" key on your keyboard and click the categories.
Please note: WordPress will not display empty categories by default.
Display Featured Categories in Sidebar
Home Widget - Intro Block
You can add a Intro Block section, which contains: an image, promotional text, and a call to action button.
Home Widget - Intro Block
Section Title - Enter a title for this widget/section.
Color - Select "Custom", then you can change:
Color Scheme - switch between "Light" and "Dark".
Custom Background Color - choose another background color.
Padding Top
Padding Bottom
Layout Option - There are 5 layouts to choose from.
Heading - Enter the heading of the promotional text
Description - Enter the description content
Button Options
Enter button text
Add button link
Enable "Open link in a new tab" or not
Text Alignment
Upload an image
Home Widget - Ad Banner
If you want to display an ad on your homepage, you can add this widget to Content Area Before Latest Posts.
It supports adding a custom ad banner, and ad code (such as Google AdSense).
Home Widget - Ad Banner
The settings for this home widget:
Section Title - Enter a title for this widget/section.
Color - Select "Custom", then you can change:
Color Scheme - switch between "Light" and "Dark".
Custom Background Color - choose another background color.
Paddings - Select "Custom", then you can change the padding top & padding bottom.
Ad Source - There are 2 options: Custom Banner / Embed Code
When selecting "Custom Banner": You can upload a custom ad banner image and add a link to the promoted page:
URL - This is optional. You can enter URL of the page you are promoting.
Ad Image - Upload a custom banner image.
Image Max Width
Open link in a new tab
Make the container to be fullwidth when homepage has no sidebar
If enabled, a new option will show: "Enable large banner special effect" - When enabling this option, a parallax effect will be applied to this ad banner (Only works when screen width is larger than 1024px).
When selecting "Embed Code": You can add ad code, such as Google AdSense.
Home Widget - Posts
With this home widget, you can add multiple sections with posts on the homepage.
Home Widget - Sections with posts
Settings of this home widget:
Section Title - Enter a title for this widget/section.
Color - Select "Custom", then you can change:
Color Scheme - switch between "Light" and "Dark".
Custom Background Color - choose another background color.
Paddings - Select "Custom", then you can change the padding top & padding bottom.
Choose Posts - You can choose to display posts from different sources:
Post Meta – You can choose which post meta to show in posts archive.
Number of Posts displayed Per Page
Home Widget - Call To Action
You can add a Call To Action section, which contains: a promotional heading, and a call to action button.
Home Widget - Call To Action
Paddings - Select "Custom", then you can change the padding top & padding bottom.
Heading - Enter the promotional heading
Button Options
Enter button text
Add button link
Enable "Open link in a new tab" or not
Color - Default / Custom. If selecting "Custom", then you can adjust the colors of elements in this home widget.
Home Widget - Promotion Blocks
With this home widget, you can add 3 Promotion Blocks to promote some content.
Home Widget - Promotion Blocks
Section Title - Enter a title for this widget/section.
Color - Select "Custom", then you can change:
Color Scheme - switch between "Light" and "Dark".
Custom Background Color - choose another background color.
Paddings - Select "Custom", then you can change the padding top & padding bottom.
Block Style - There are two block styles.
Block #1 - Add the image, heading and link for the first box.
Block #2 - Add the image, heading and link for the second box.
Block #3 - Add the image, heading and link for the third box.
If you want to add more than 3 boxes, then please add another "Promotion Blocks" home widget to the homepage.
Home Widget - MailChimp Signup Form
With this home widget, you can display your MailChimp Newsletter Signup Form on the homepage. Please note: this home widget is available after installing
and activating the recommended plugin: MailChimp for WordPress.
Home Widget - Signup Form
Please check this chapter and setup your Newsletter Signup Form. After the form is created, please add this home widget to your homepage.
Settings of this home widget:
Color - Select "Custom", then you can change:
Color Scheme - switch between "Light" and "Dark".
Custom Background Color - choose another background color.
Then you can choose to add a Background Image
Paddings - Select "Custom", then you can change the padding top & padding bottom.
Choose a Form
Layout - Left Column / Center Column / Right Column.
Home Widget - Custom Content
With Custom Content home widget, you will be able to add your custom content via the TinyMCE editor (the classic editor of WordPress).
Therefore, you can add many different elements in this section, such as text paragraphs, HTML code, embedded videos, shortcode of third-party plugins, etc.
Home Widget - Custom Content - Popup Video Button (Theme Built-in Shortcode)
Section Title - Enter a title for this widget/section.
Color - Select "Custom", then you can change:
Color Scheme - switch between "Light" and "Dark".
Custom Background Color - choose another background color.
Paddings - Select "Custom", then you can change the padding top & padding bottom.
Add Content with a TinyMCE editor
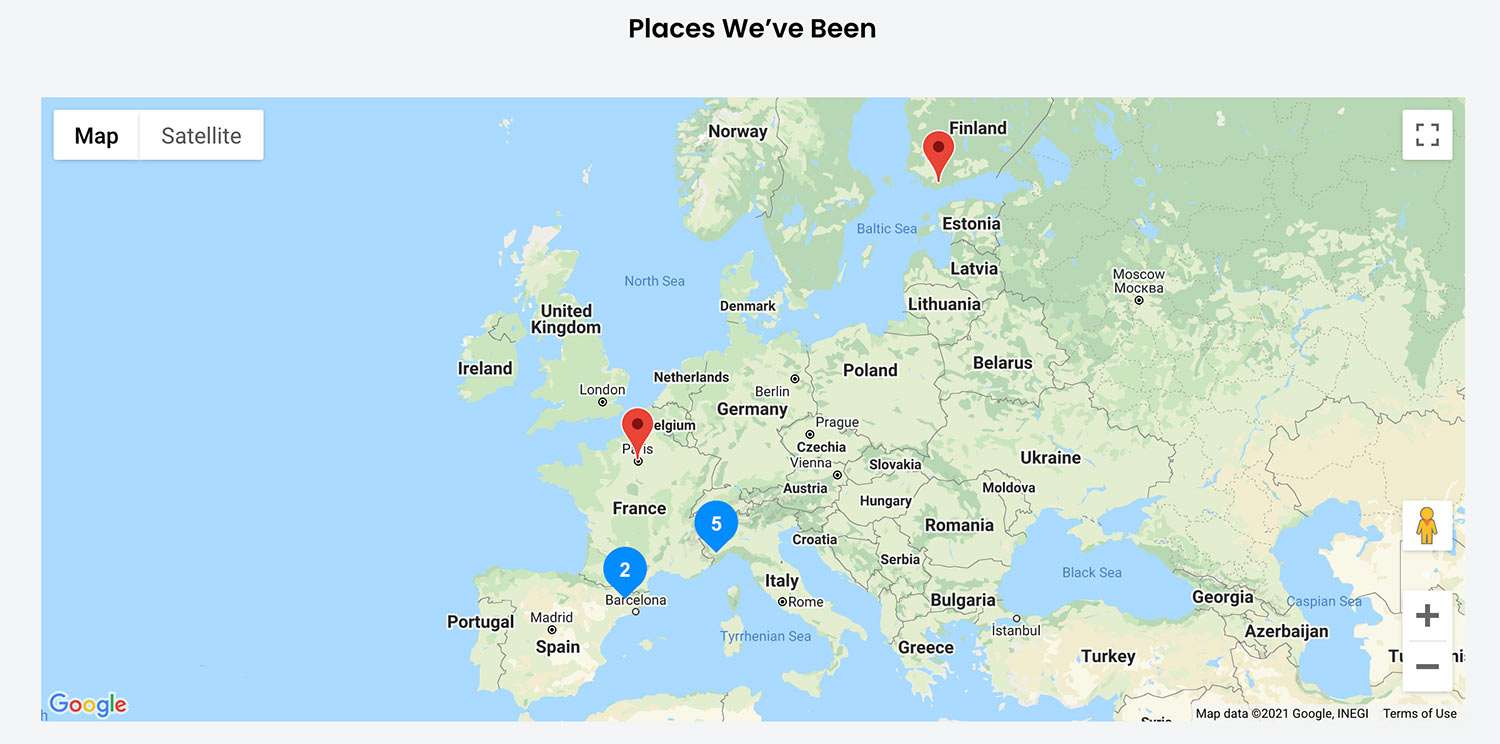
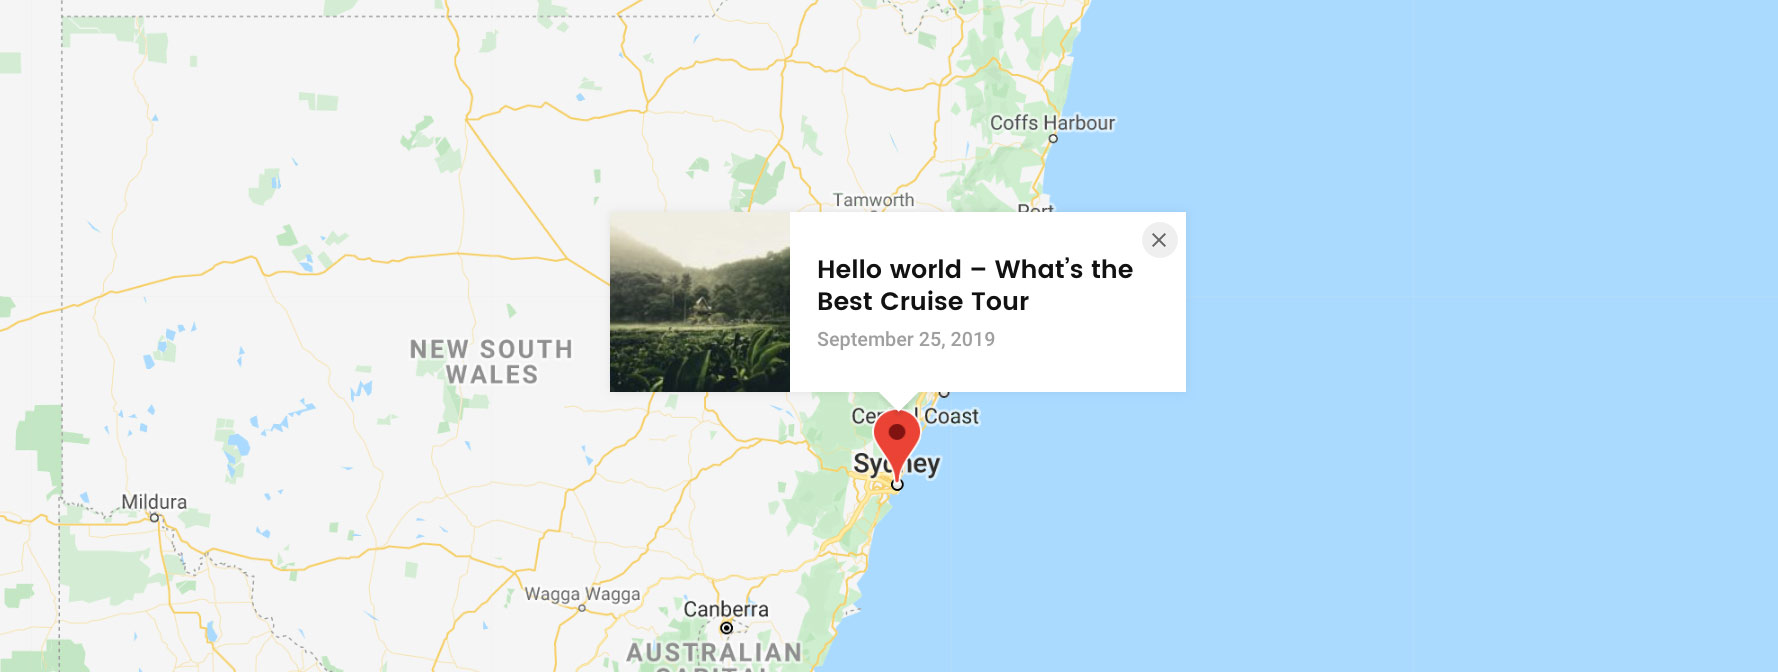
Home Widget - Google Map
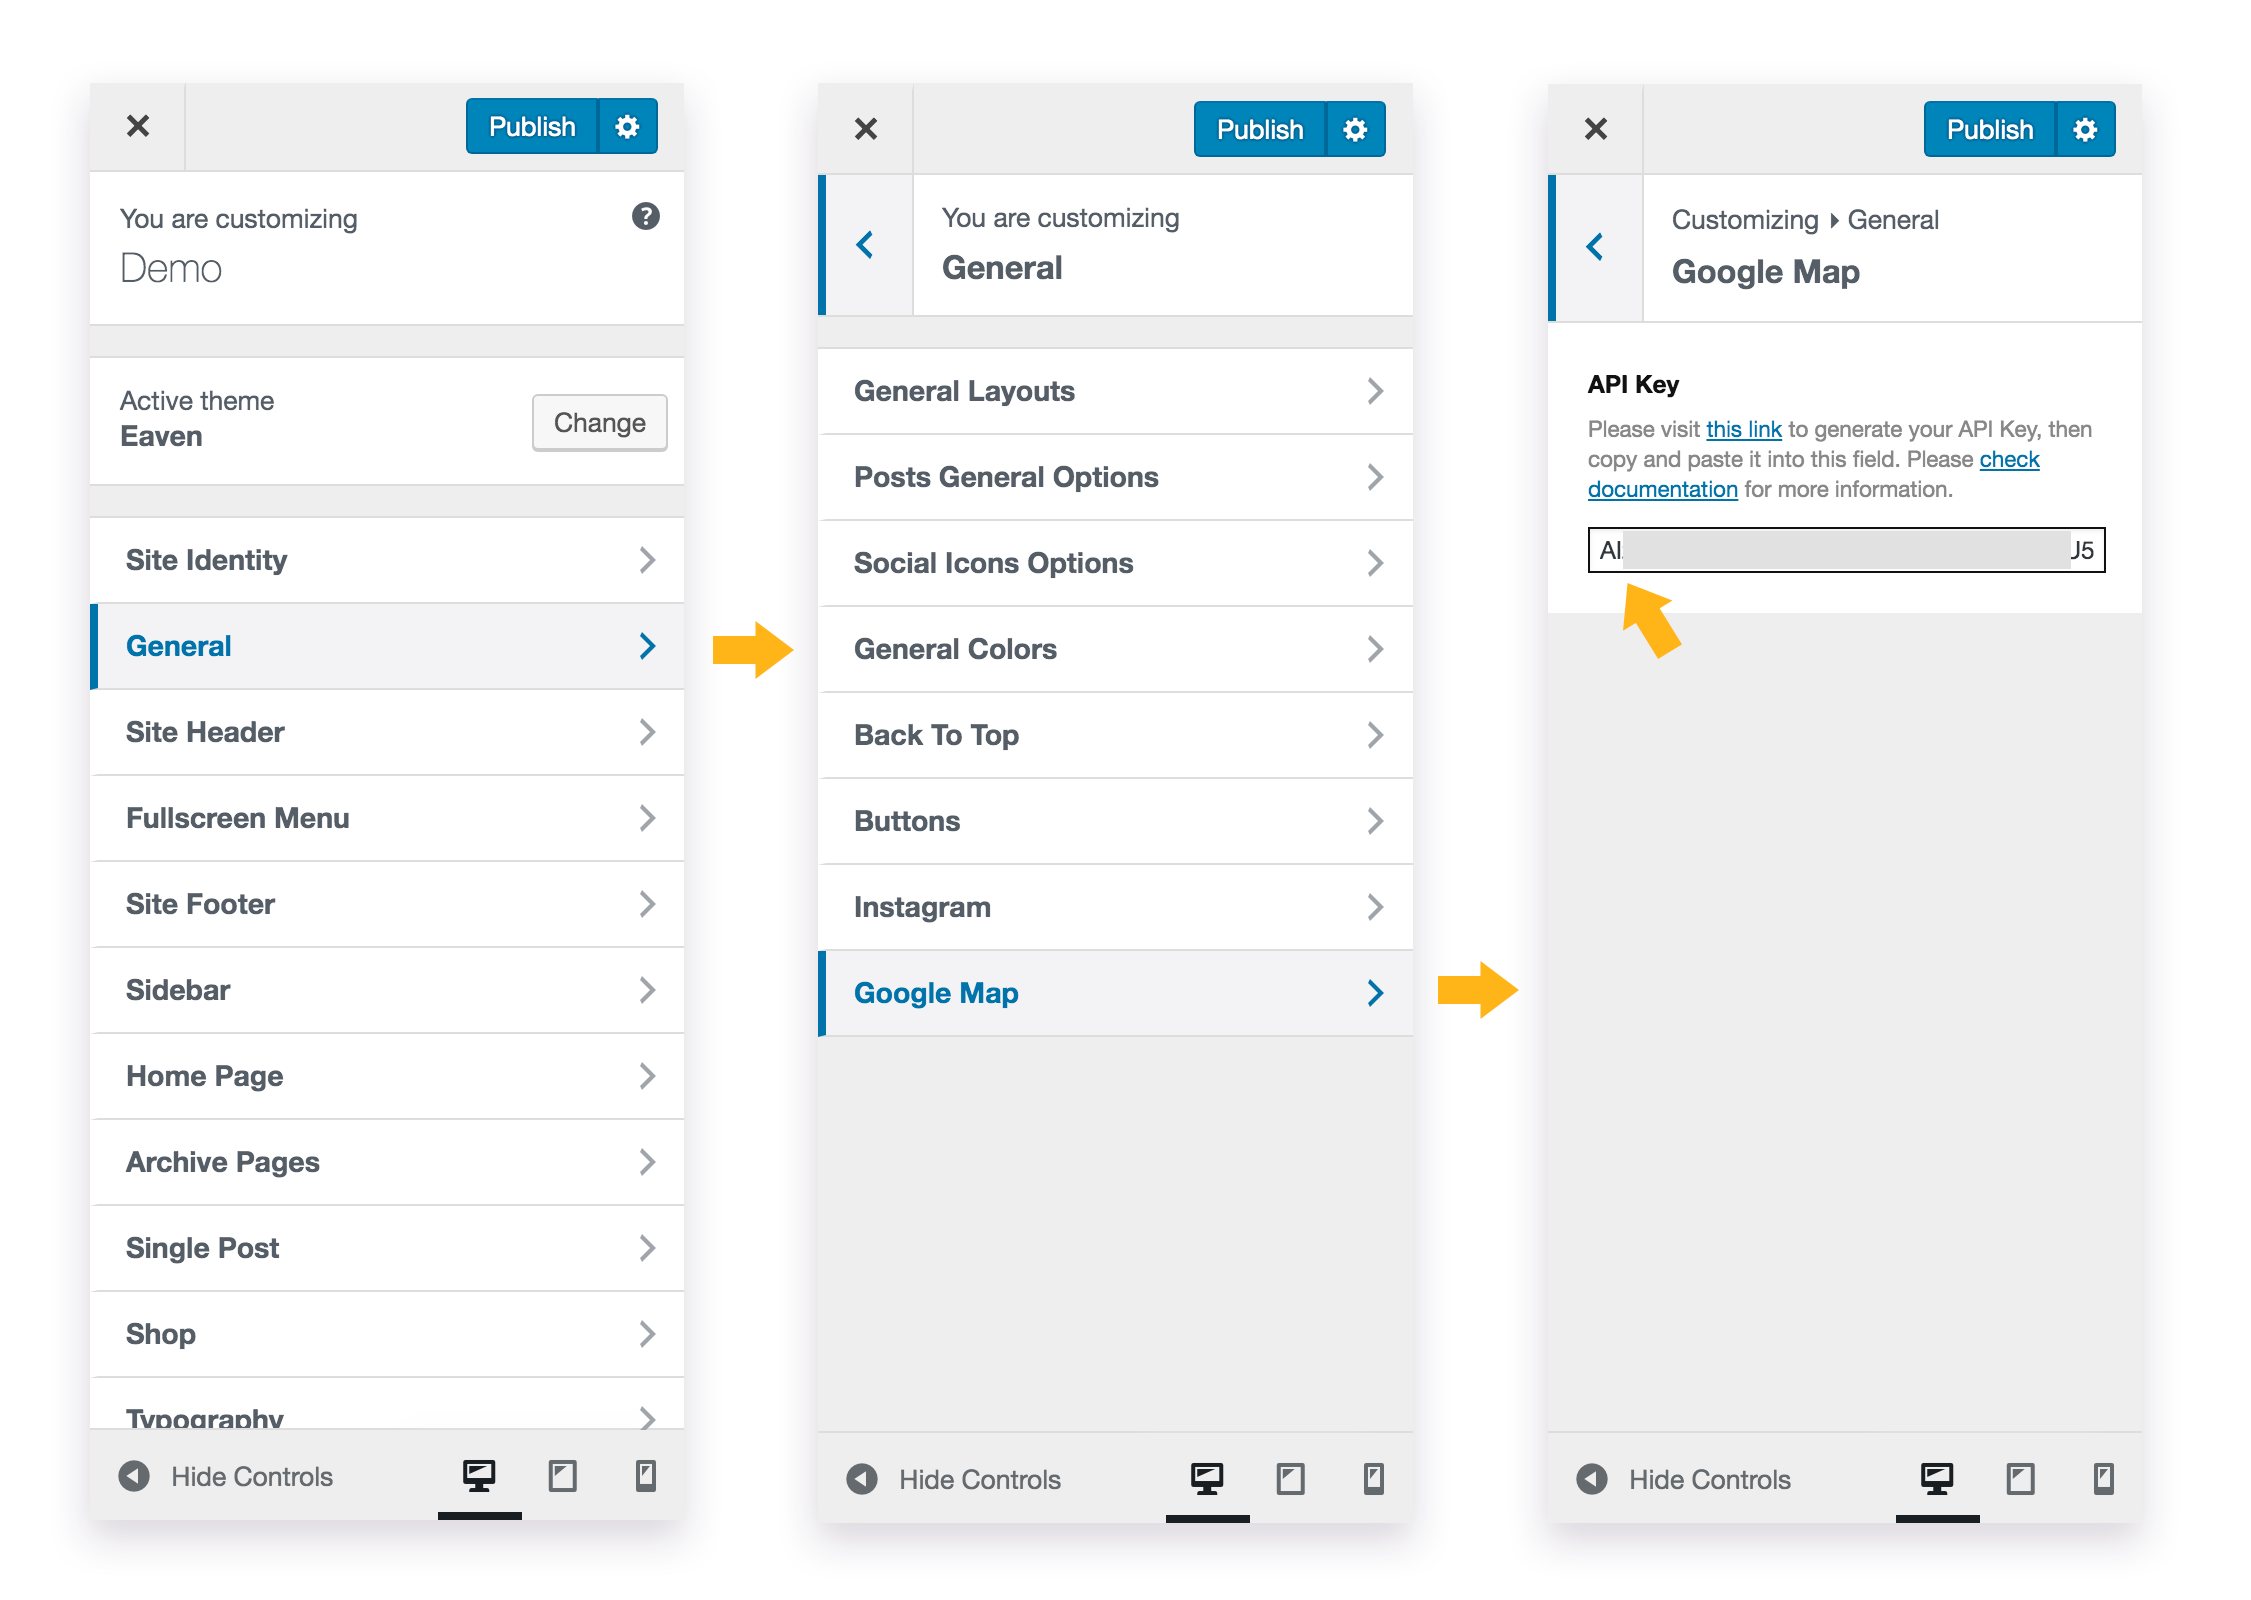
With this home widget, you can display a Google Map (with posts) on the homepage. Please note: check this chapter to learn how to
set up your Google Map first.
Home Widget - Google Map
Settings of this home widget:
Width - Normal or Fullwidth
Height - Enter a height for the map.
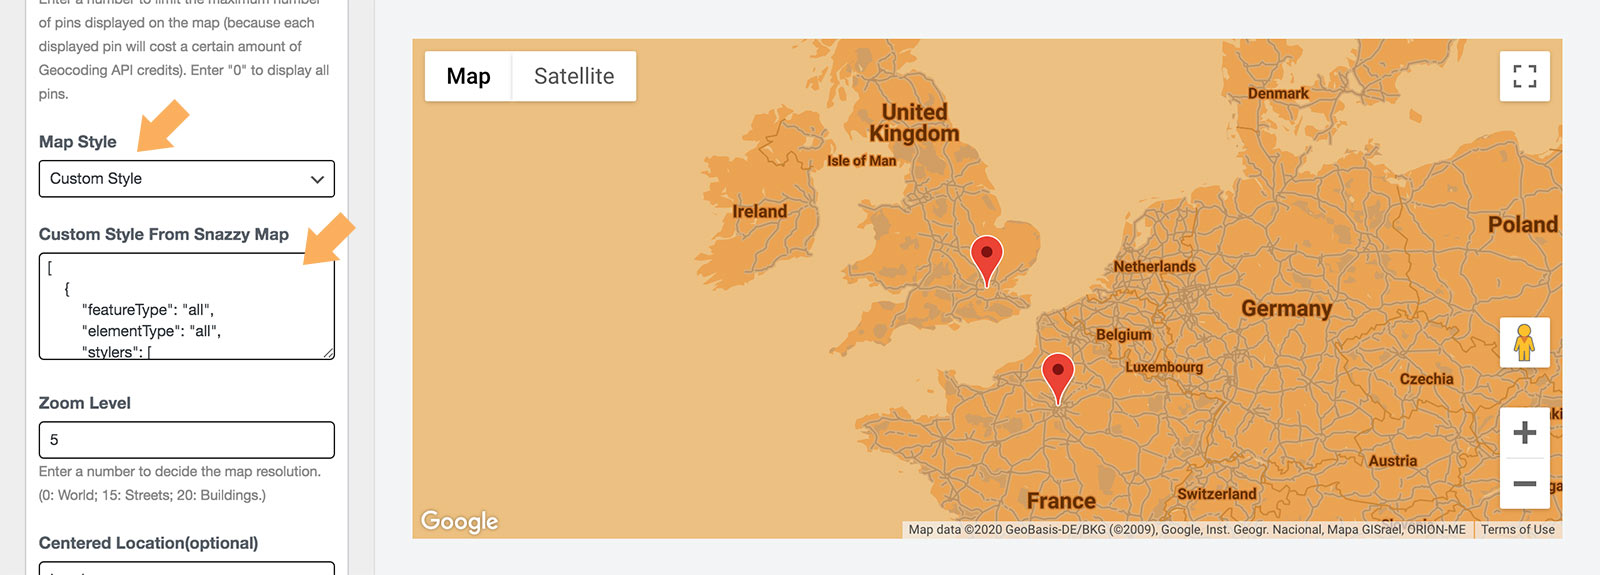
Number of Displayed Pins - Enter a number to limit the maximum number of pins displayed on the map (because each displayed pin will cost a certain amount of Geocoding API credits). Enter "0" to display all pins.
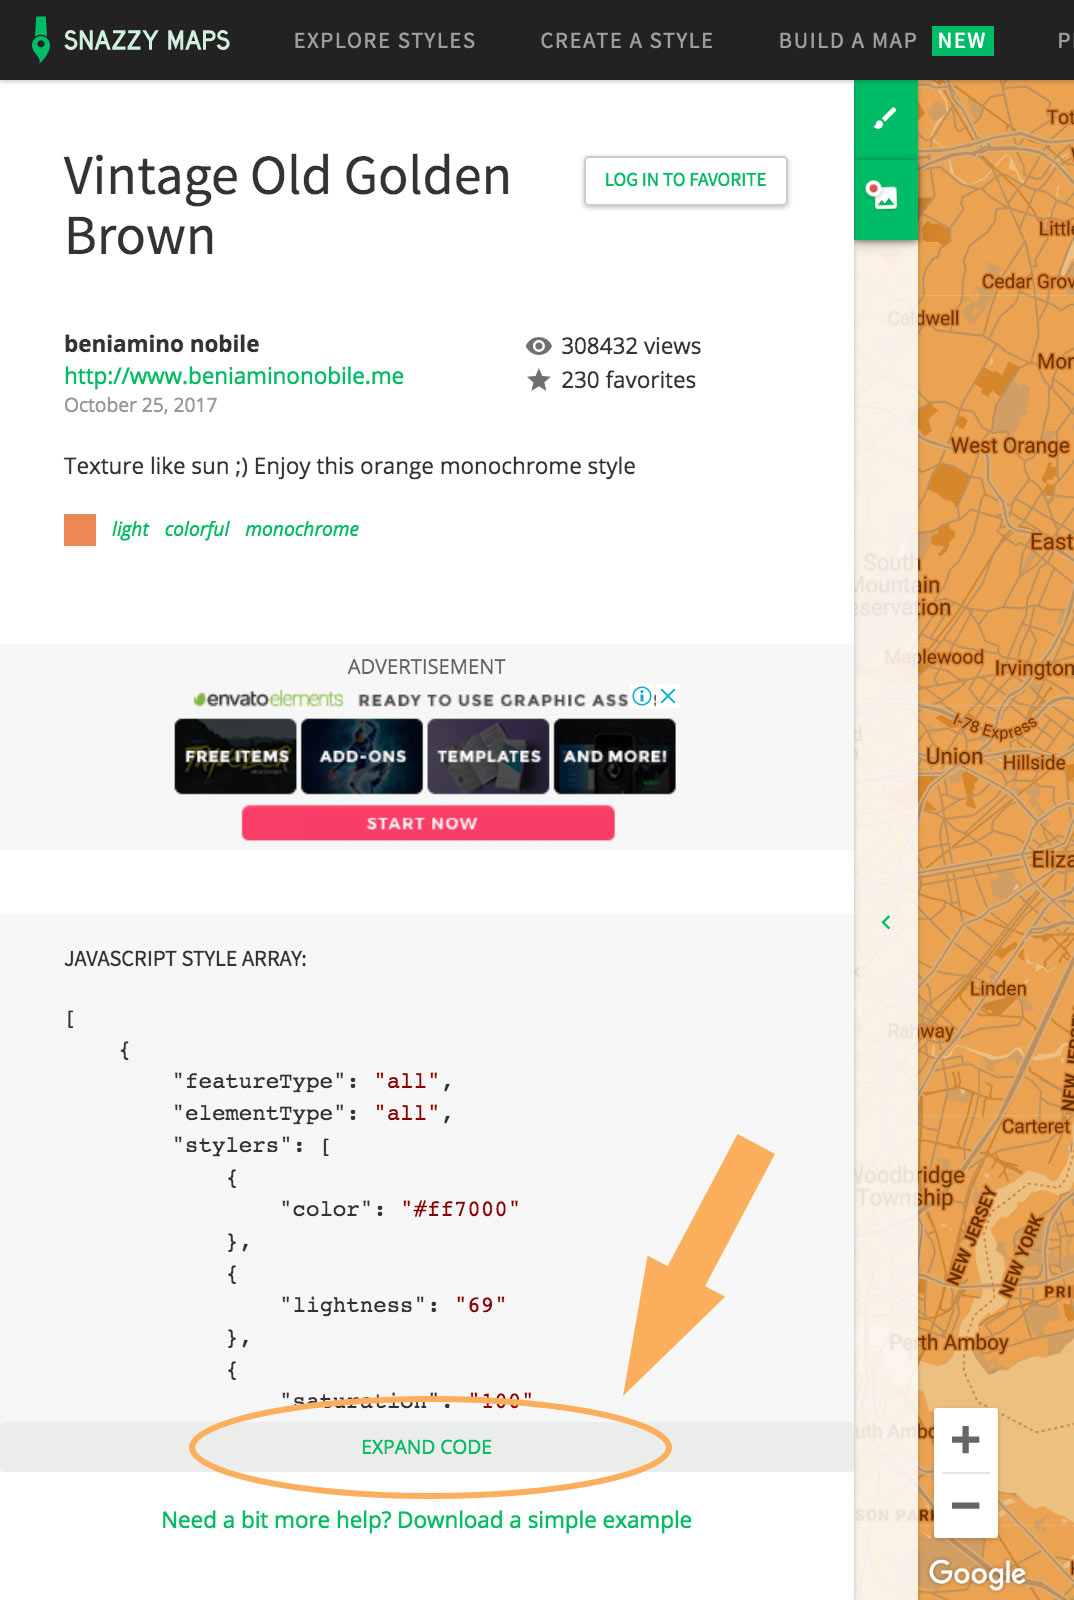
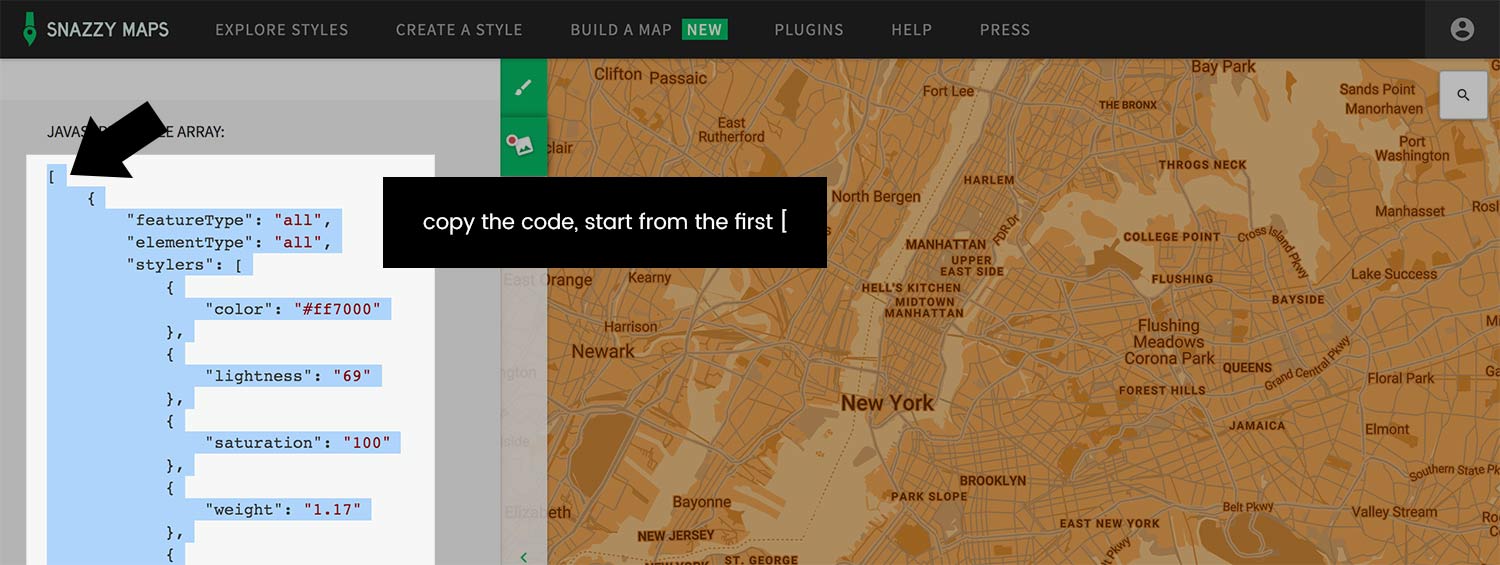
Preset Style - Select a preset style for your map. Currently there are 4. More styles will be added in future updates.
Zoom Level - Enter a number to decide the map resolution. (0: World; 15: Streets; 20: Buildings. More info can be found here.)
Centered Location (optional) - Add a location to ensure the center point of the map. It can be the name of a city/street/building.
6. Theme Options
On your site admin panel, please go to Appearance > Customize, there you can customise and personalise your theme layout and styles.
Open Customizer
6.1 Site Identity
You will find the following options in this section:
Logo – Upload your custom brand image then display it as site logo in the site header.
Logo Width – To keep your custom brand image look sharp on retina devices, we recommend upload an image
with 2x size and give 1x size. For example, upload an image which is 200 x 200 px, and enter 100 px as the image width value.
Site Title – Enter your site title and it will show in the site header below the logo image.
Tagline – Input the brief description of your site.
Display Site Title and Tagline – Uncheck it to hide site title and tagline so only show the logo image.
Site Icon – Upload a square image to use it as a browser and app icon (the favicon) for your site.
Upload a SVG Logo
If you need to upload a SVG logo, please use this plugin: Safe SVG.
6.2 Site Layout
To customize your site layout, please go to theme customizer > General > Site Layout. There are 2 site layout options:
Fullwidth
Boxed
And you can also upload a site background image. And if you choose "Boxed" as site layout, you can also customize background for outer area,
and change Site Max Width for "Boxed" site layout.
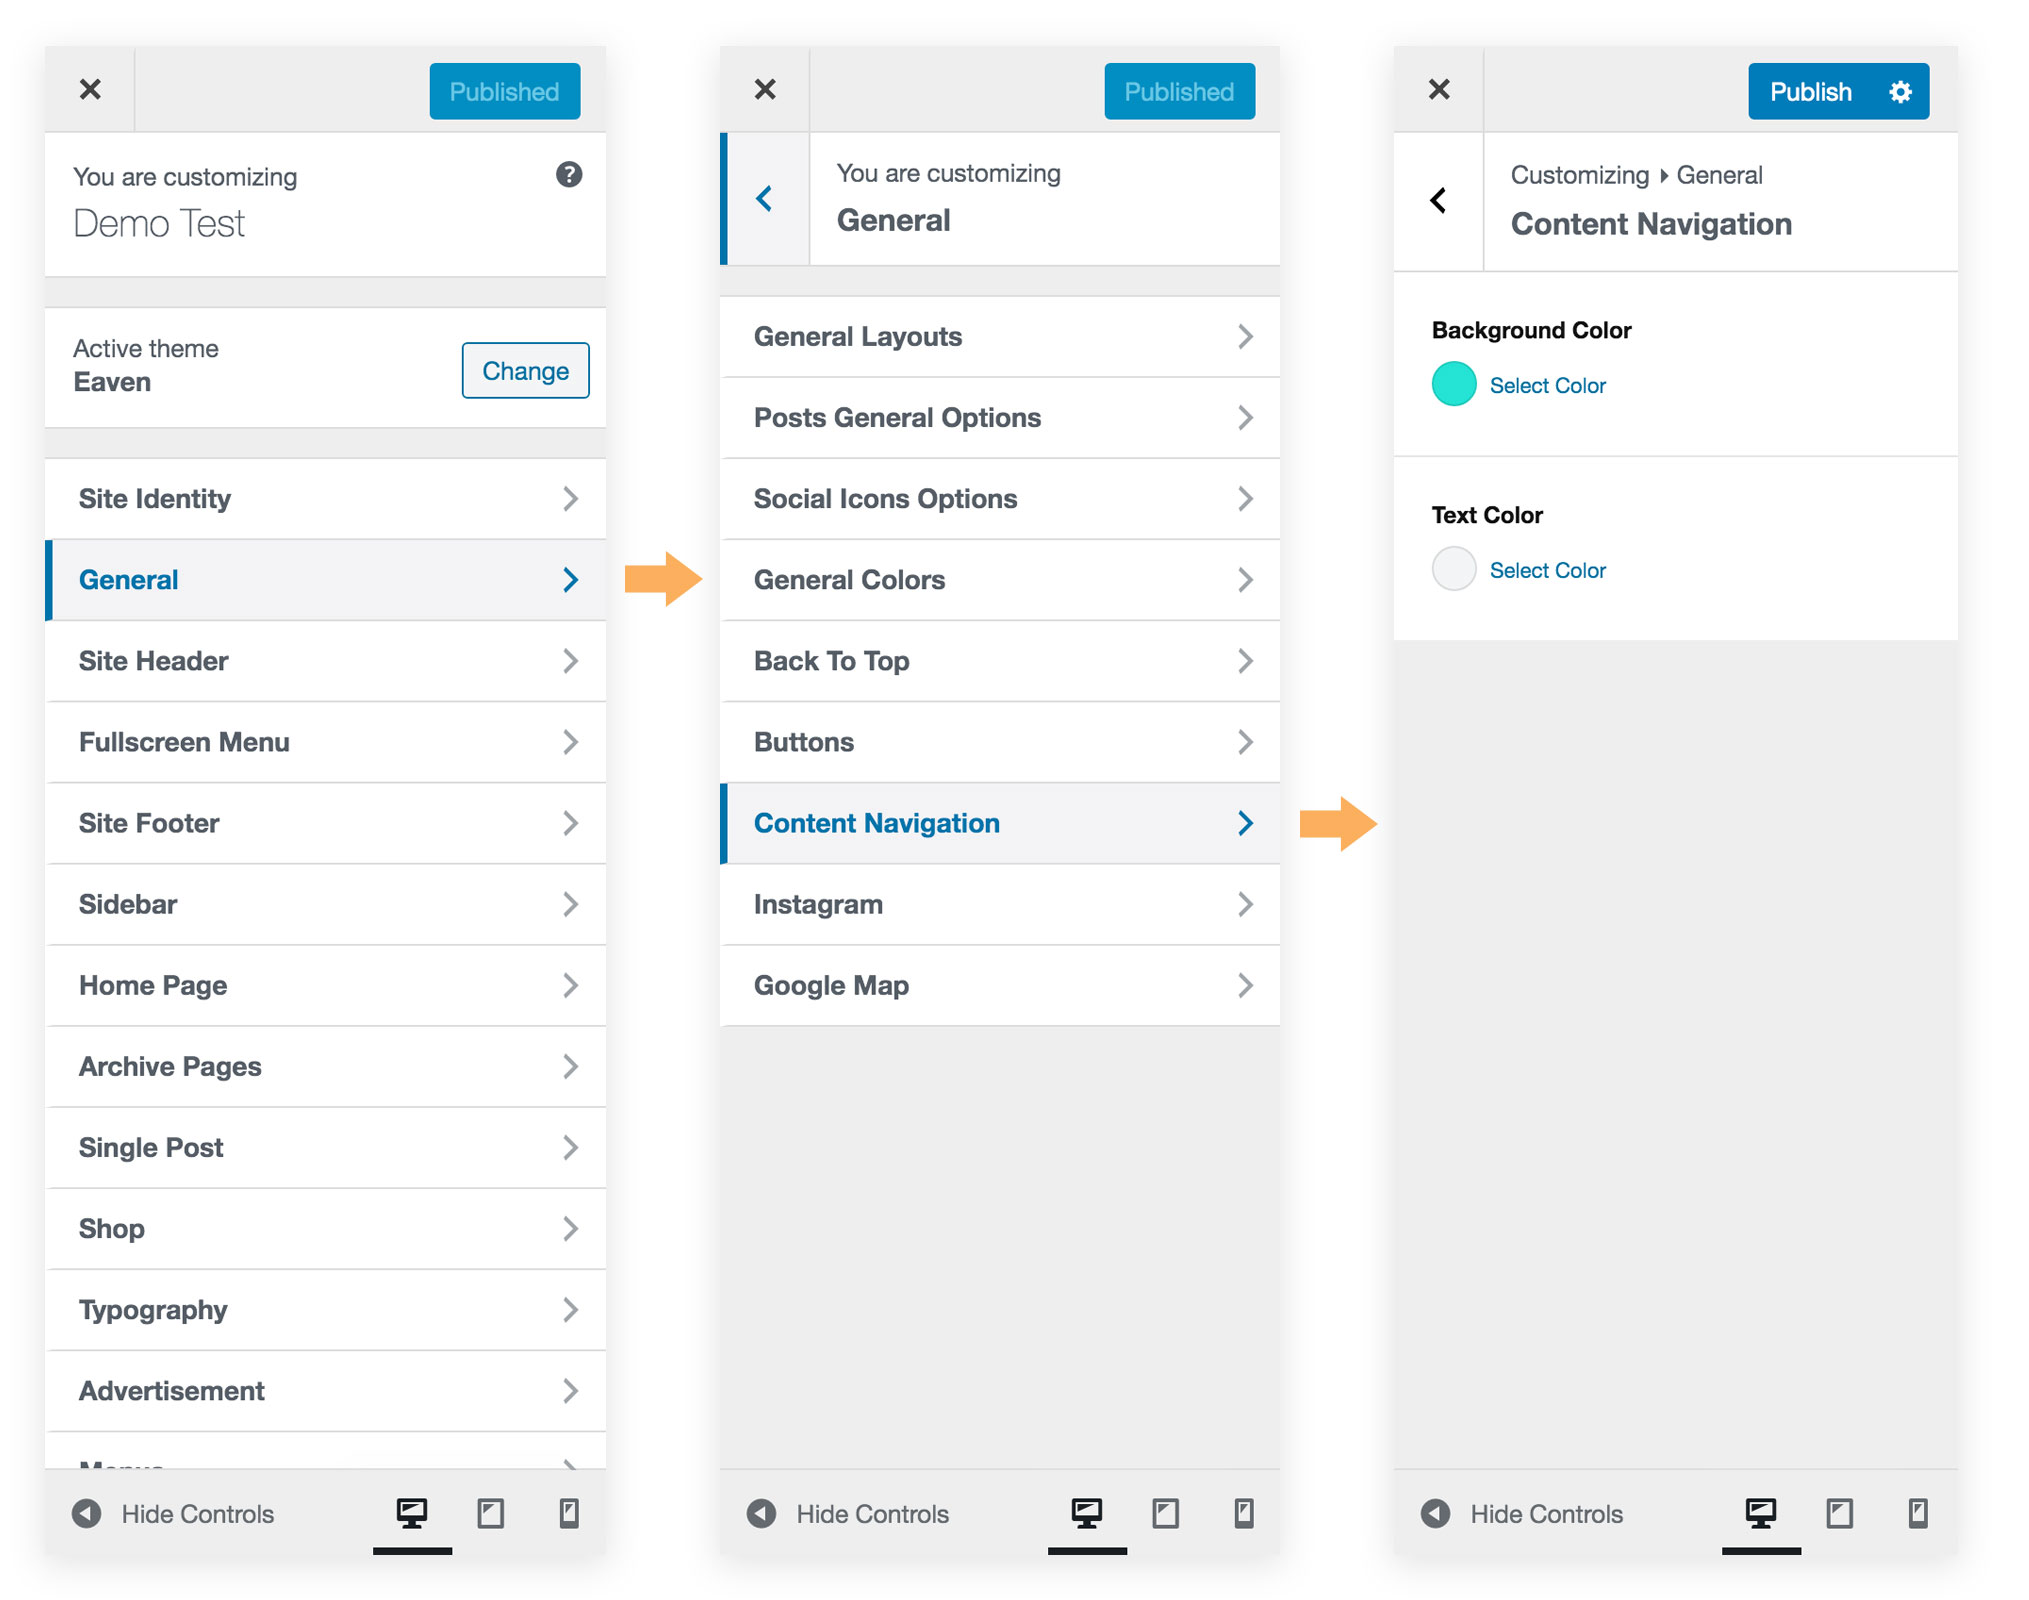
6.3 Colors
You can change general color settings, and also can override color settings for specific elements, like site header, sidebar, site footer, etc.
General Color Settings
Please go to theme customizer > General > General Colors, there you can:
Choose a basic color scheme for your site: Light or Dark.
You can choose an accent color. The accent color will be applied to links (hover state), buttons, and other highlighted elements.
You can choose to enable the Gradient Accent Color, and then set the colors.
You can also modify text/background colors for the 2 color schemes.
6.4 Site Header
6.4.1 Site Header Layout
Please go to theme customizer > Site Header > Header Layouts, there you can:
Choose a site header layout from 4 layouts.
Enable Sticky Header effect or not.
Show or hide Social Menu in site header.
Show or hide search button in site header.
Please Note:
If you choose "Site Header Layout 4", you need to create 2 new menus and choose menu locations for them. More information please read this chapter:
Menus for Site Header Layout 4.
6.4.2 Site Header Colors & BG
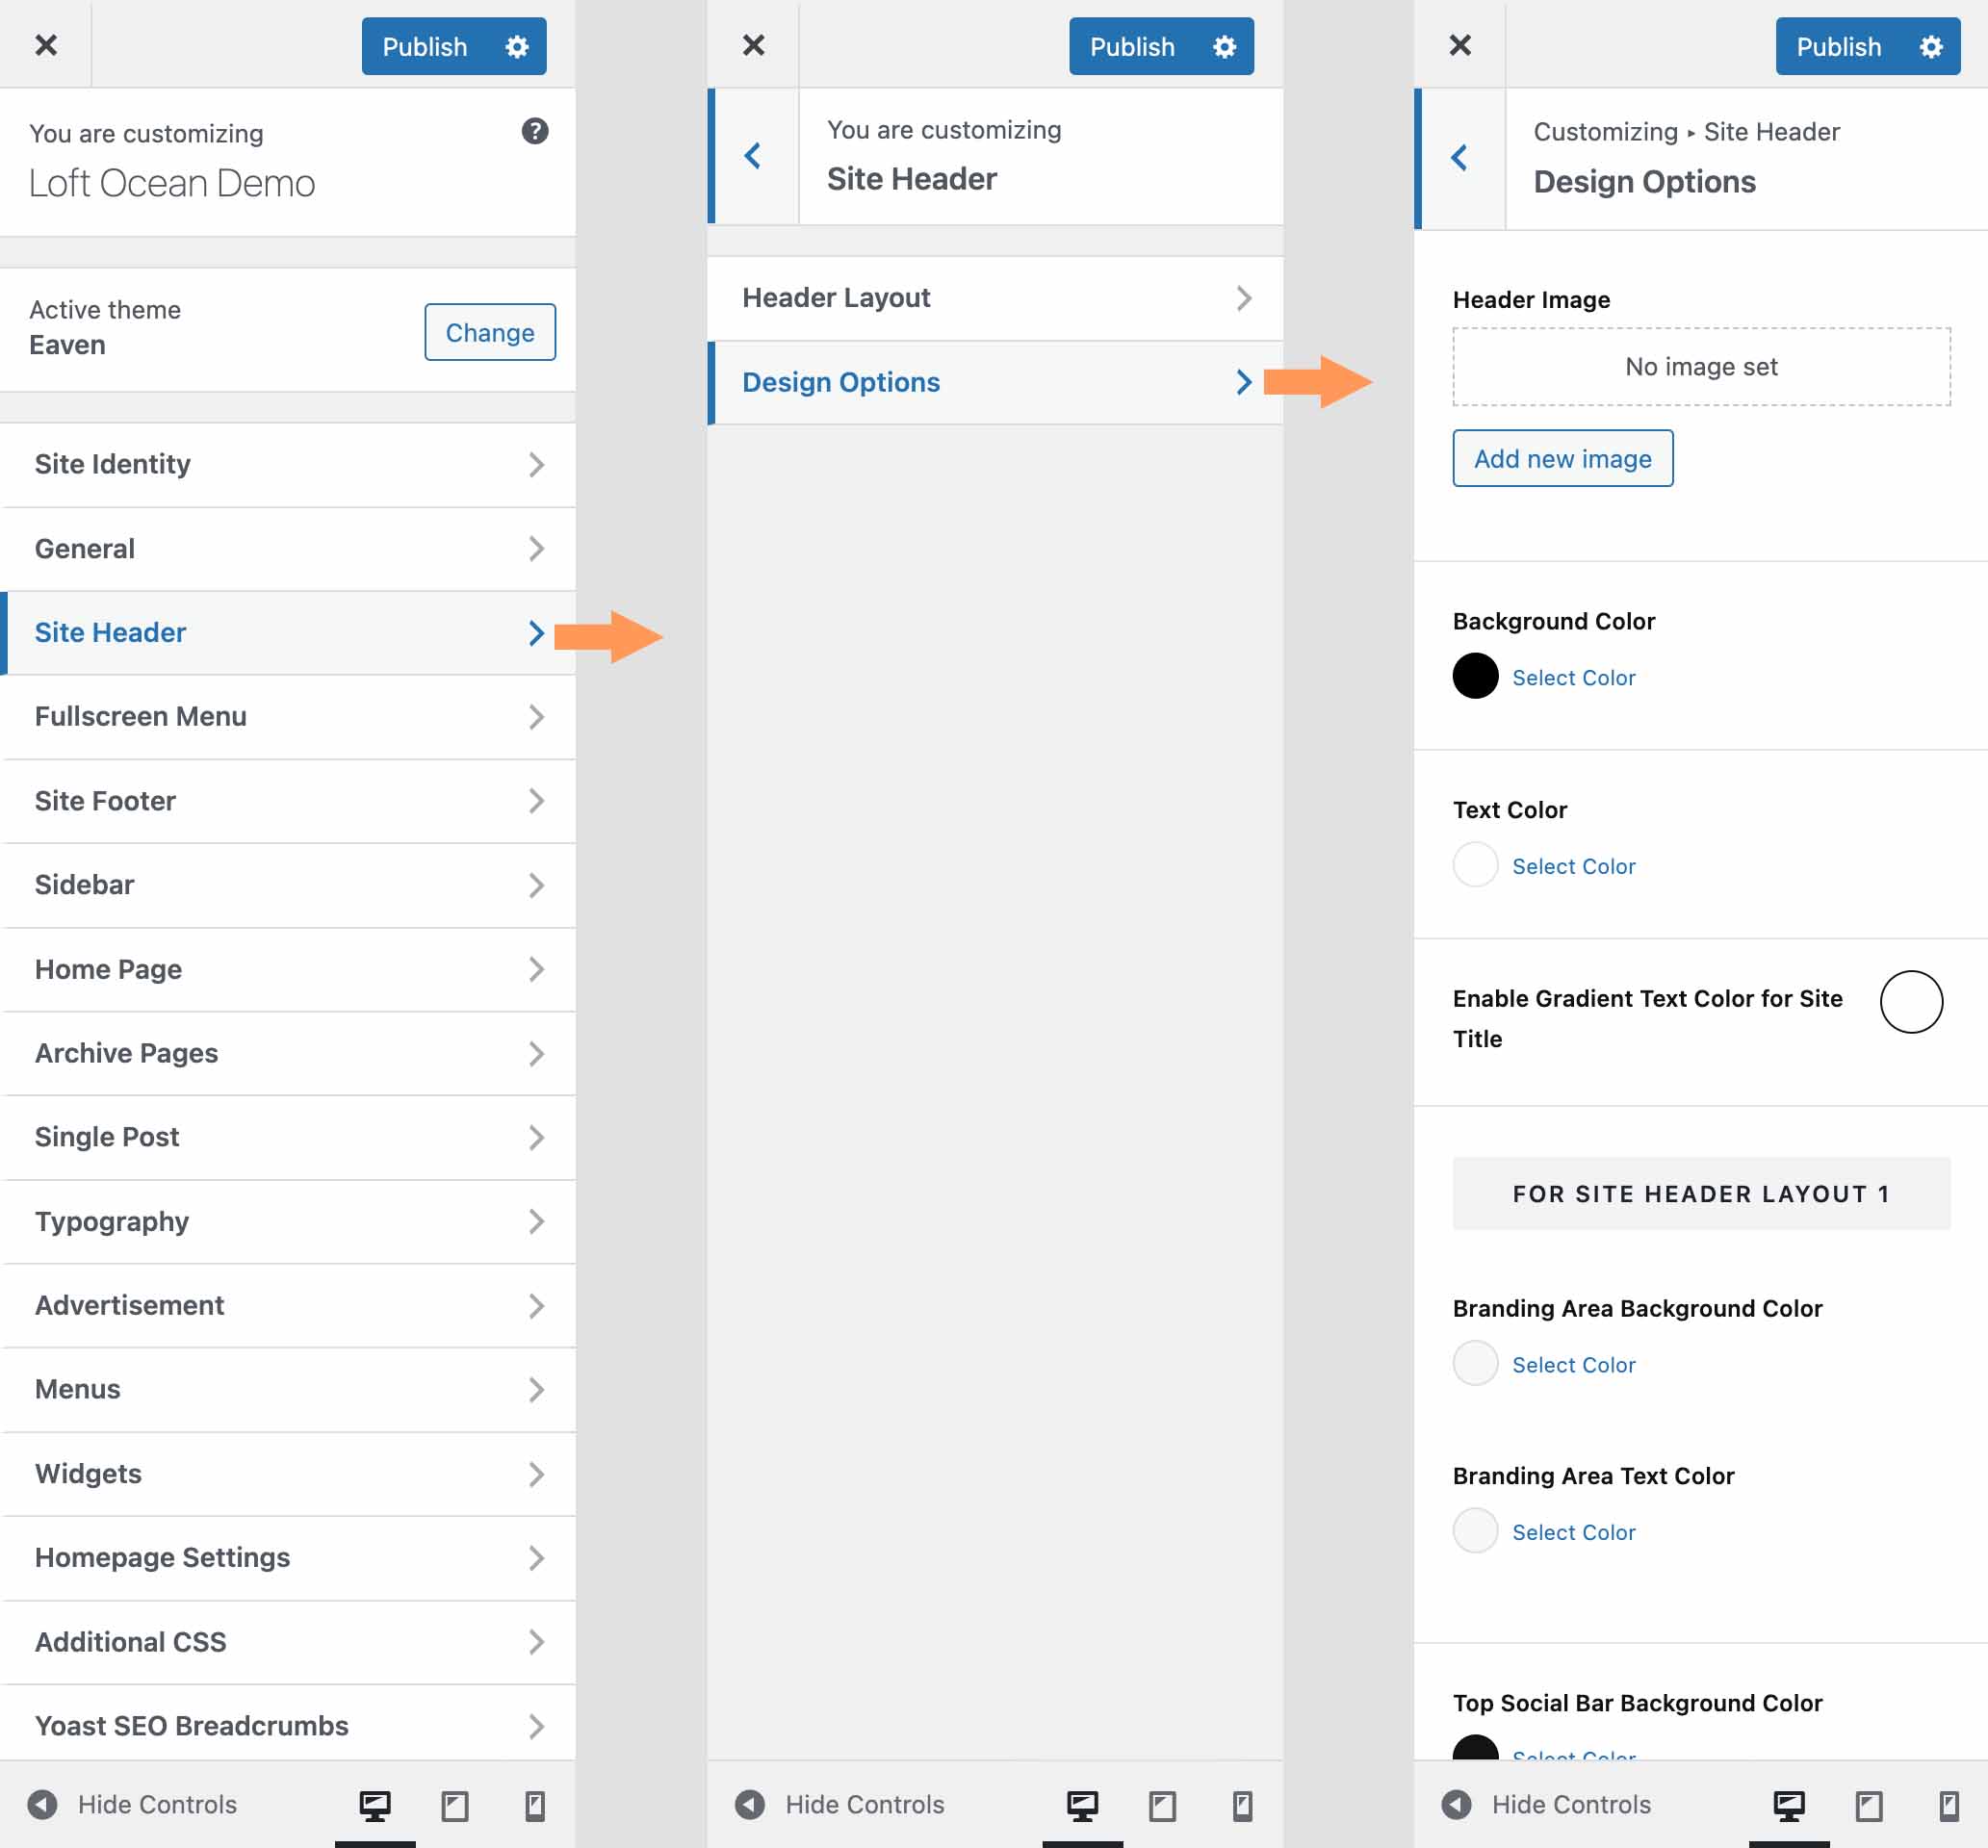
Please go to theme customizer > Site Header > Design Options, there you can:
Set up site header image.
Change site header background color and Text Color.
Customize Site Header Colors & Background
6.5 Fullscreen Menu
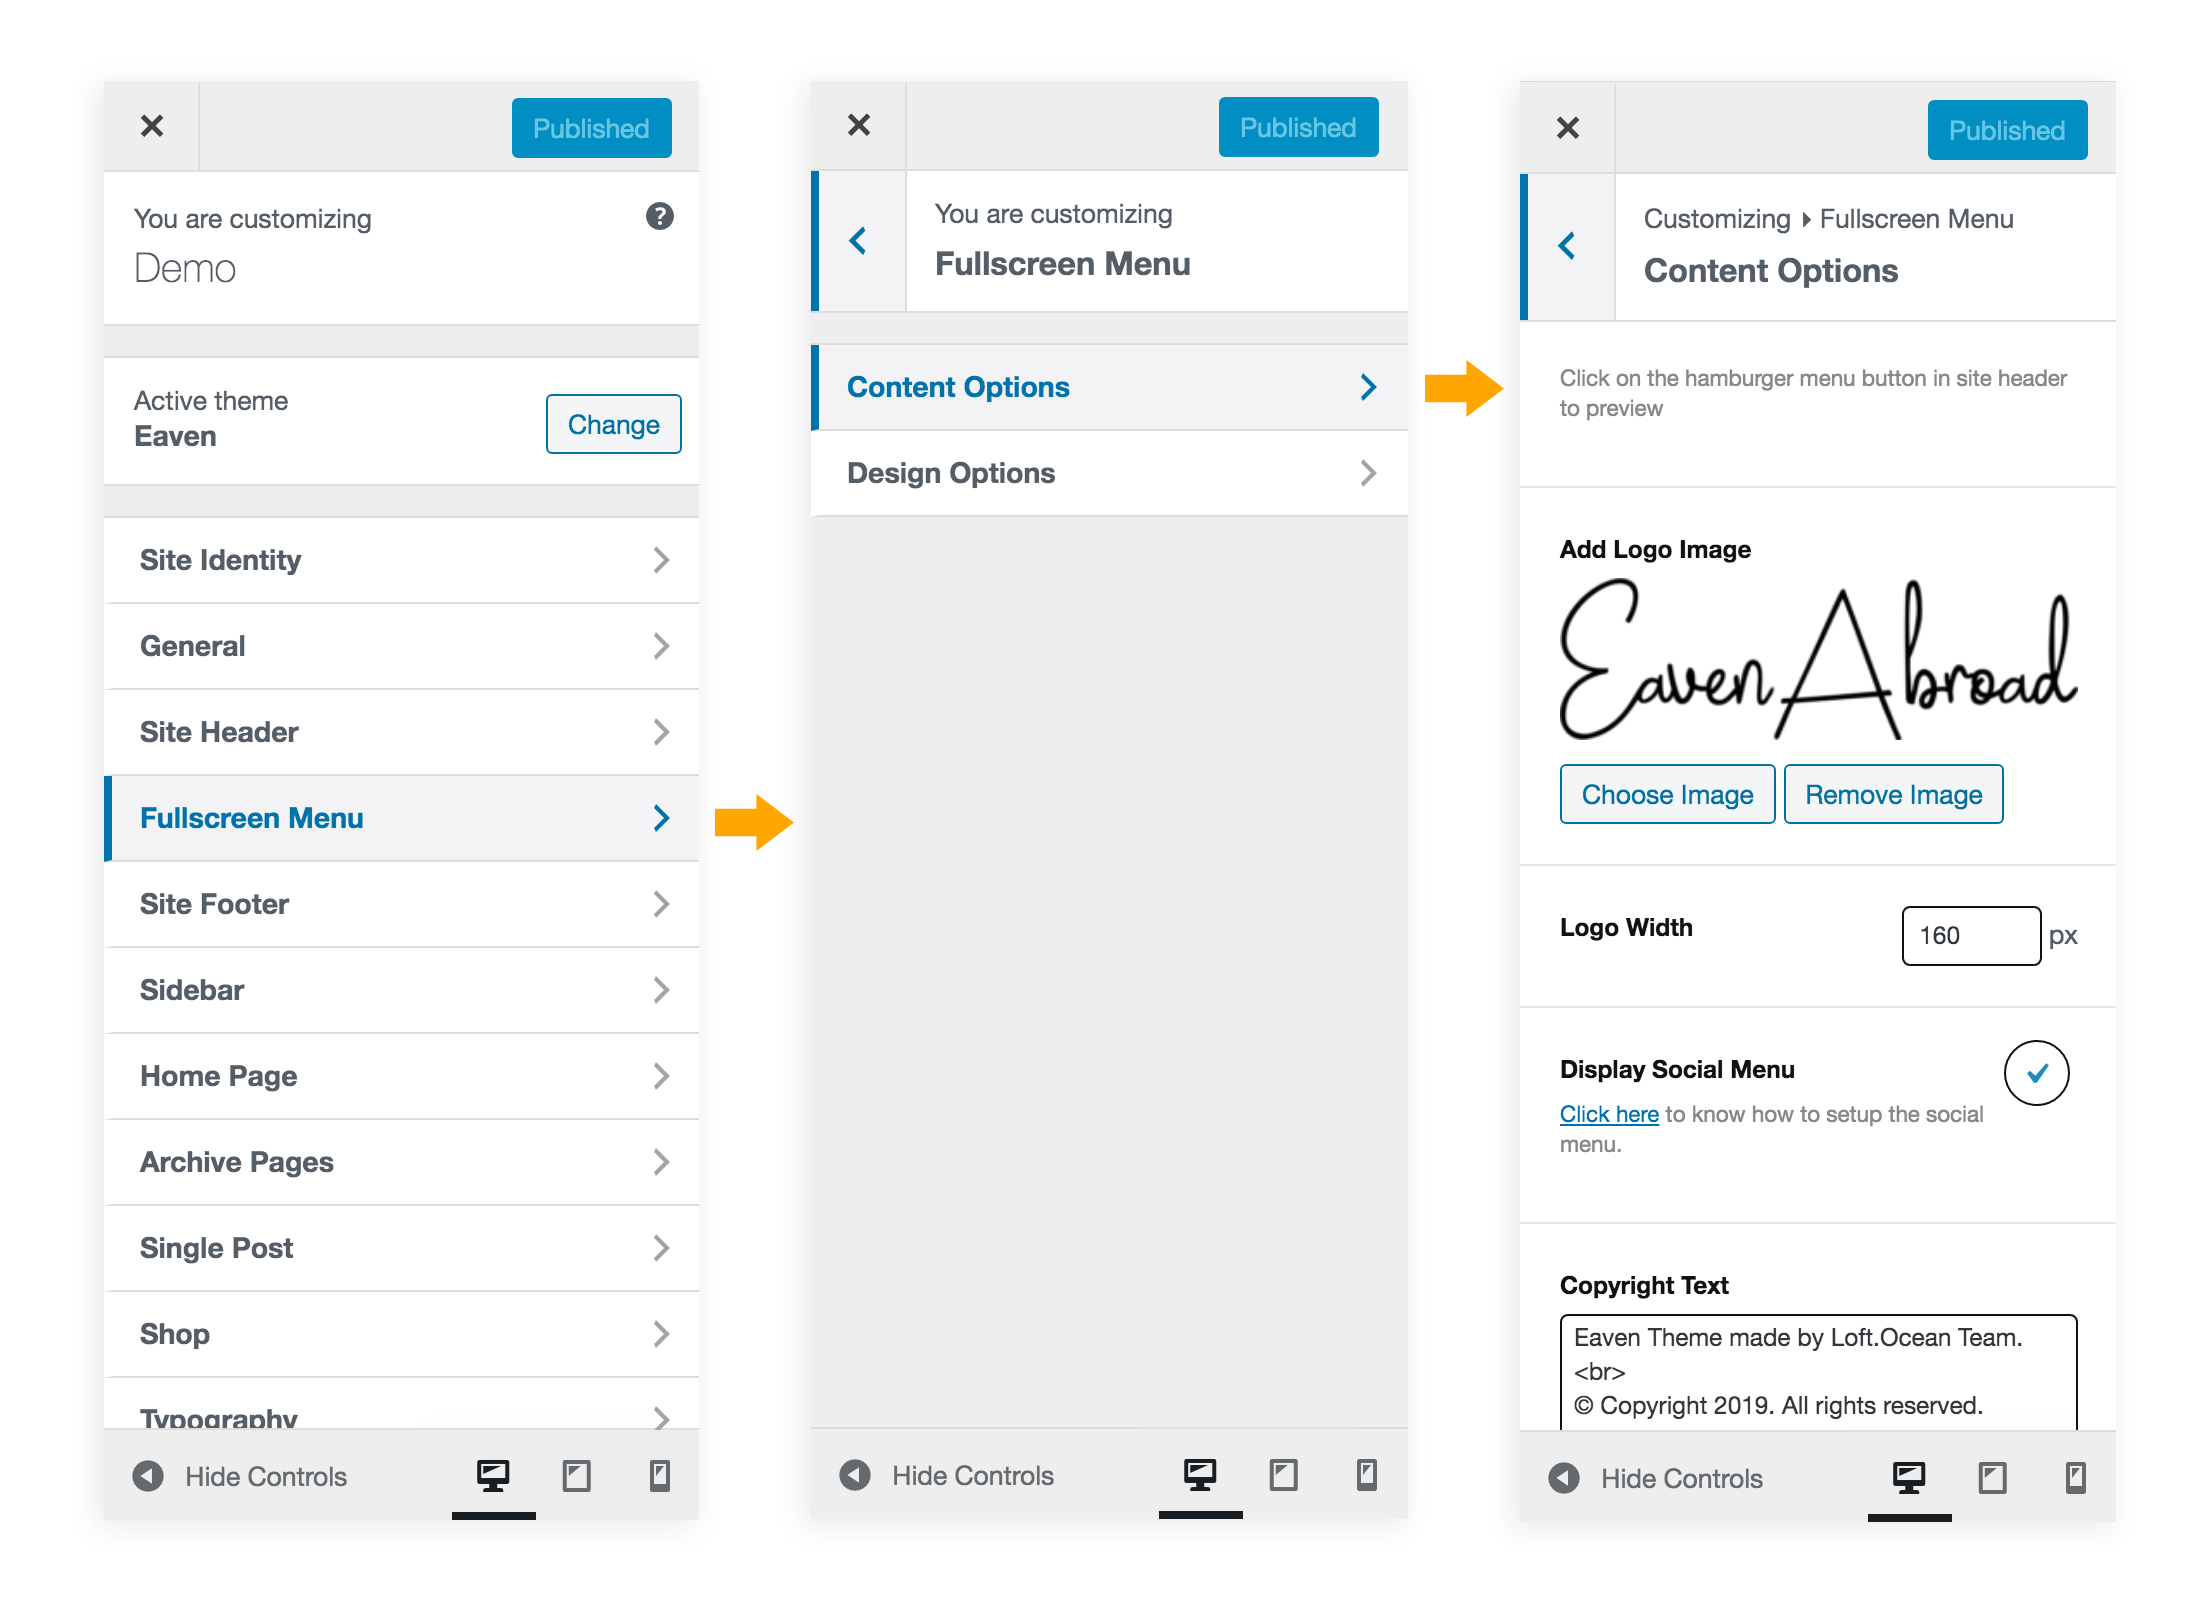
Go to Appearance > Customizer > Fullscreen Menu, there are 2 sub sections:
Content Options – Decide what content will be shown in the fullscreen menu.
Design Options – There you can change the background color & text color of the fullscreen menu.
Customize the fullscreen menu
Content Options
Your site primary menu will be displayed in the fullscreen menu. In addition, you can choose to show the following elements:
Social Menu
Copyright Text (or any custom text)
Hero Image
To know more details about how to set up menus, please read Menu section in this documentation.
Fullscreen Menu Colors & BG
Please go to theme customizer > Fullscreen Menu > Design Options, there you can change the fullscreen menu
background color and text color.
6.6 Site Footer
Please go to Appearance > Customizer > Site Footer, there are 5 sub sections:
Featured Categories – Select some categories and display them in the site footer.
Footer Widgets Area – This theme supports to add widgets into the site footer. In this sub section you can change the Color Scheme and Background Color of the Footer Widgets Area.
Instagram
Please connect your website with your Instagram account first. Please click here to know how to set up your Instagram.
After that, you can check it to enable this feature.
Enter a title (it's optional) for the feed, for example, "Follow Me on Instagram".
If you want to link the title to your Instagram account page, please enter your Instagram account username.
You can choose to display the latest 4 to 8 pictures from the Instagram account in a full-width row at the top of the site footer.
Please note: your Instagram account needs to be public to show feed on your site.
Site Footer Bottom – Add your copyright text to the bottom bar of the site footer, and you can also choose to display your social menu or a navigation menu. And you can change the colors of this area.
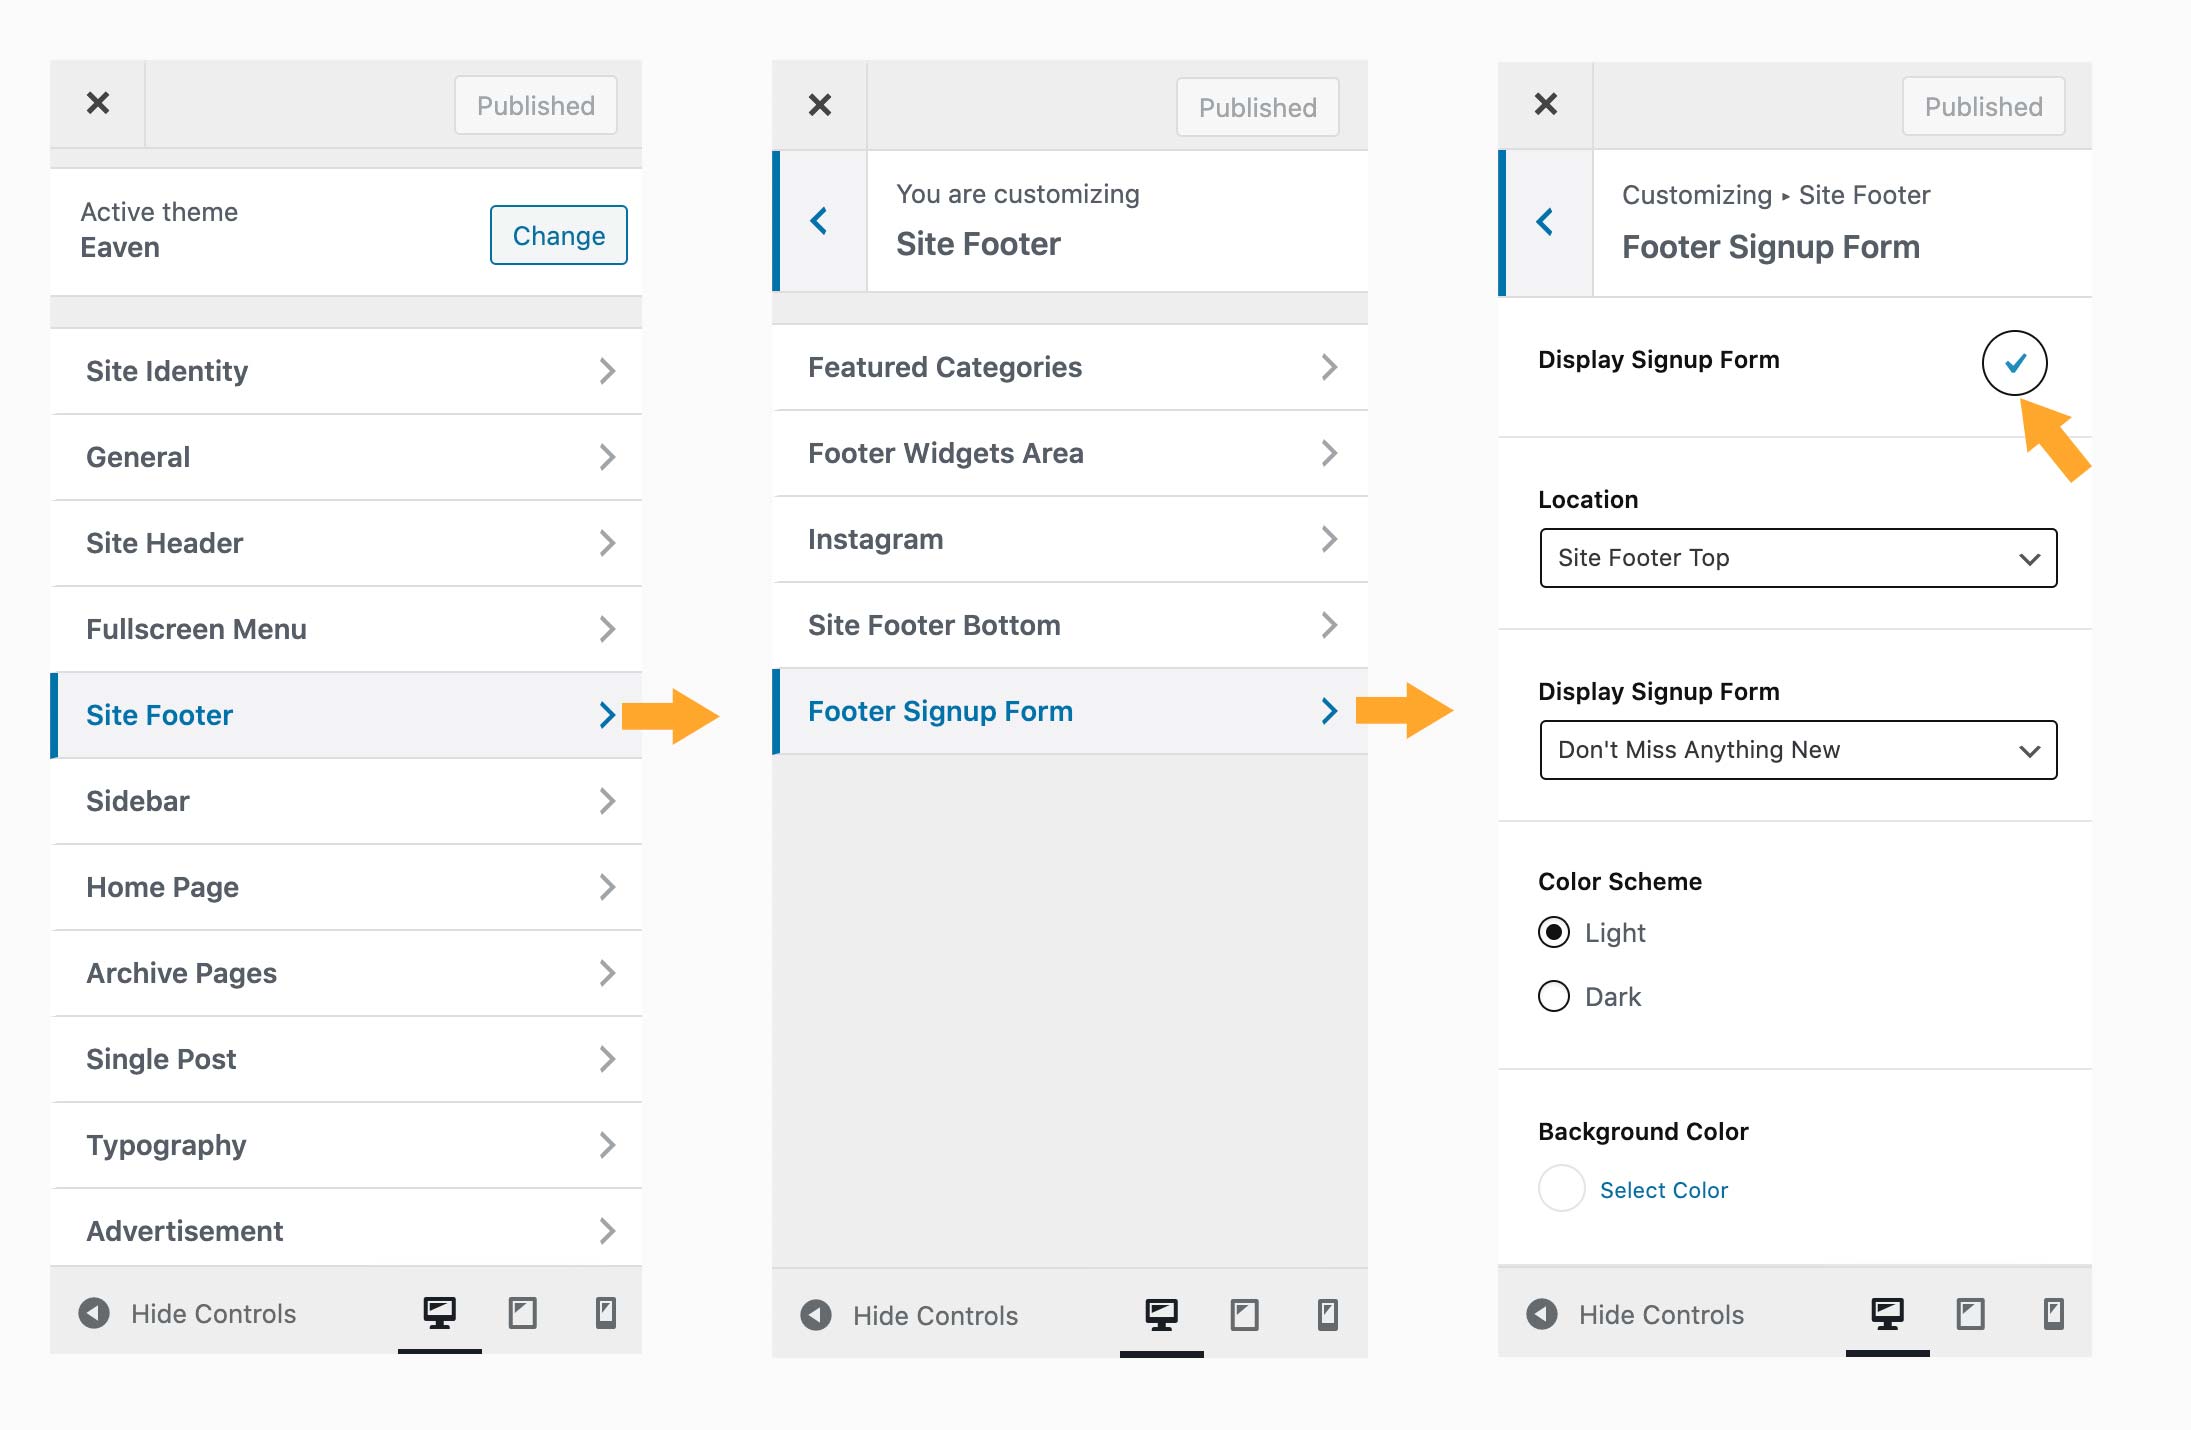
Footer Signup Form – Display your Email Signup Form at the top of the site footer, or at the bottom of your website. Please note: You need to install & activate the plugin “MailChimp for WP” first.
6.7 Typography
Please go to Appearance > Customizer > Typography to customize font options for text.
Font Family
Options in this sub section will work for the whole site. You can choose 2 different fonts for different types of text. All 800+ Google Fonts are included in the drop down lists.
Text Font Family – It’s the font family for the main text content.
Heading Font Family – This font will be used for all titles (post title, page title, widget title…) and headings (< h1 > to < h6 >).
Font Options for Each Type of Text
There are more options (font weight, font style, text transform…) for you to customize each type of text:
Heading Text
Content Text
Post Title
Post Excerpt
Page Title
Widget Title
Home Widget Title
6.8 Instagram
Instagram General Settings
You can add your Instagram feed on your website. Please note: your Instagram account needs to be public to show feed on your site.
Please go to Appearance > Customizer > General > Instagram.
Set up your Instagram
Before June 2020: For most users, there is no need to add the Instagram Access Token to display the Instagram feed on the website.
Only a few users need to add the Instagram Access Token because of a connection problem between their websites and Instagram.
Since June 2020 However, starting in June 2020, Instagram made changes AGAIN, and the old API will be deprecated at the end of June 2020. The new Instagram API is currently enabled.
Because of these changes, from June 2020, it is required to add the Instagram Access Token to connect your website with your Instagram account before you can display the Instagram feed on your website.
For users who have previously added the token manually in the old way, since you are using the old Instagram API (will be deprecated after June 29, 2020), so please follow the steps below to reconnect your Instagram account.
Please follow the steps below to connect your website with your Instagram account:
Install the bridge plugin we made: "LoftOcean Instagram": Please click the plugin download link, and then install and activate this plugin on your website.
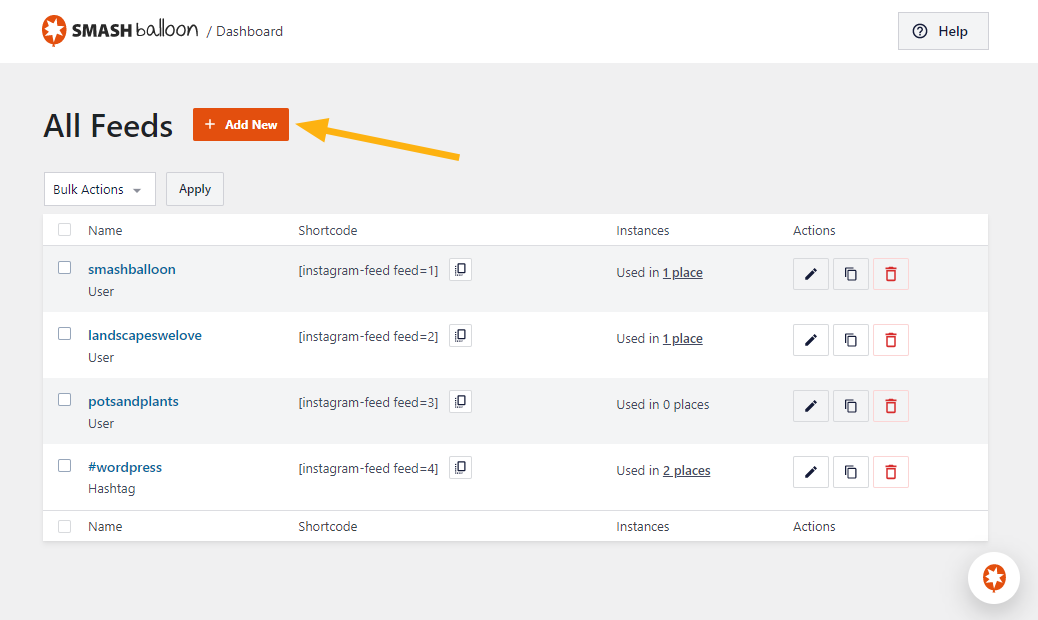
Connect your website with your Instagram account. Please go to your WordPress dashboard, find "Instagram Feed" in the sidebar. Then please click on the Add New button (as shown in the screenshot below) to connect your website with your Instagram account.
After clicking the button, please follow the instructions displayed to operate. It will guide you connect your Instagram account and create a new feed.
Connect your website with your Instagram account, and create new feeds (Smash Balloon v6.x updated interface).
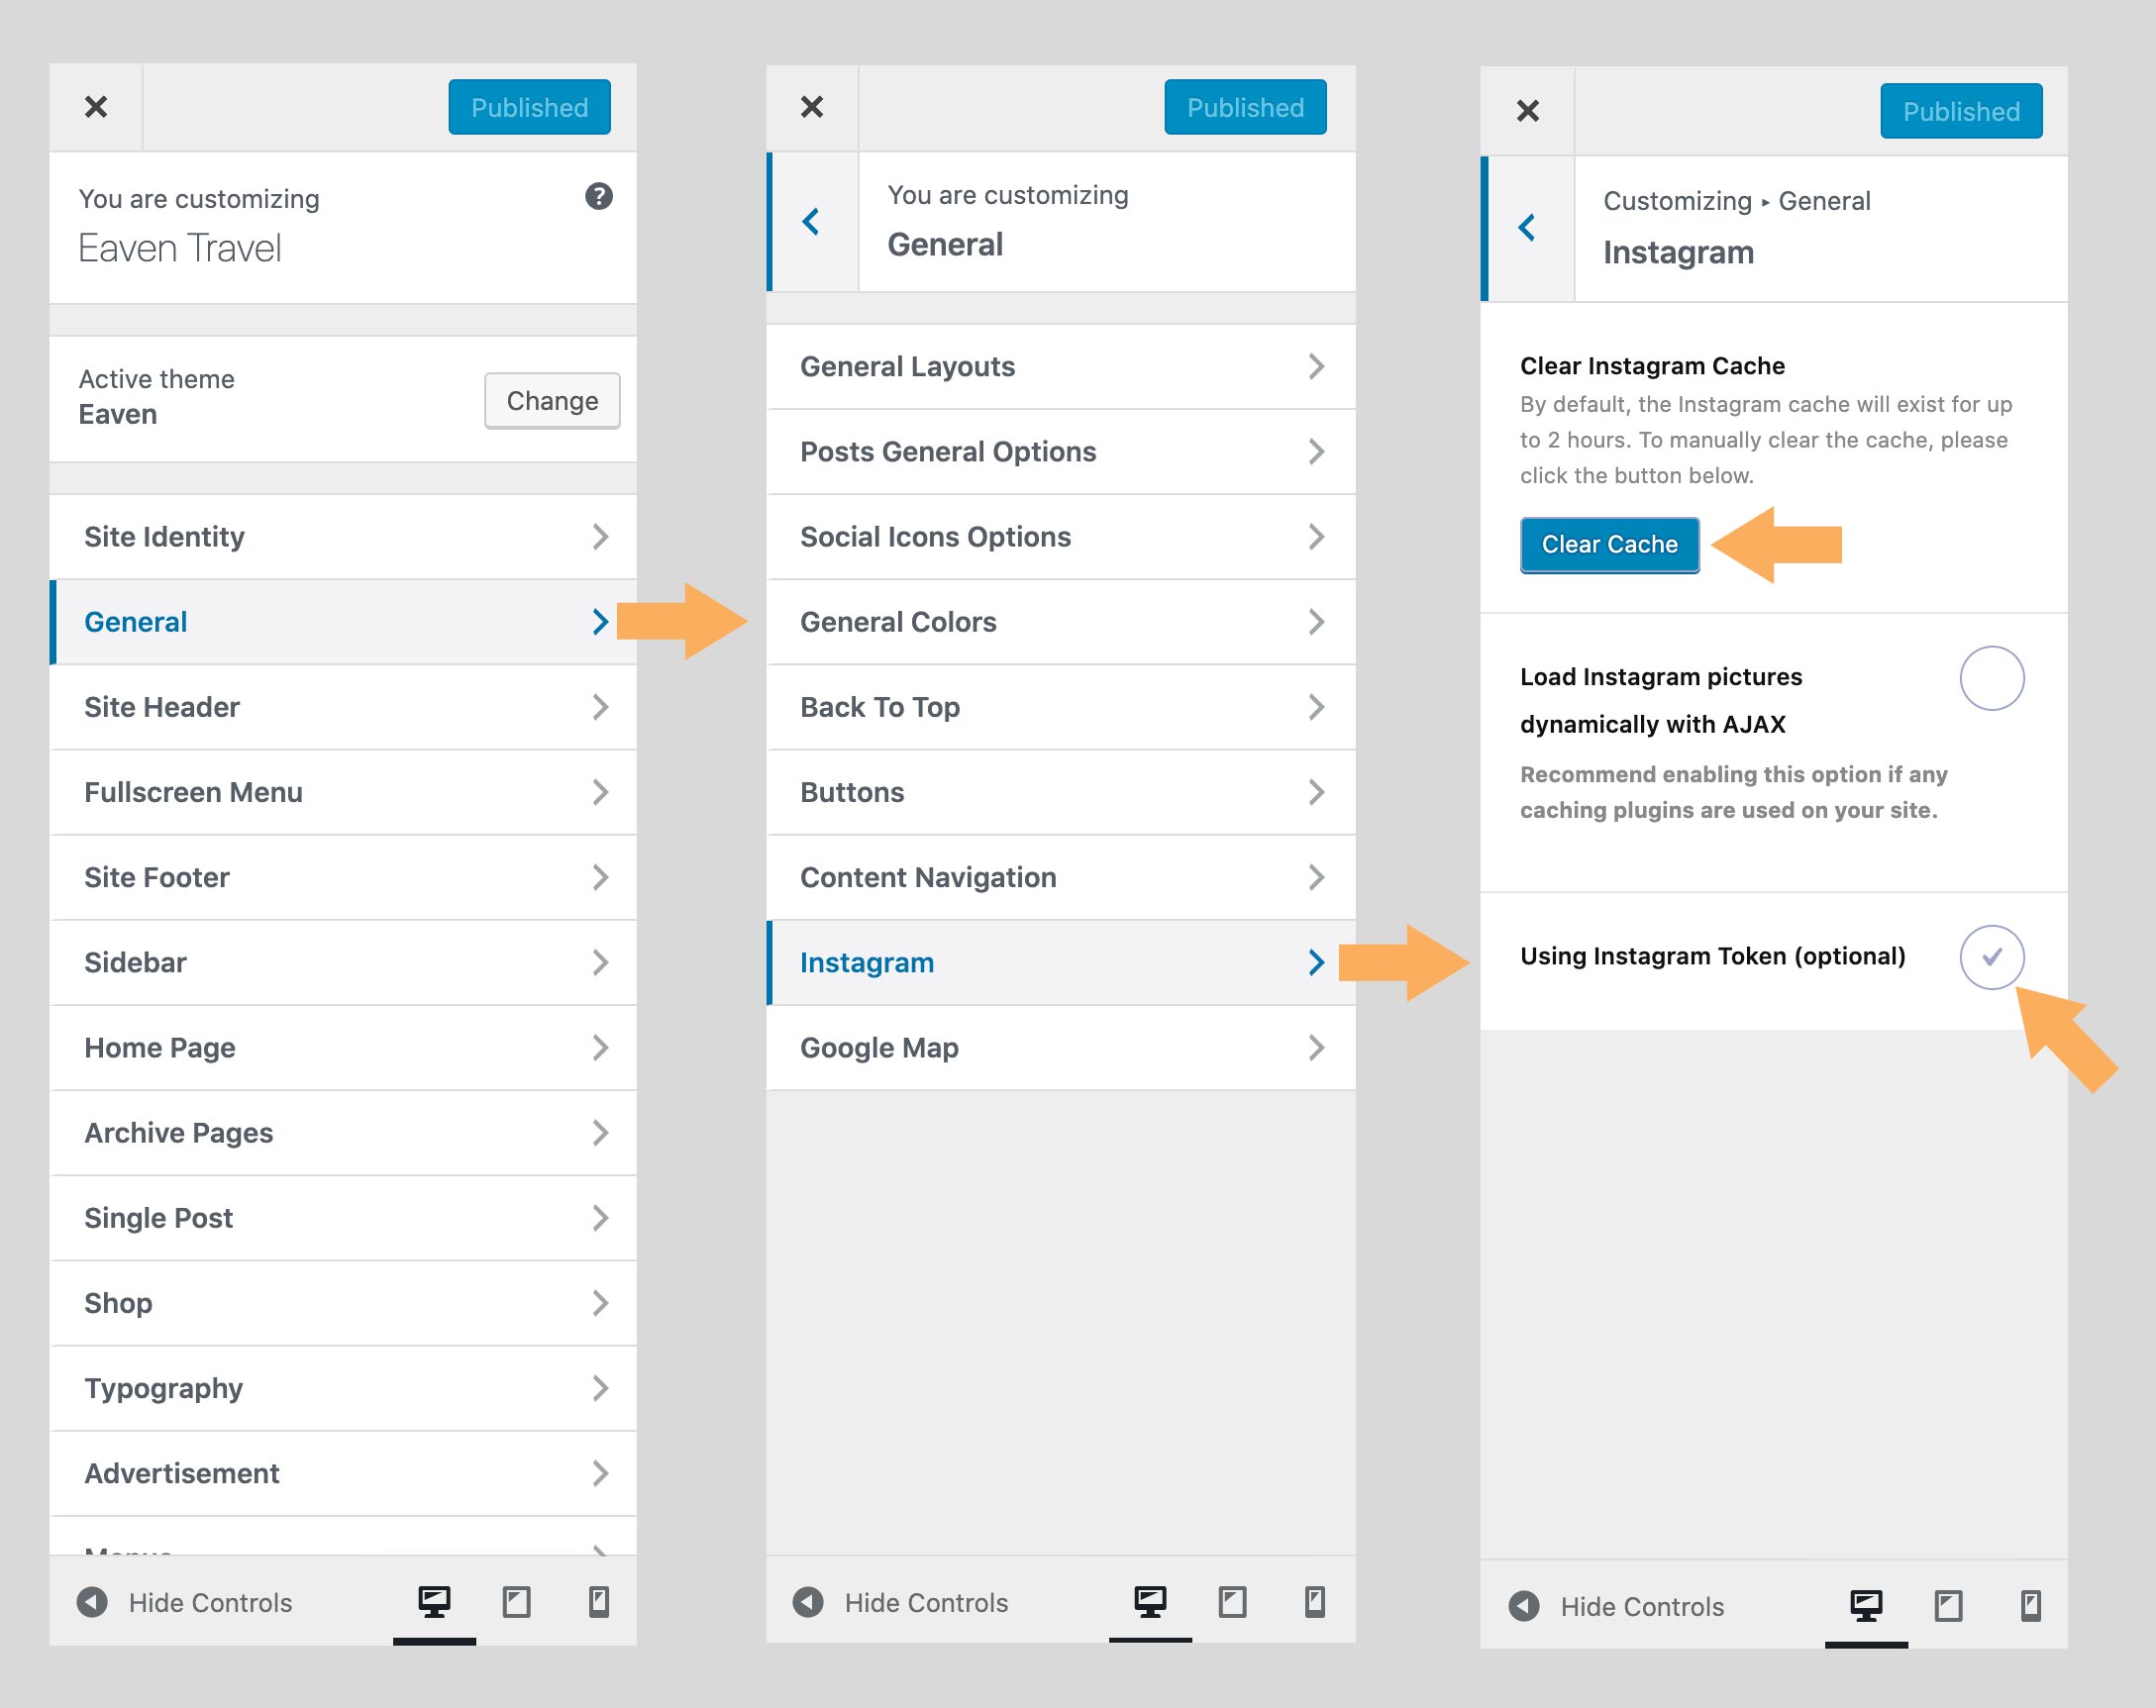
Enable an option in your Customizer: Please open your WordPress customizer, then go to "General" > "Instagram" > find "Using Instagram Token" option, tick the box, and save the changes. After that,
please click on the "Clear Cache" button.
Enable an option in your Customizer.
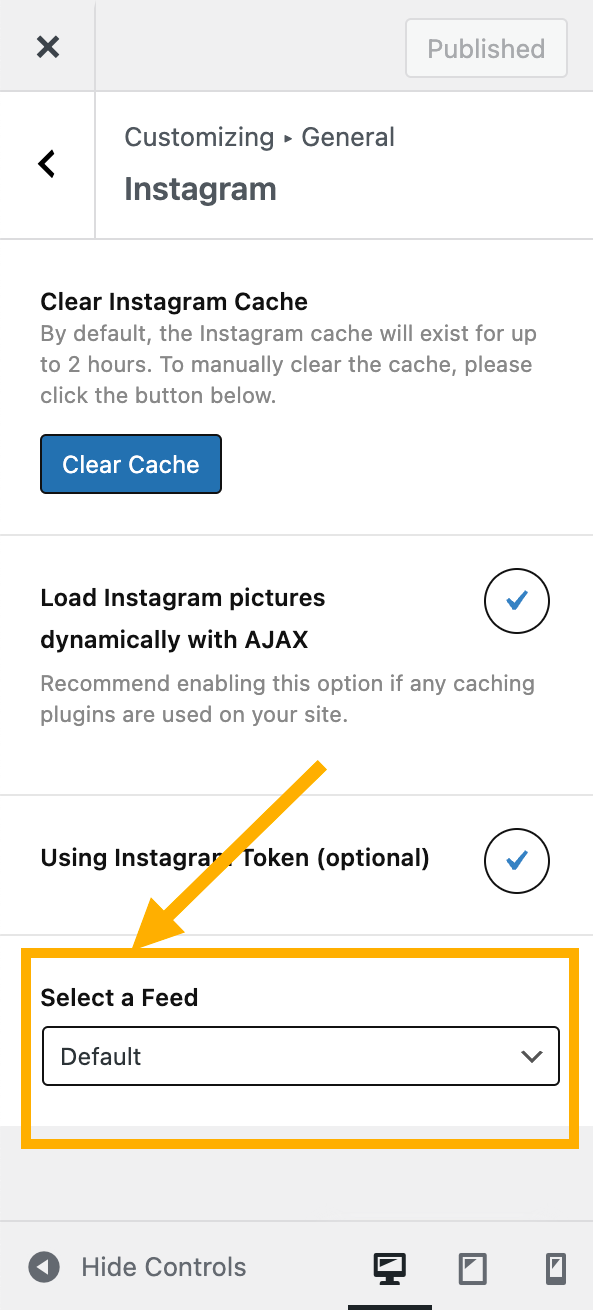
Select one of the feeds you created.Select one of the feeds you created
Done. Please keep these two plugins installed and activated. And please make sure your Instagram account is public.
Please note: After connecting your website to your Instagram account, you can only display the Instagram feed from the linked Instagram account.
"Why do I need to install these two plugins?"
Since Instagram API made changes frequently, we use this third party plugin "Smash Balloon Social Photo Feed" to manage Instagram Token.
This is a plugin specifically made for Instagram feed, which is stable and frequently updated.
Bridge plugin "LoftOcean Instagram": This is a bridge plugin. After activating this plugin, the Eaven theme can work with the "Smash Balloon Social Photo Feed" plugin,
so your Instagram feed can be displayed in the theme’s built-in locations (sidebar and footer), with the style set by the theme.
After connecting your website with your Instagram account, you can display your Instagram feed in the site footer, or use a widget to display the feed in the sidebar.
Instagram feed in site footer: Please open your WordPress Customizer, then go to "Site Footer" > find "Instagram" options. Enable the option and the Instagram feed will be displayed in the
site footer. Please check this chapter for more details.
Instagram feed in widget areas (sidebar, footer widget column): Please use the custom widget "Eaven Instagram" to display Instagram feed in a widget area.
If you are new to WordPress, you may like to read this tutorial: How to Add and Use Widgets in WordPress.
Instagram Cache
By default, the Instagram cache will exist for up to 2 hours, which means that if your Instagram has just added some new photos, those photos will not be shown on your website until the cache expires. In some cases, you may like to manually clear the cache. Please open your WordPress Customizer, go to General > Instagram, find the “Clear Instagram Cache” option, and click the “Clear Cache” button.
Enable AJAX
If you use any caching plugin on your site, you may find that sometimes your Instagram photos stop updating, especially if you haven’t updated your site content for a while, such as posting a new article. This is because the Instagram feature uses PHP code to render content by default. When the cache plugin works, the code of the Instagram feature may not run.
To avoid this problem, please open your WordPress Customizer, go to General > Instagram, find the “Load Instagram pictures dynamically with AJAX” option, tick the box to enable this option.
Common Problem with Instagram
Instagram feed cannot be displayed on your website?
Please check by following the steps below:
Please check whether the required plugin "Eaven Extension" is installed and activated.
If you update the theme, please make sure you also update the required plugin "Eaven Extension".
Please check if you have enabled the "Instagram" feed in your site footer.
Please make sure your Instagram account is public.
Issue: Action Required Within 7 Days
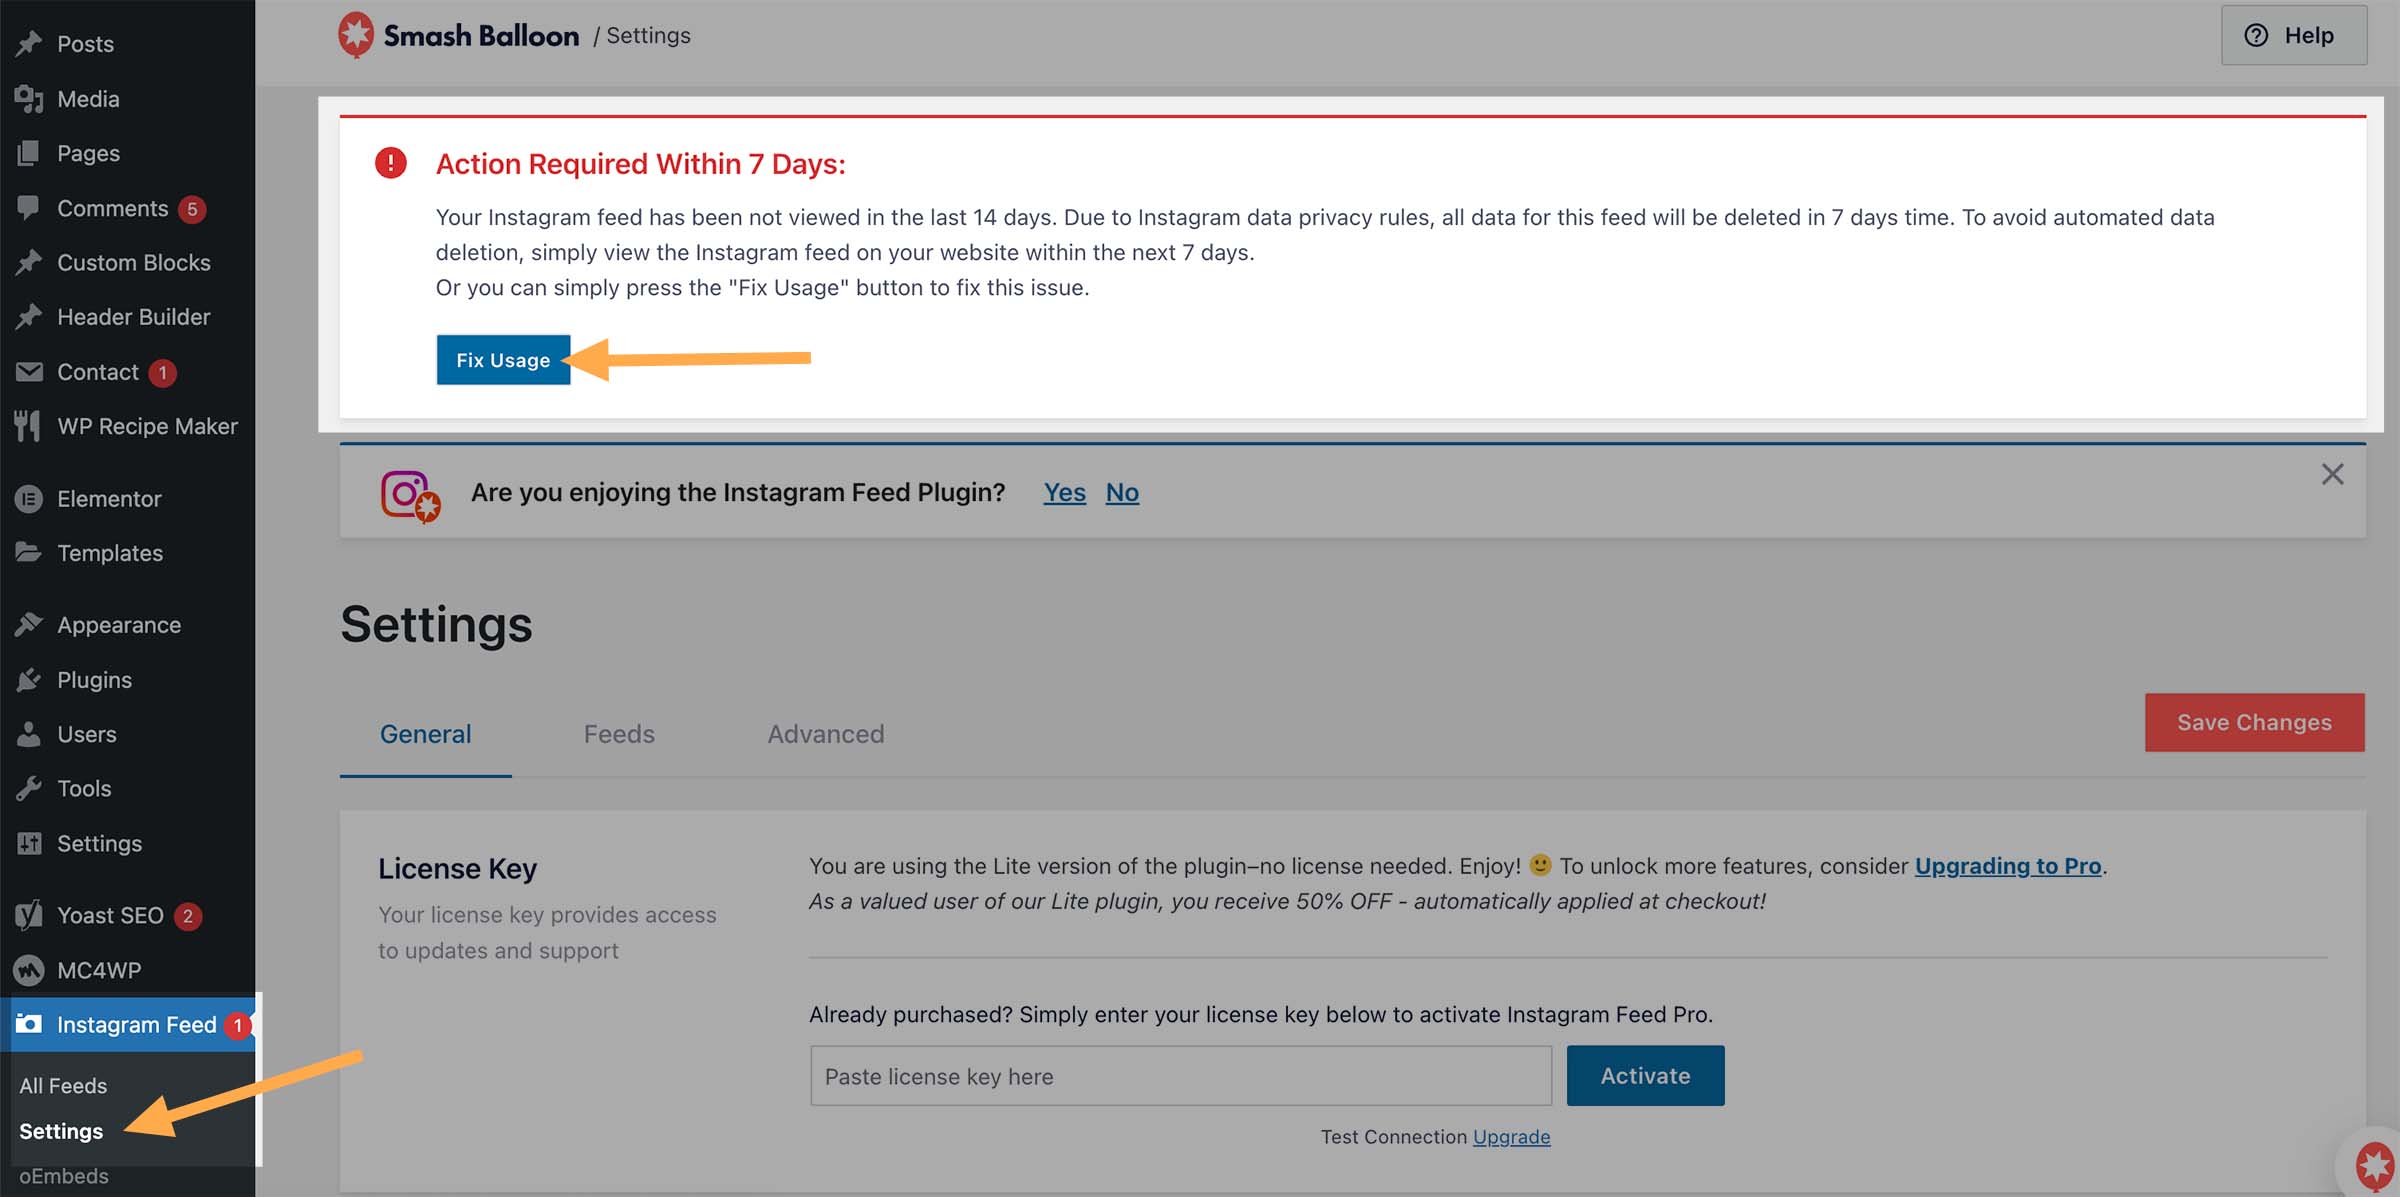
If you receive an email about "Action Required Within 7 Days", or suddenly you find that your Instagram feed does not show on your website, and then find this warning message on your website dashboard > Instagram Feed > Settings page:
“Action Required Within 7 Days
An Instagram feed on your website has been not viewed in the last 14 days. Due to Instagram data privacy rules, all data for this feed will be deleted in 7 days time.
To avoid automated data deletion, simply view the Instagram feed on your website within the next 7 days.”
Instagram Feed Issue - Action Required Within 7 Days
And they also explained: "Other than the page with the feed not being visited, this warning can appear if our app is deauthorized on the Instagram account or Instagram invalidates the access token for some other reason." (More details can be found here.)
Due to Instagram’s data privacy policies, if this is not resolved within the 7-day period, this plugin (Smash Balloon Social Photo Feed) must delete all the Instagram platform data it saved on your website, such as cached posts and account connections. It will not affect your actual account on Instagram though.
How to fix this issue?
Go to WordPress Dashboard > Instagram Feed > Settings. In the warning message box, if you see the "Fix Usage" button, try clicking on it and clearing your website cache and browser cache to check again.
If it does not work, then go to WordPress Dashboard > Instagram Feed > Settings again, remove the connected account(s) by clicking the red trash icon.
Click the Save Settings button.
Click the Add Source button, then click the blue Connect button and go through the connection process again. If connecting a Business Profile, when sent to Facebook, you may need to click the Edit Settings (reference) button to review your connection settings and make sure the correct account and related pages you manage are selected, and all permissions.
For any existing feed or legacy feed, go to the specific feed options > Settings > Sources and select the newly connected source. Once your account has been readded, click the Save Changes button.
More details can be found in the following articles:
Recently, Instagram's cache expiration time is unstable and may expire within a short period of time, causing the Instagram feed images on the website to not be displayed.
To fix this problem, please follow the steps below.
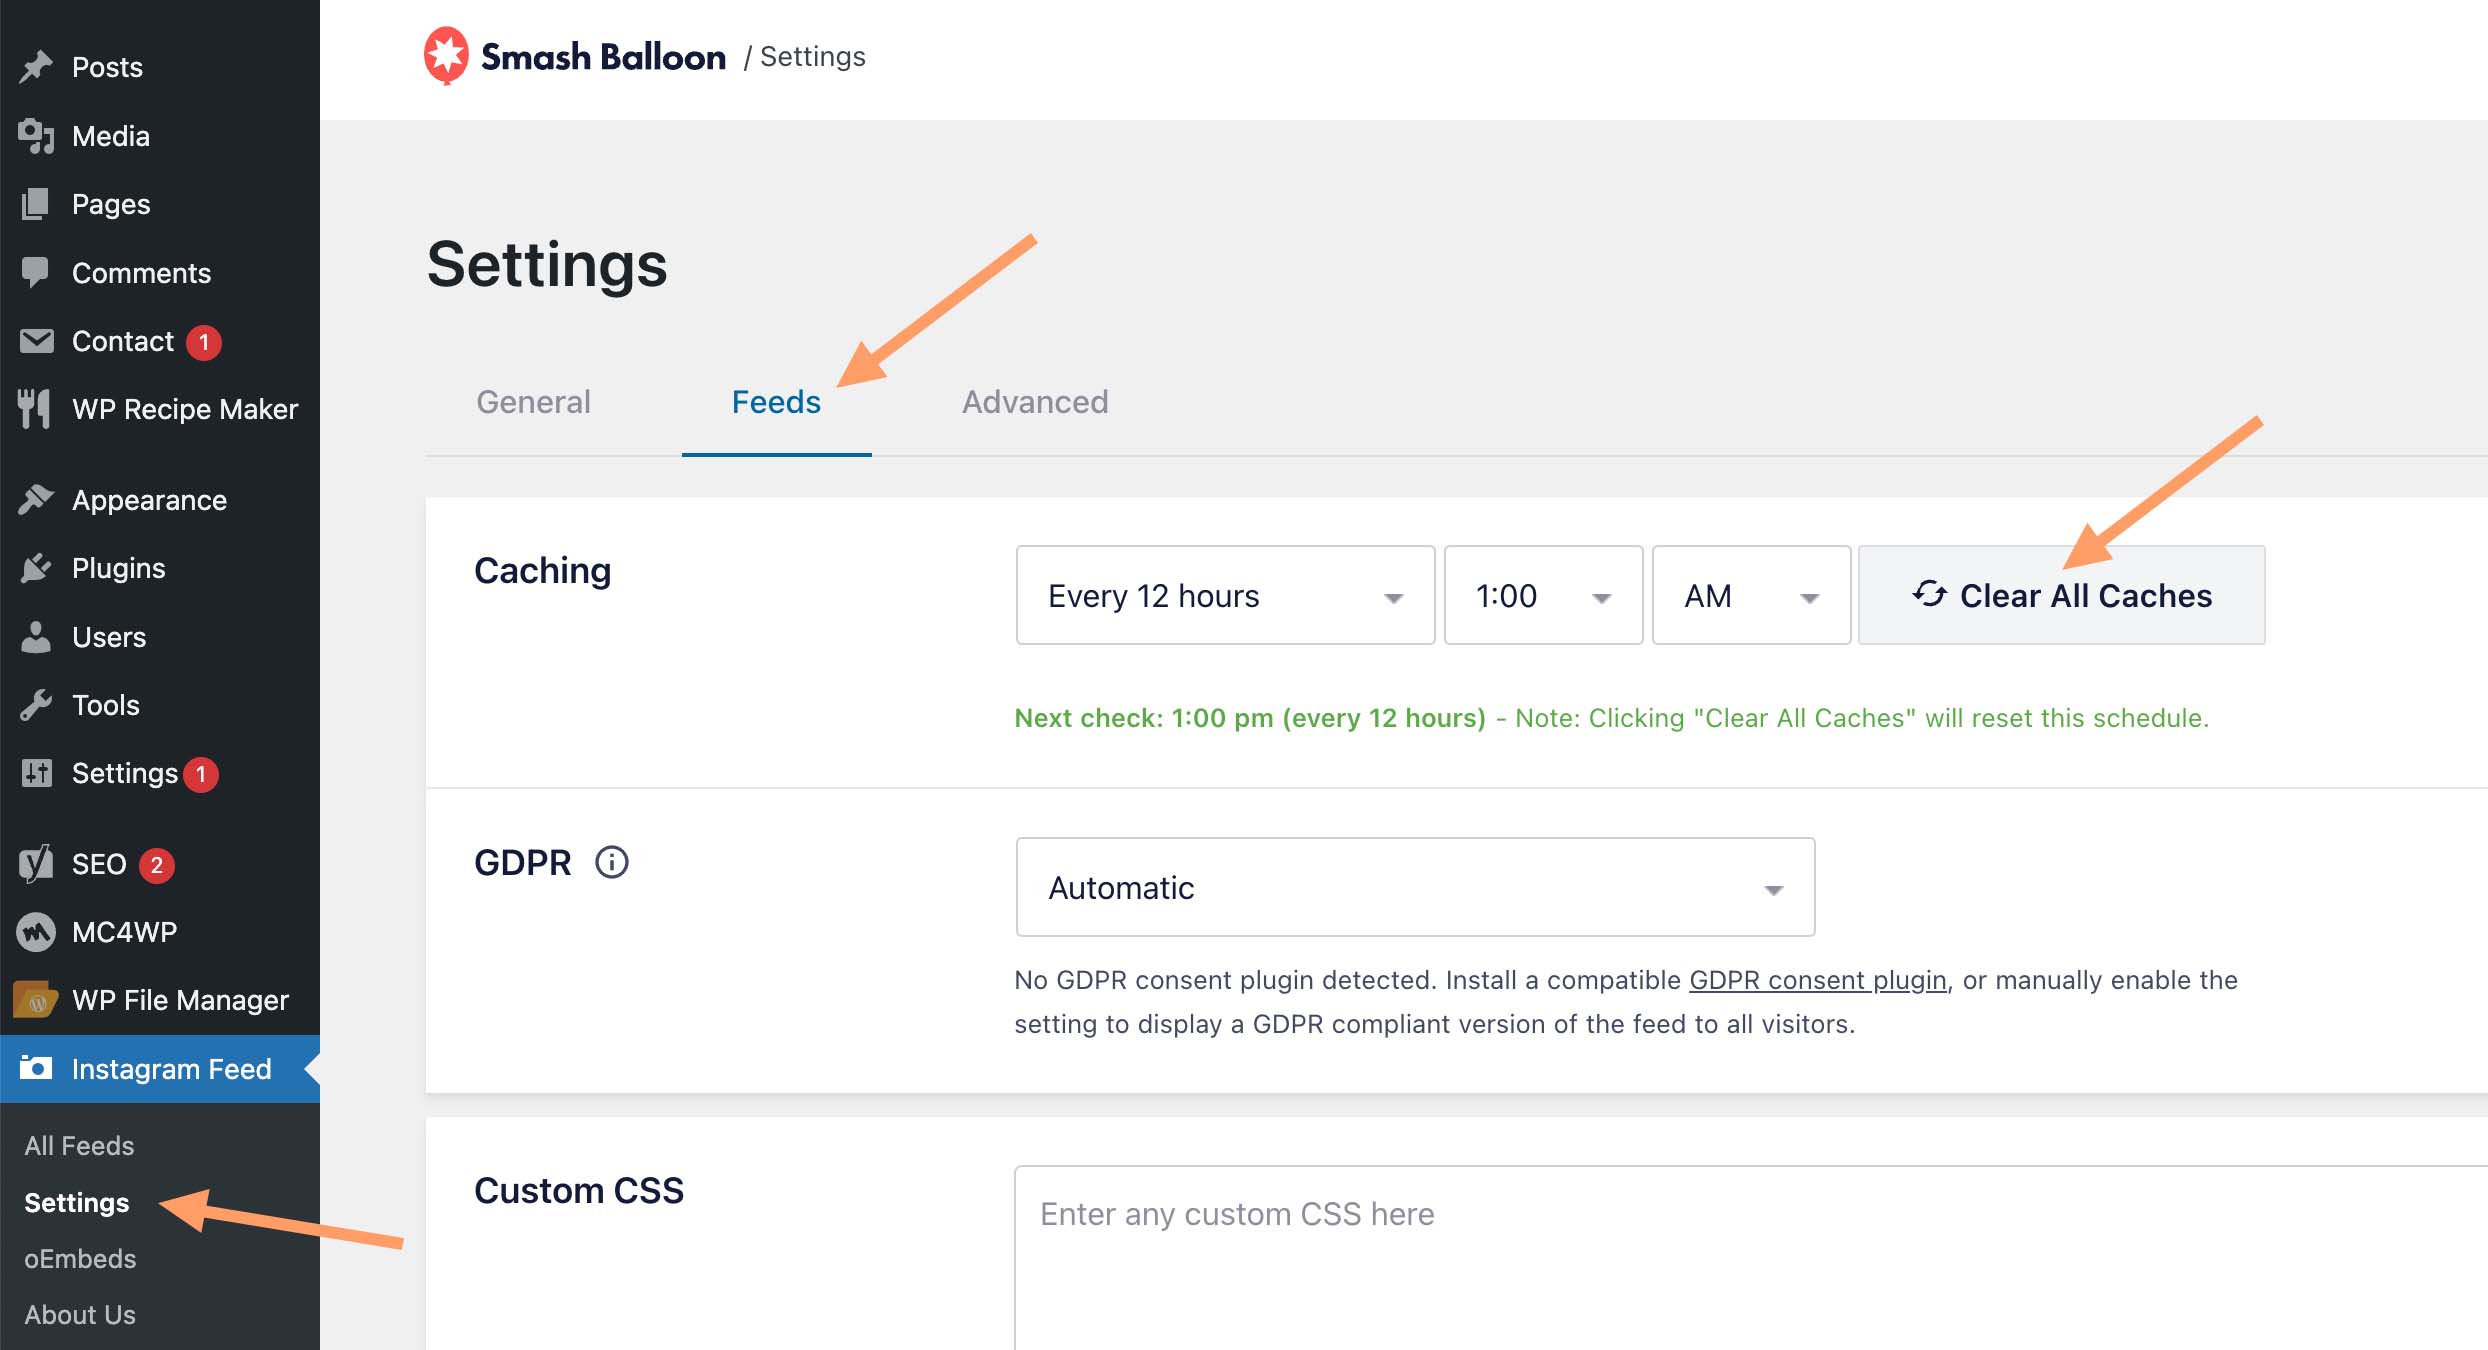
On your site dashboard, please navigate to Instagram Feed > Settings > Click the "Feed" tab, and then click the Clear All Caches button.
Instagram Feed Settings - Clear all caches
Then, please open the Customizer and navigate to General > Instagram > Click the "Clear Cache" button.
Now you can clear your website cache (if you are using any performance optimization / cache plugins), and clear the browser's cache, refresh the pages to check again.
If the problem persists, please contact our support team at Loft.Ocean Help Center and our support specialists will further assist you in investigating the issue
to find out the specific cause.
6.9 Button Shape
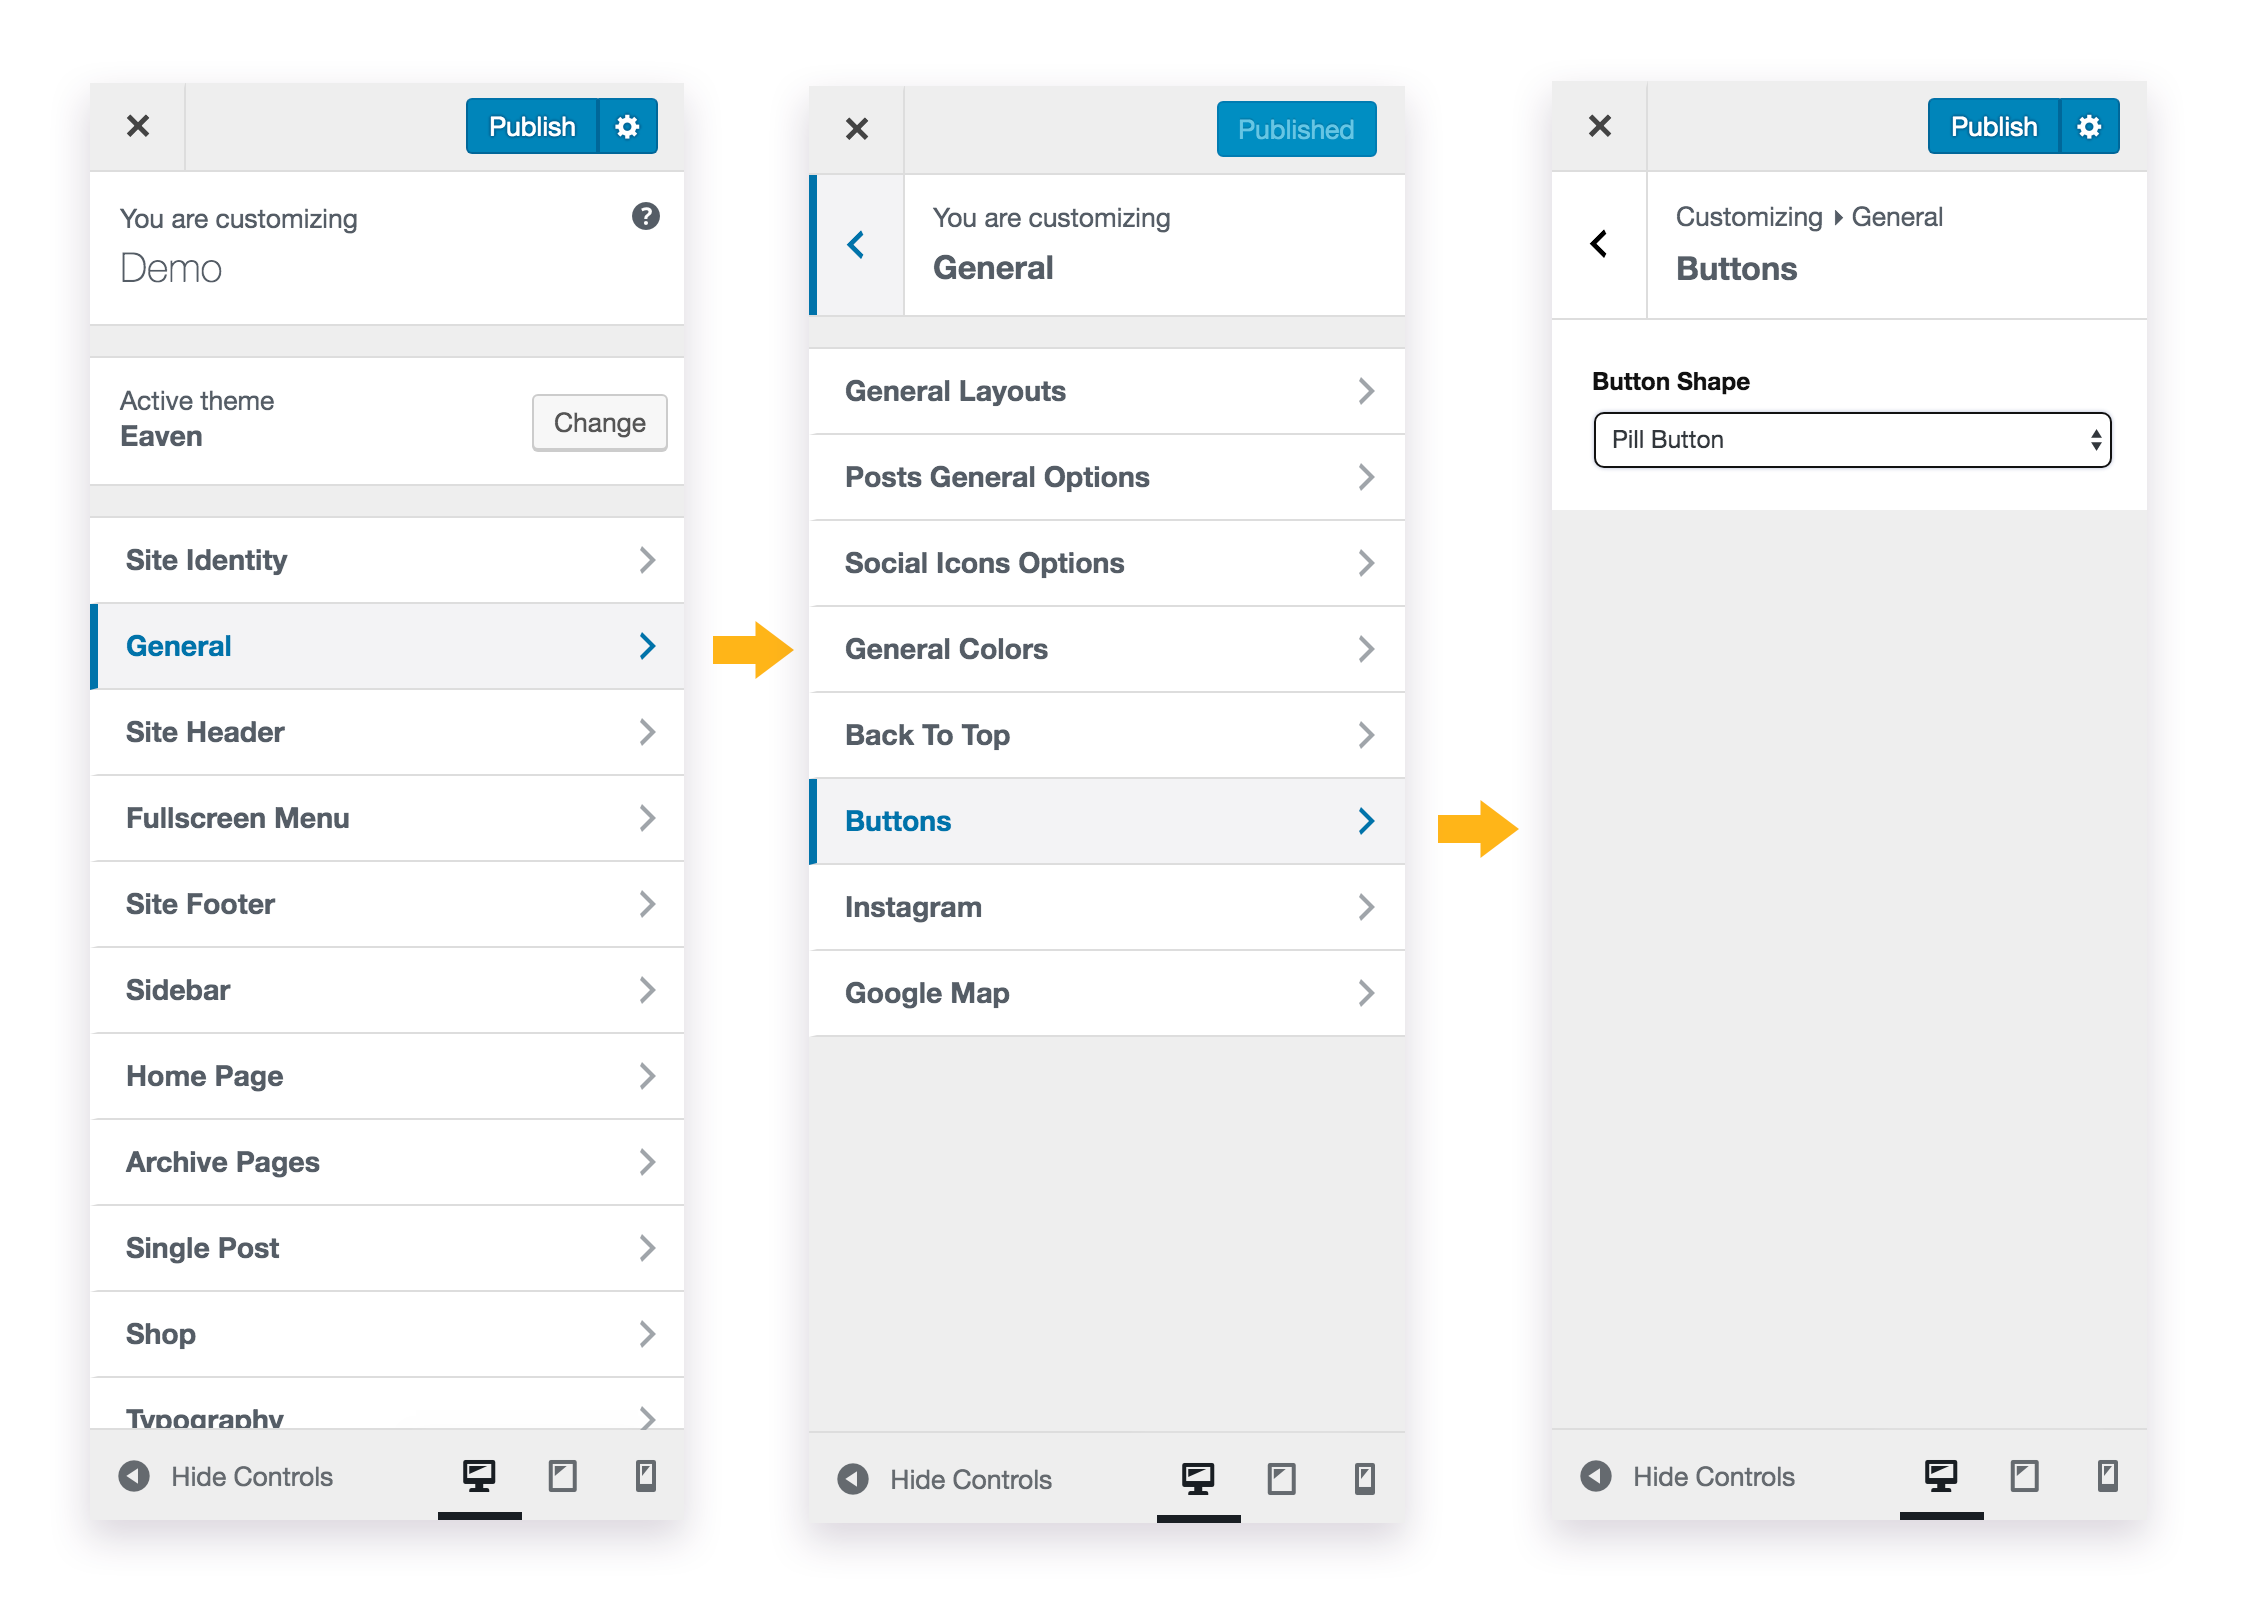
Since v1.2, you can change the shape of buttons.
Please open your WordPress Customizer, then go to General > Buttons, then select a button shape from the dropdown list.
Choose a button shape
There are 3 shapes to choose: Pill Button / Rectangle / Rounded Corner (border radius: 4px). This setting will be applied to the following buttons:
"Read More" button for each post in Post Archive List.
"Add to Cart" button for each product in Products Archive List.
Category Label Buttons for "Featured Categories" home widget and custom widget.
Please note: Some special buttons of WooCommerce will not be affected by this settings, such as "Process to Checkout" on Cart page,
"Continue to Payment" on Checkout page, "Add to Cart" button on single product page.
6.10 Advertisement
Eaven theme provides many built-in places for inserting and displaying ads and banners. You can add custom banner images with URL, or display
Google Ads by adding the ad code.
1. On the homepage
You can add multiple ads and banners on the homepage by adding the "Ad Banner"Home Widget.
Home Widget - Ad Banner
Home widgets are only available for Multi-content Homepage. You can find more details here.
2. In Widget Areas
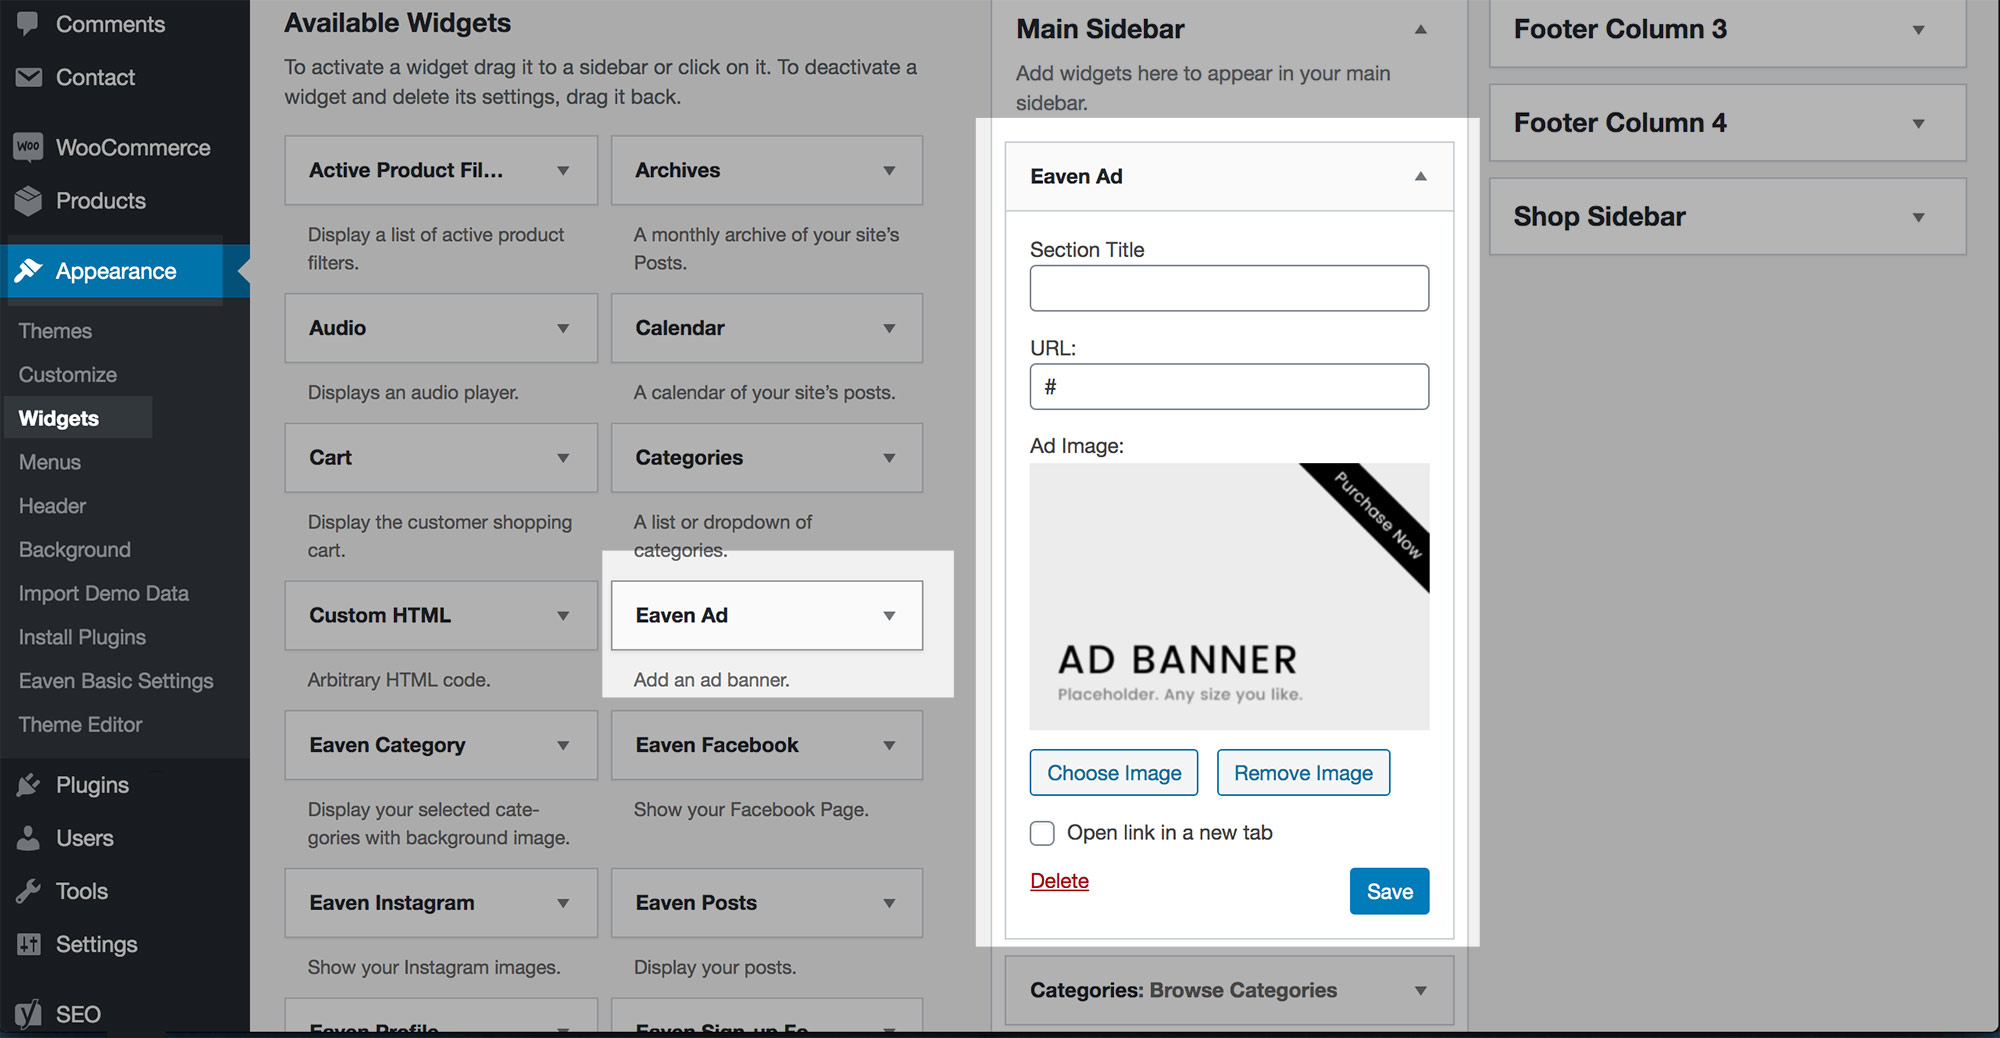
Ads and banners can also be added into the widget areas (sidebar, or widget column in site footer) with the custom widget "Eaven Ad".
Custom Widget - Eaven Ad
If you'd like to insert ad code (Google Ads) to the widget areas, please use the Custom HTML widget to add code.
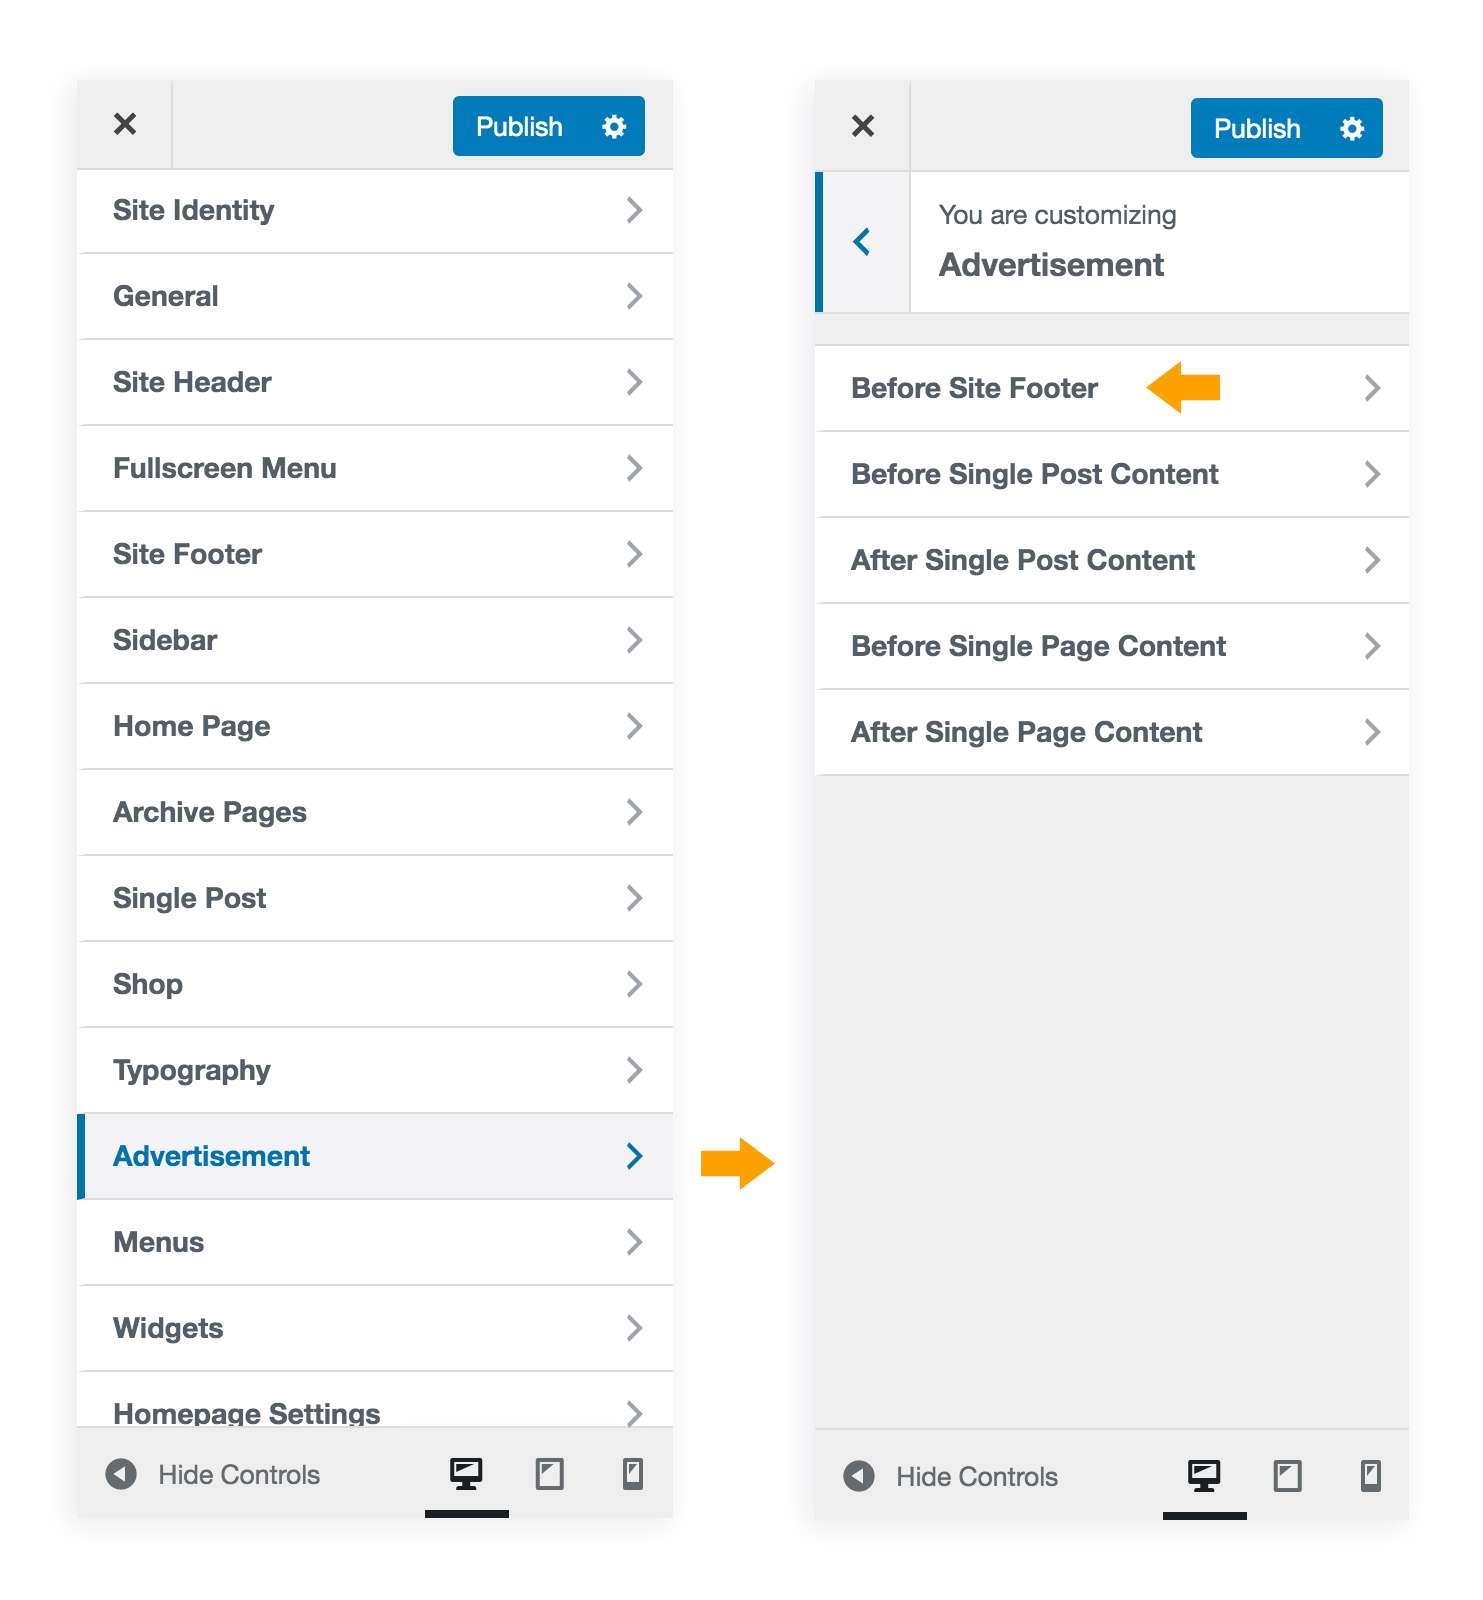
3. Before Site Footer
In the customizer, please go to "Advertisement" sub section, here you can add advertisement to different places.
When adding advertisement to "Before Site Footer" sub section, this advertisement will display before the site footer on every page of your website.
Places for Advertisement
4. On Single Post
Also in the customizer > "Advertisement" sub section, you can add advertisement to:
Before single post content
After single post content
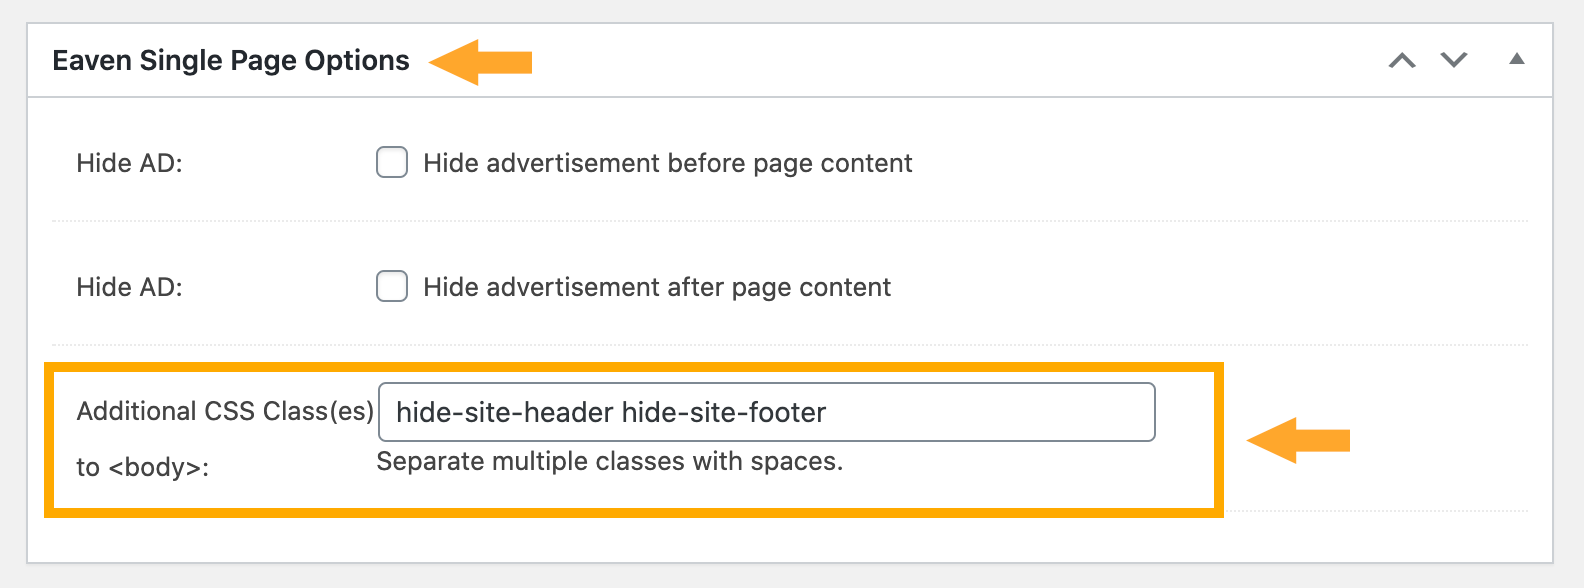
5. On Single Page
Also in the customizer > "Advertisement" sub section, you can add advertisement to:
Before single page content
After single page content
6.11 Yoast SEO Breadcrumbs
New Feature added in v1.13
You can display the Yoast SEO breadcrumbs on your website. Breadcrumbs are a way to help your users better navigate your site and its structure. Additionally, they can appear on Google and provide a better user experience.
Please note: this feature is provided by the third party plugin Yoast SEO. If you have any questions or problems while using this feature, please contact Yoast SEO Support for further help.
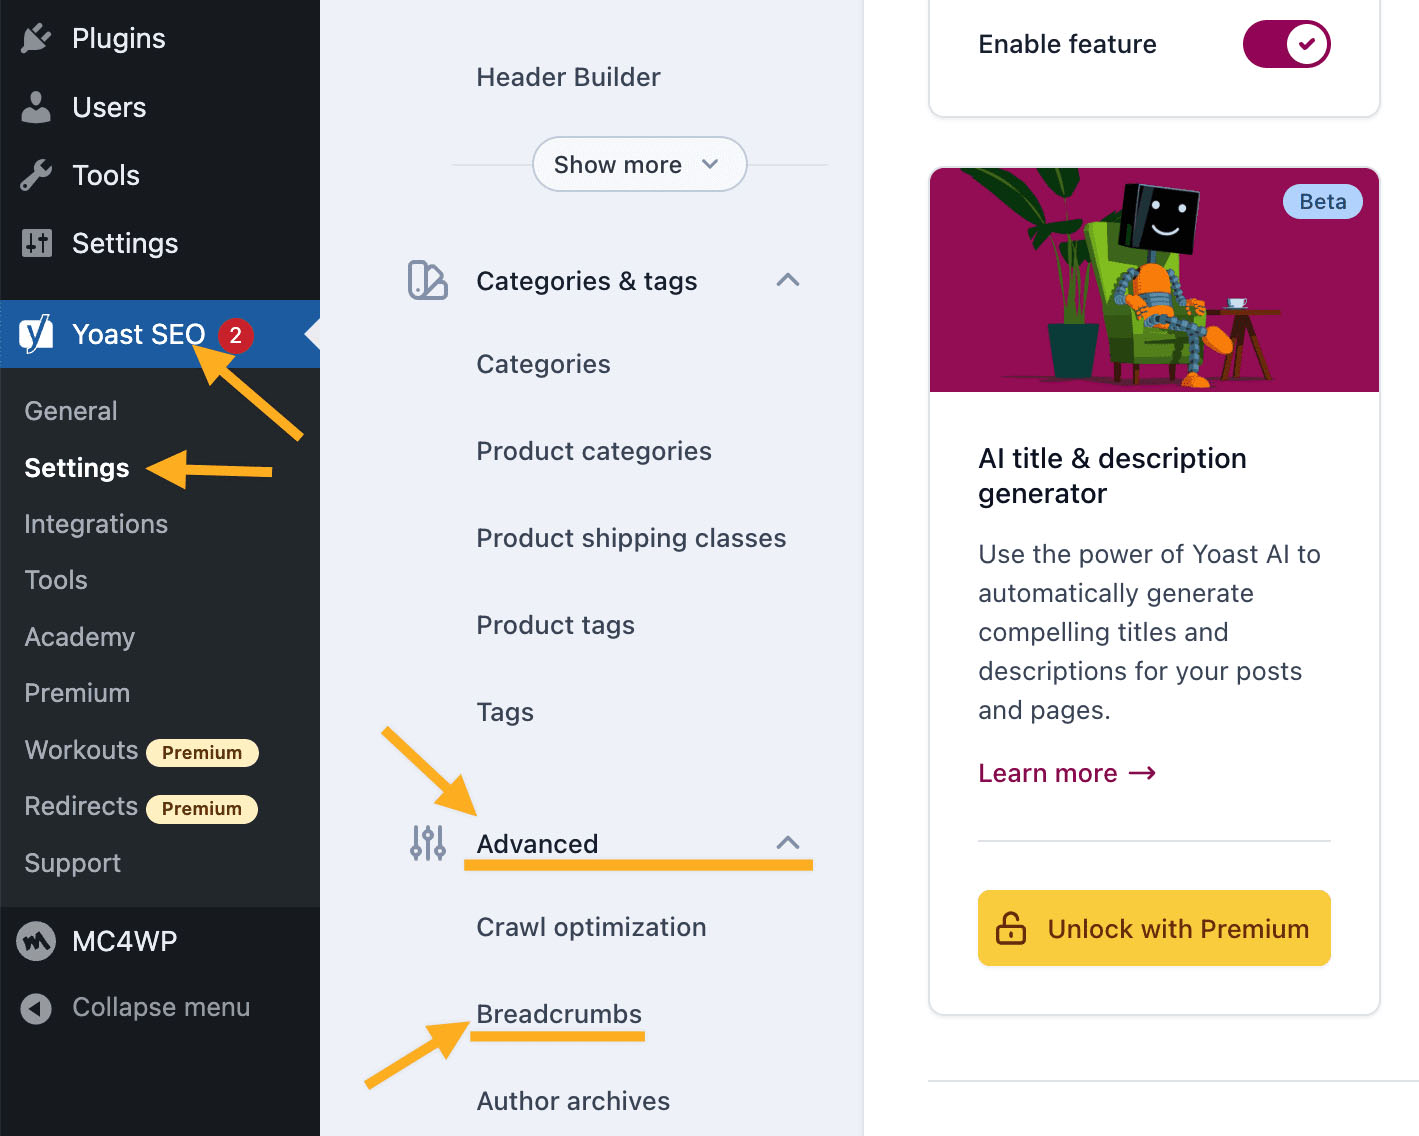
Please install and activate the third party plugin Yoast SEO.
On your website dashboard, please navigate to Yoast SEO > Settings > Advanced, click it to expand and then find Breadcrumbs.
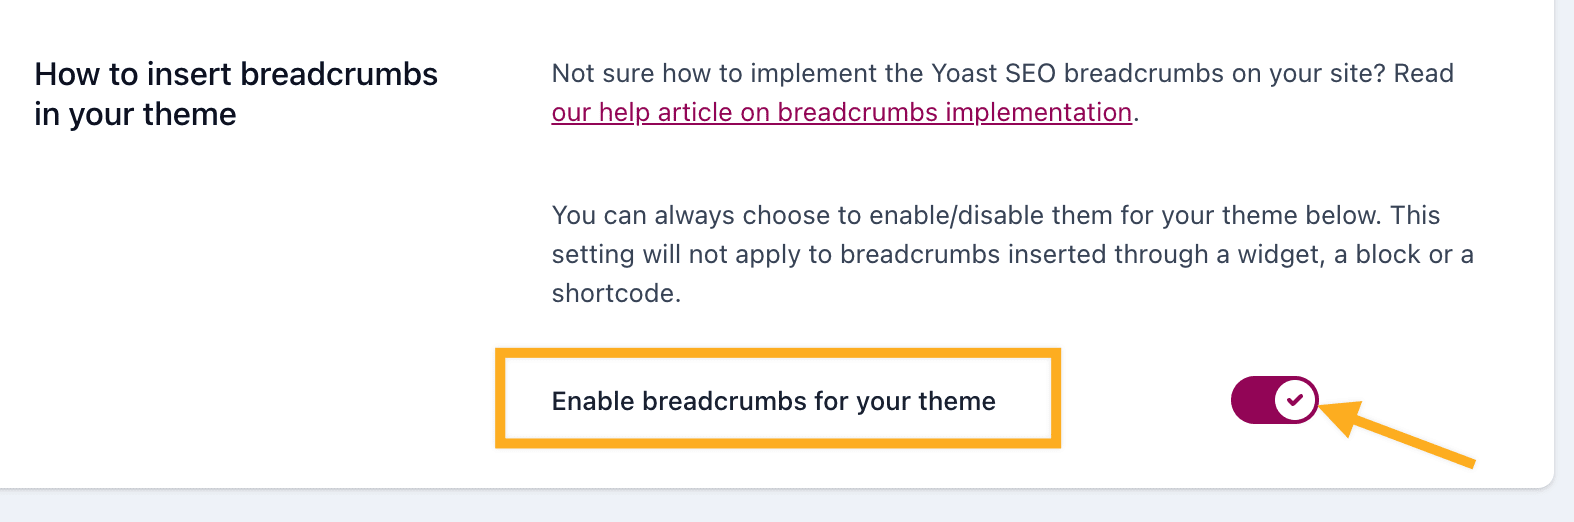
Scroll down to the bottom of the screen and toggle the switch behind “Enable breadcrumbs for your theme“.
After enabling this feature, Yoast SEO will show the Breadcrumbs as JSON-LD in the source code of each page/post. It will display in Google search results for better SEO. However, when visitors browse your website, they won’t see the breadcrumbs (but this will not affect your website SEO).
If you would like to display Yoast SEO breadcrums on single pages/posts and archive pages, please open the WordPress Customizer and navigate to General > Breadcrumbs and enable the option: Show Yoast SEO breadcrumbs.
7. Menu
7.1 Manage Your Menus
Eaven theme supports 4 menu locations:
Primary Menu
Social Menu
Primary Left Menu for Site Header Layout 4 (added since v1.1).
Primary Right Menu for Site Header Layout 4 (added since v1.1).
To manage site menus, we need to locate the WordPress Menus panel.
On your website admin panel, go to Appearance > Menus.
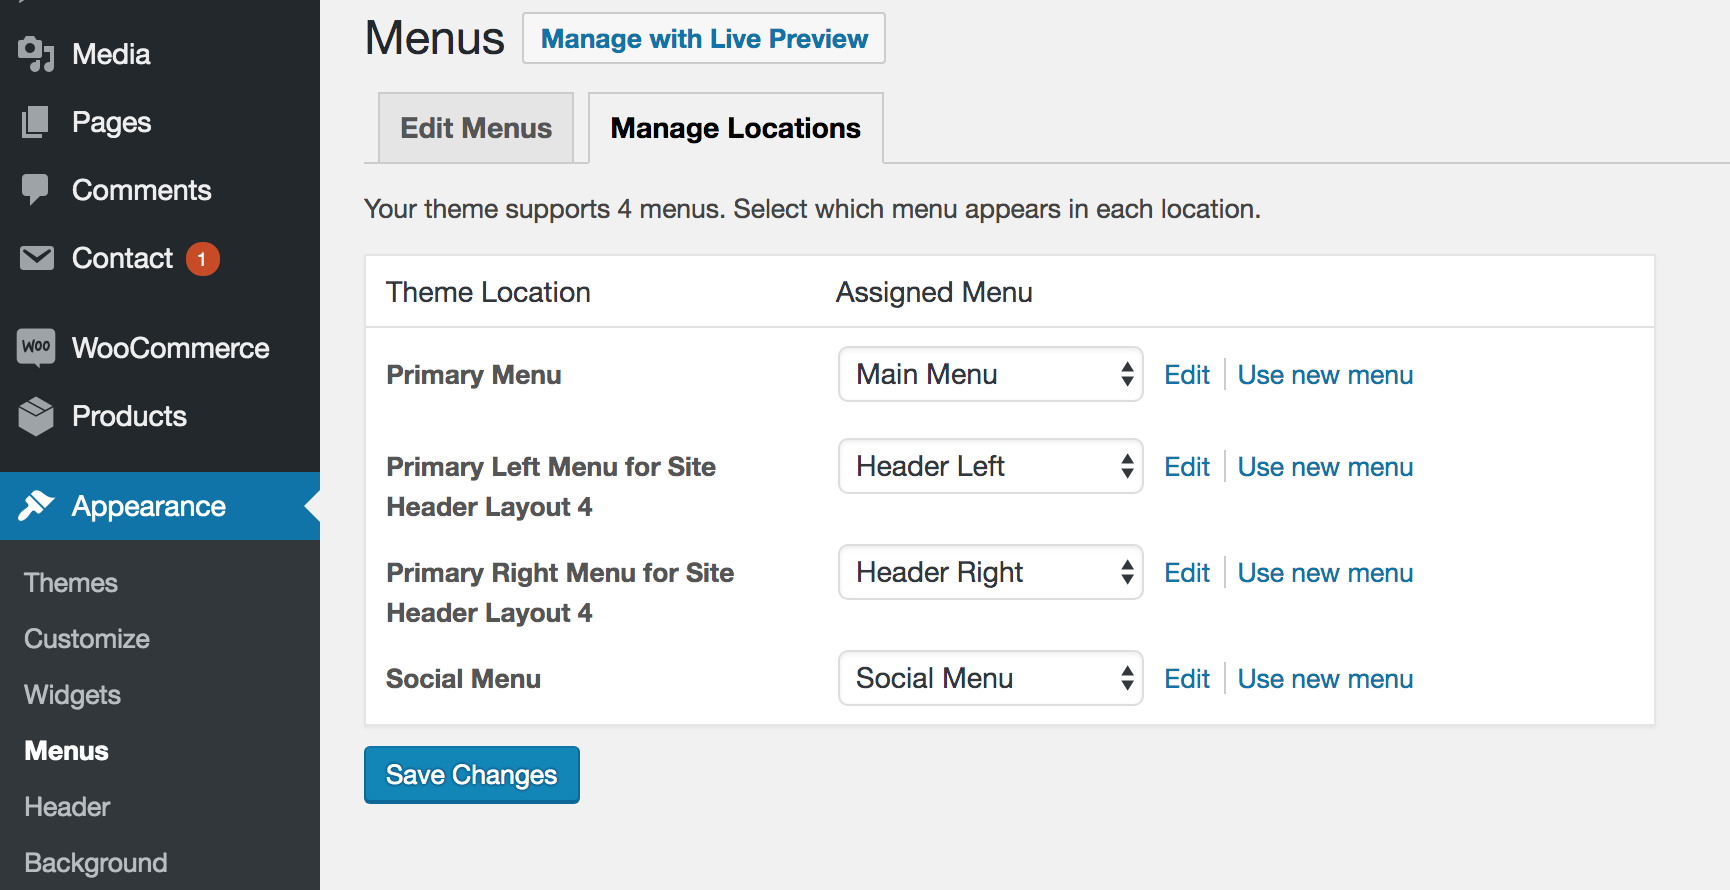
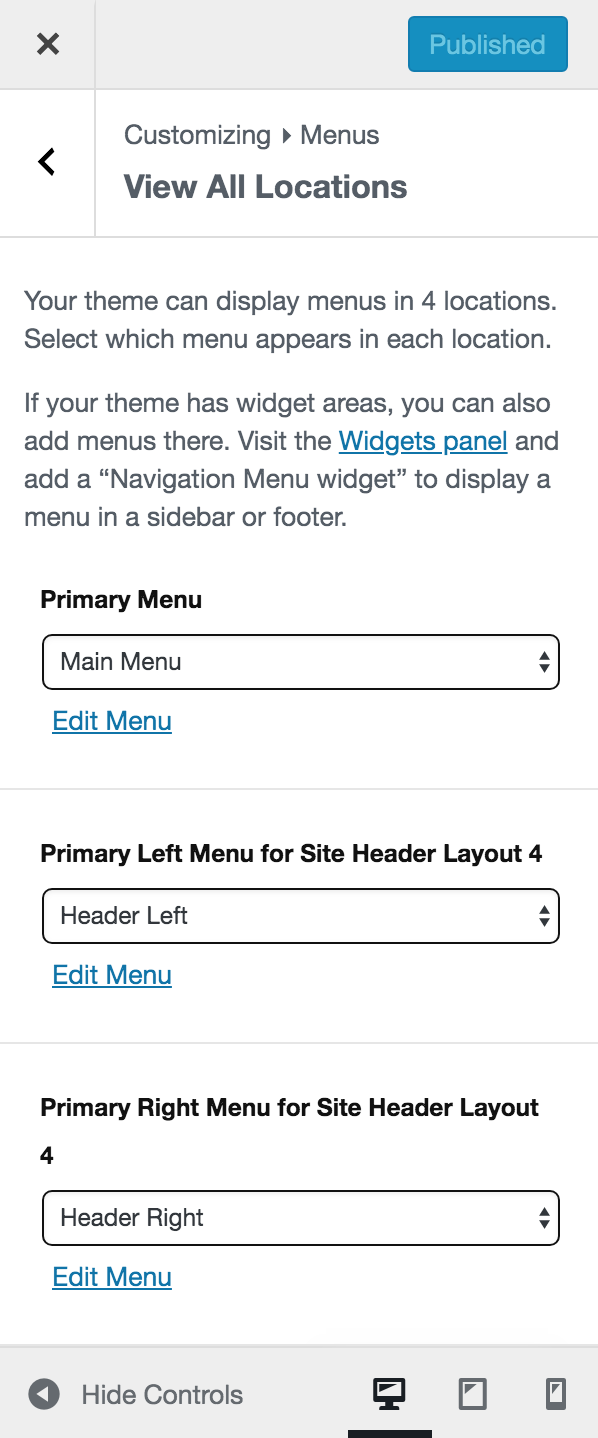
You will find there are 2 tabs: Edit Menus & Manage Locations.
On the Edit Menus tab, you can create menus and add items into it.
On the Manage Locations tab, you can select which menu appears in each location.
Manage menu locations.
And you can also manage menus in the customizer (Appearance > Customize > Menus).
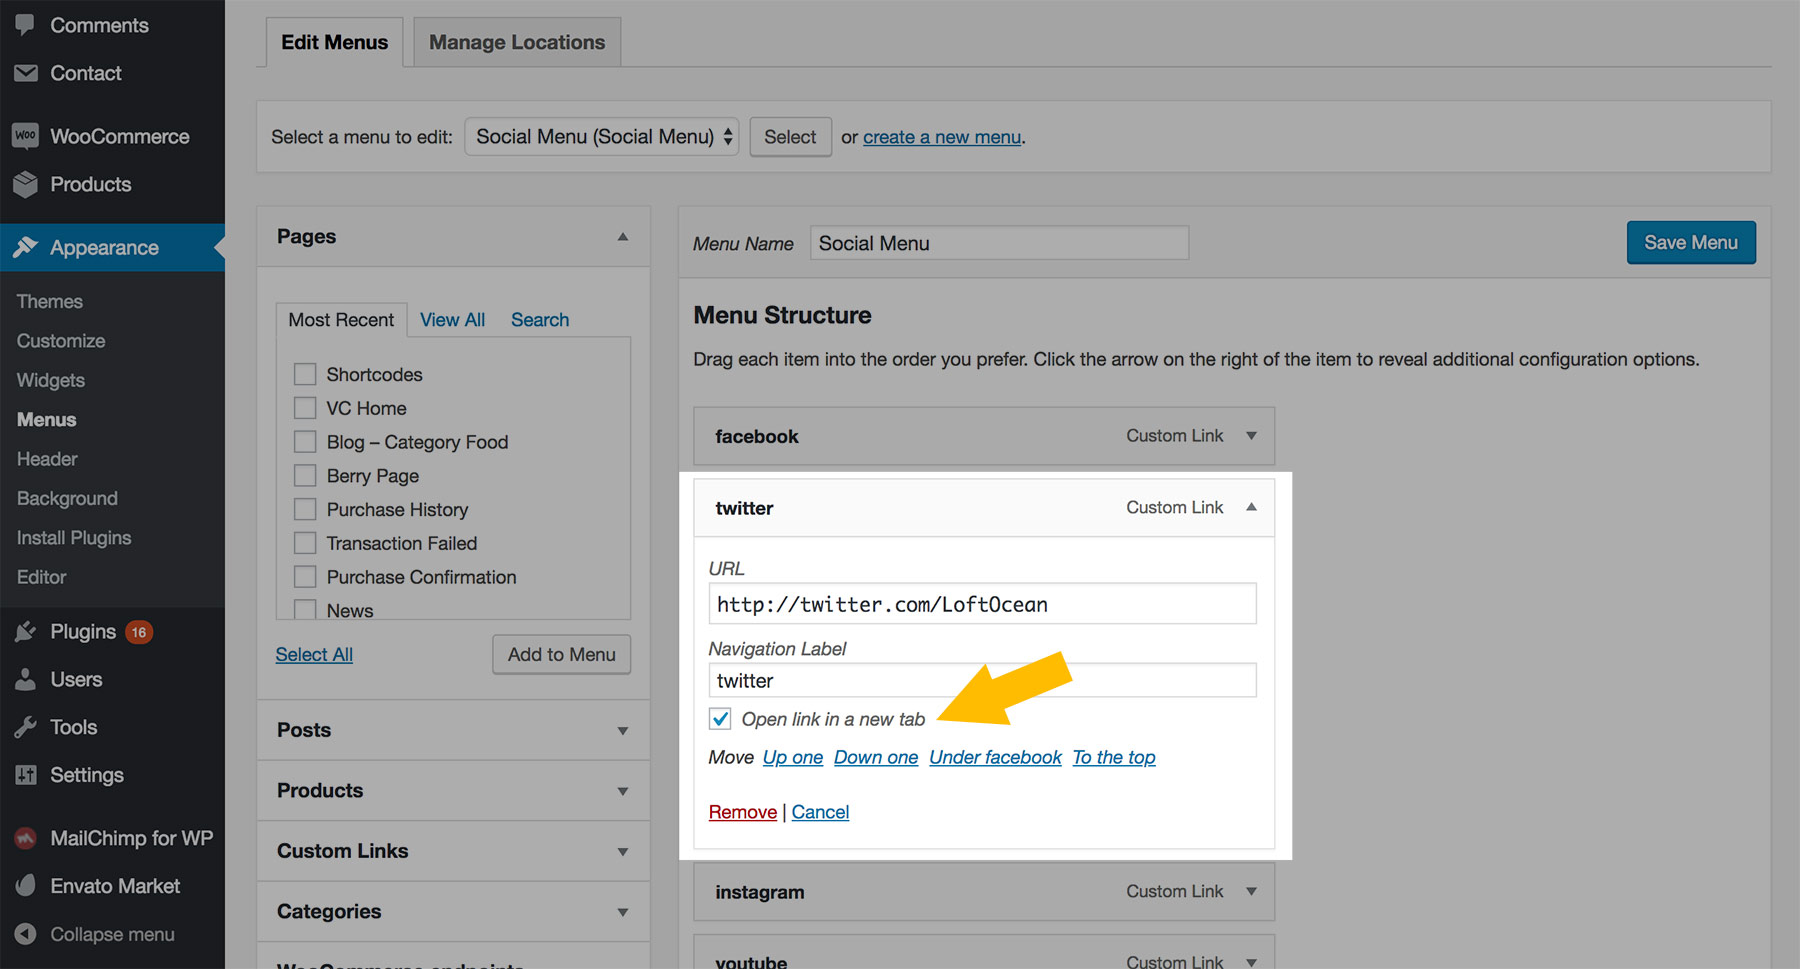
When editing a menu item, check the box of "Open link in a new tab".
Open link in a new tab.
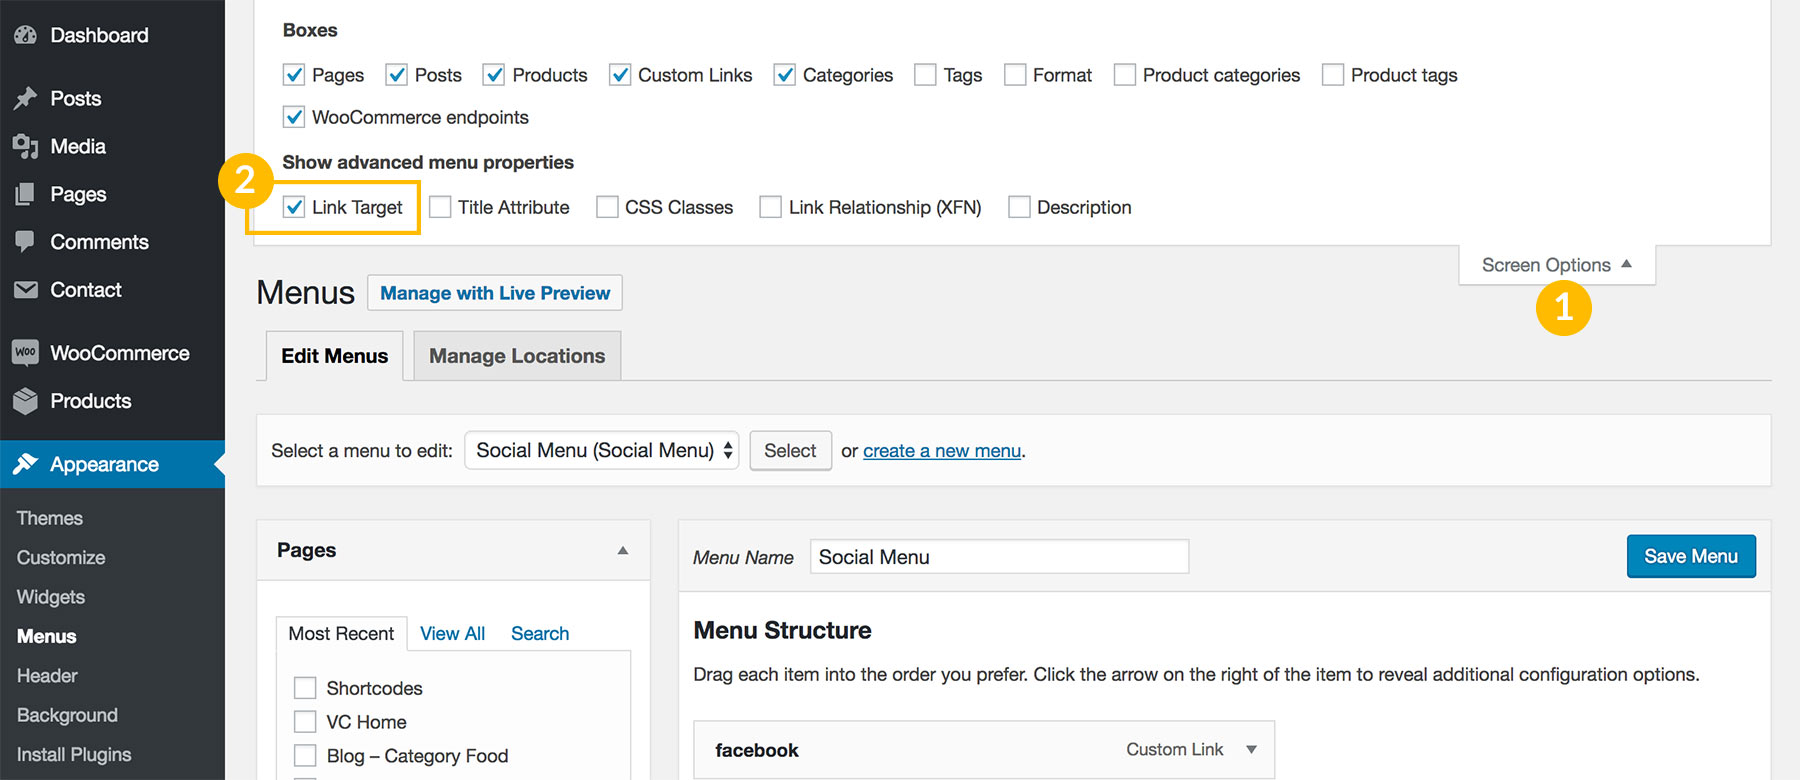
If you can't find the option, it is most likely hidden by default. Please scroll up to the top of the screen, and click the Screen Options,
then make sure the Link Target box is checked.
Enable Link Target Option
7.2 Primary Menu
The Primary Menu will be displayed in the site header when site header layout is Header Layout 1/2/3.
On your website dashboard, go to Appearance > Menus > Edit Menus.
Create a new menu. Give it a name, for example, "Main Menu". Then click on the "Create Menu" button. And add some items into it.
Find "Menu Settings" option > "Theme locations", check the box before "Primary Menu".
Click on "Save Menu" button.
The primary menu is at most 4-level-deep (Updated since version 1.9.0).
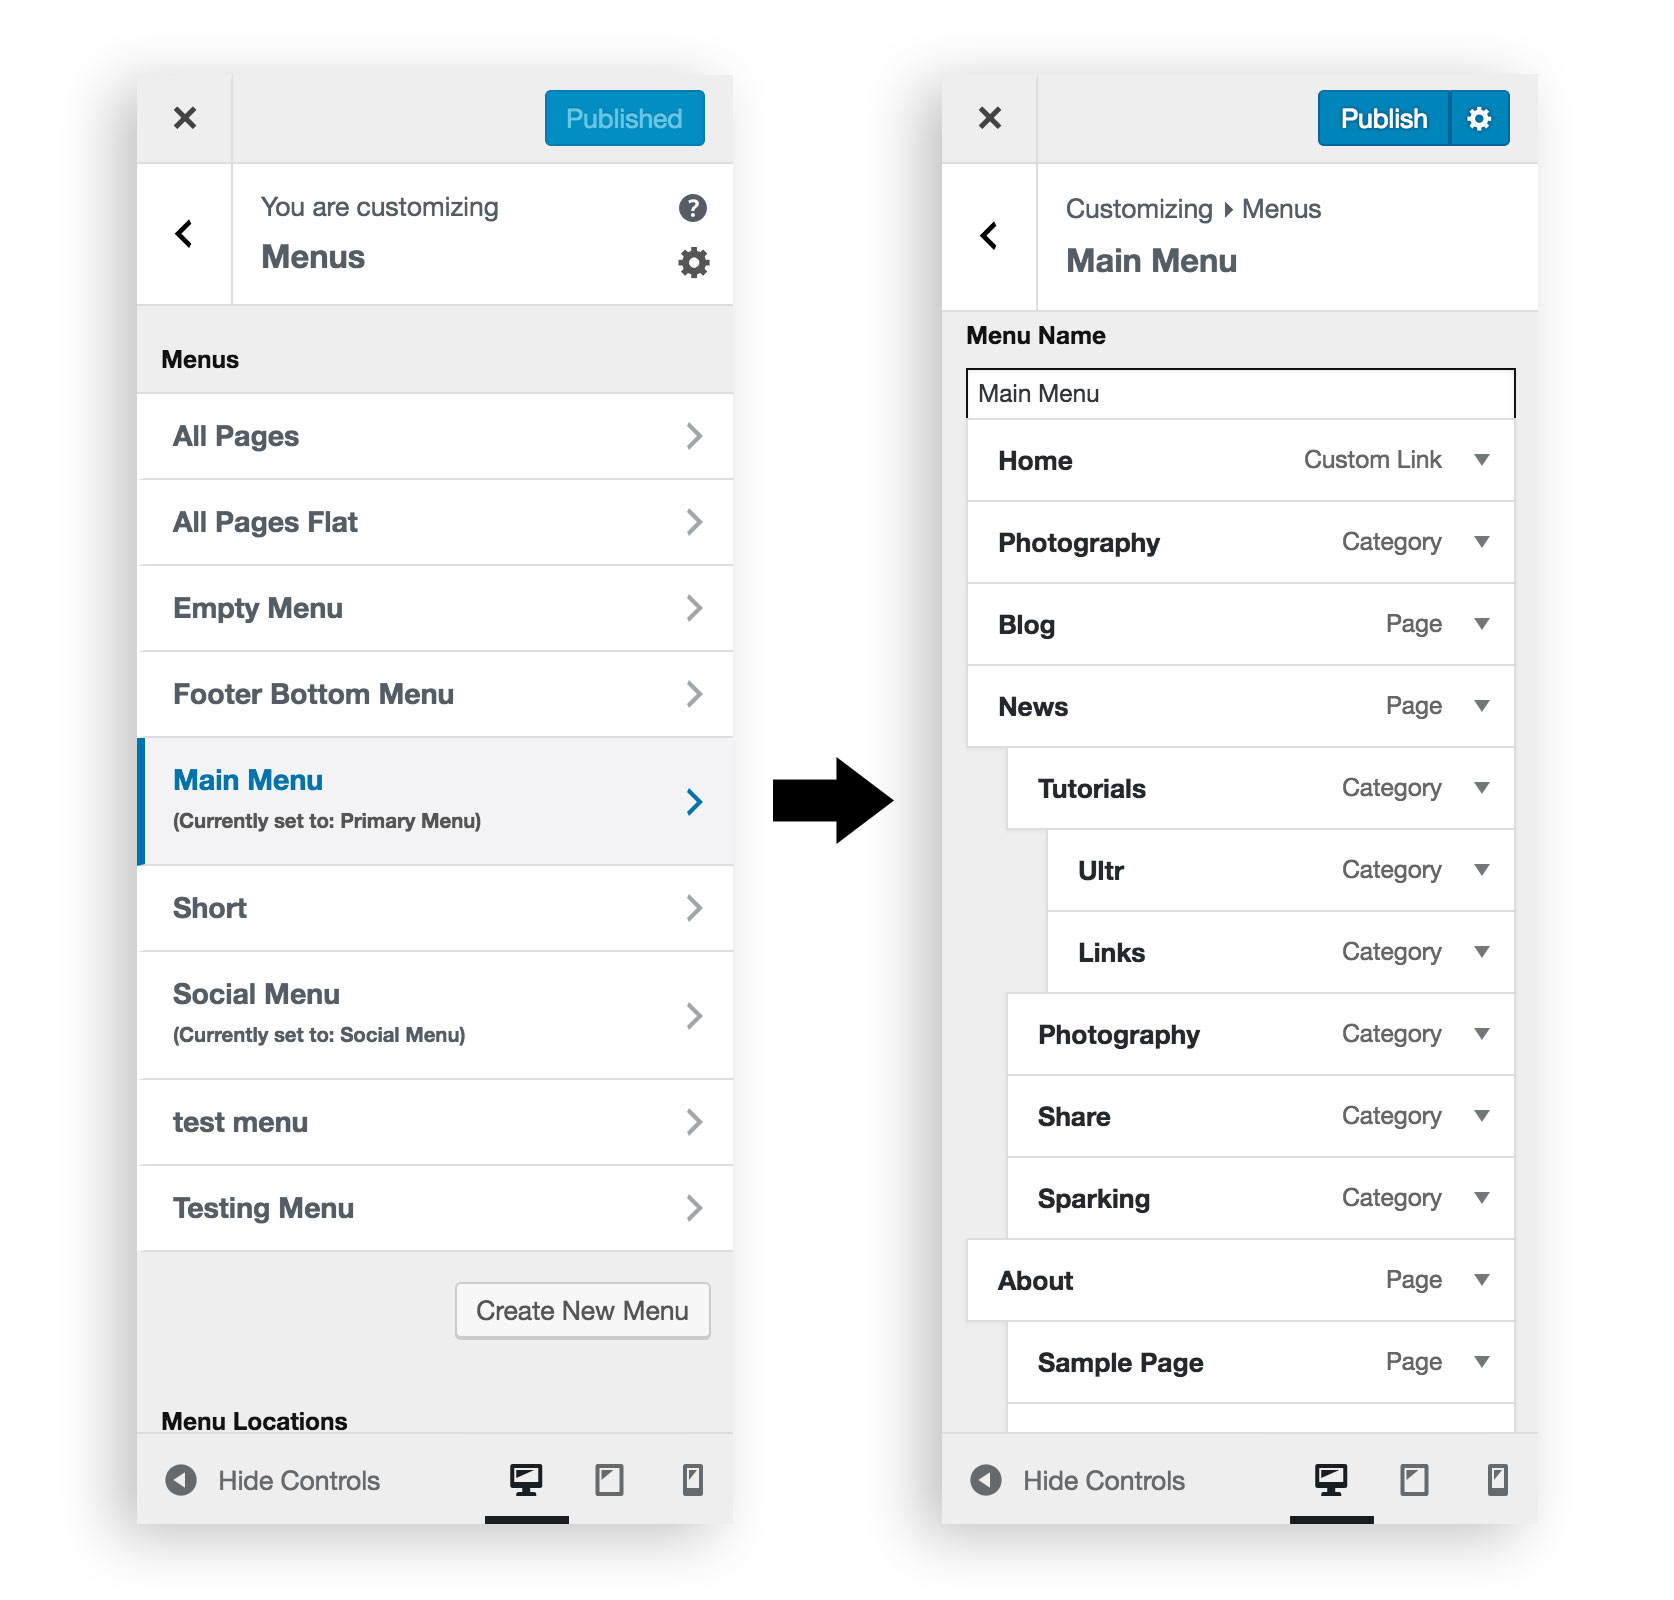
And you can also manage your primary menu in the customizer (Appearance > Customize > Menus > find the Primary Menu).
Manage Primary Menu in customizer
7.3 Menu for Site Header Layout 4
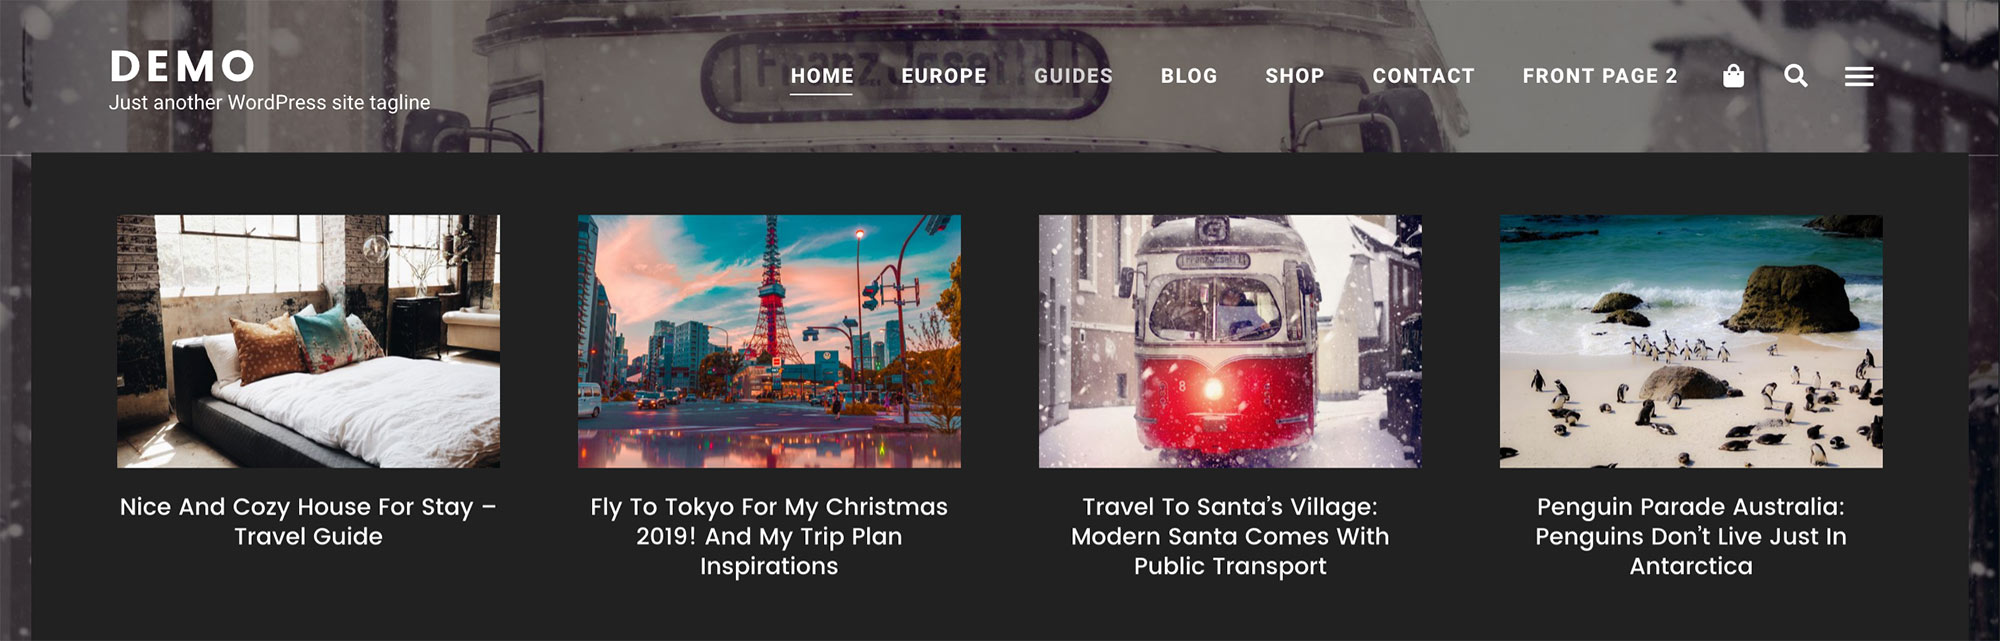
Since Eaven v1.1, a new site header layout has been added: Header Layout 4. When selecting this layout,
there will be 2 menus shown next to the site branding (logo/site title/tagline).
Site Header Layout 4
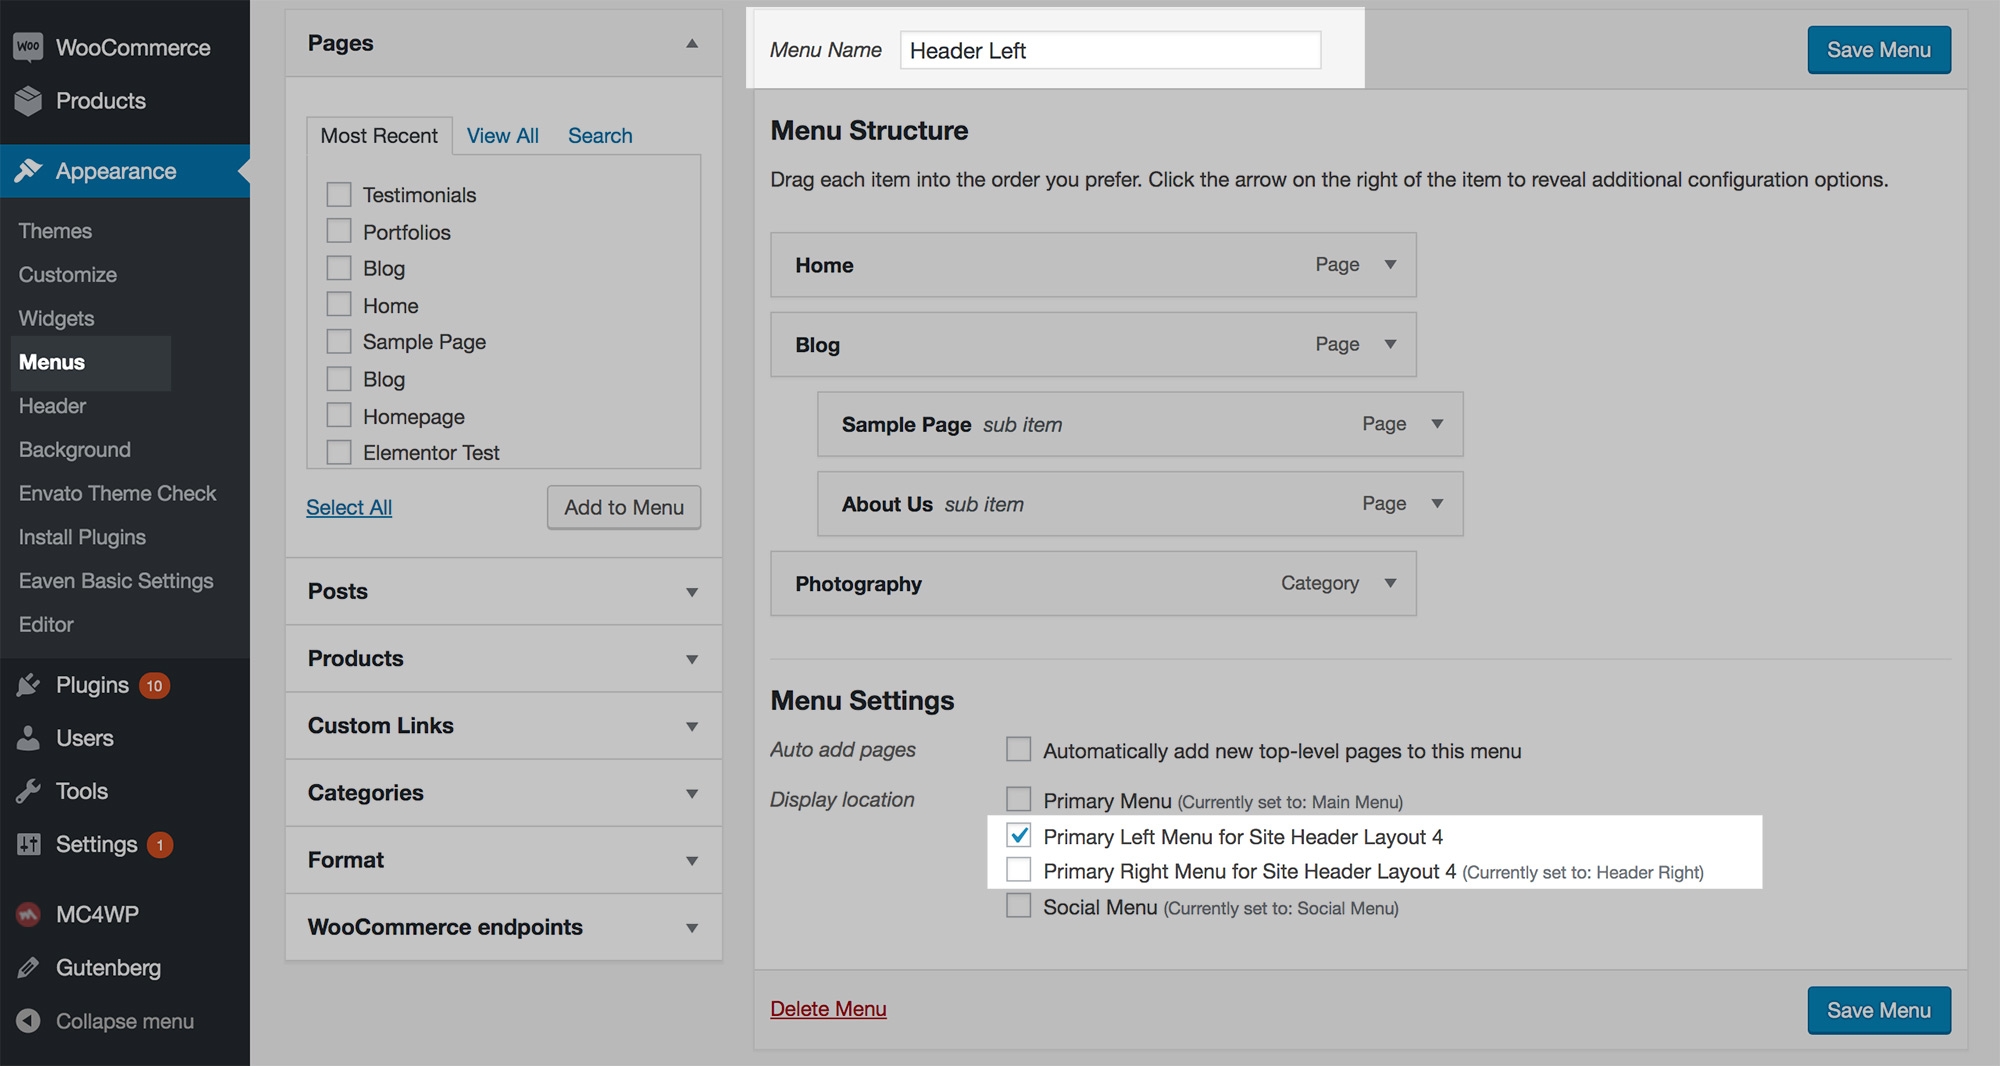
Therefore, you need to create 2 new menus, such as "Header Left Menu" and "Header Right Menu", then choose
"Primary Left Menu for Site Header Layout 4" and "Primary Right Menu for Site Header Layout 4"
as menu locations.
Create 2 menus and choose menu locations
The Primary Menu will be shown in the fullscreen menu on mobile devices. So please don't forget to assign a menu to this menu location.
7.4 Social Menu
The Social Menu can be used in 5 places:
In the sidebar - Eaven Social widget;
In the site footer widget column - Eaven Social widget;
In the site footer bottom area;
In the fullscreen menu;
In the site header.
Please follow the instructions below to create your social menu:
On your website dashboard, go to Appearance > Menus > Edit Menus.
Create a new menu. Give it a name, for example, "Social Menu". Then click on the "Create Menu" button.
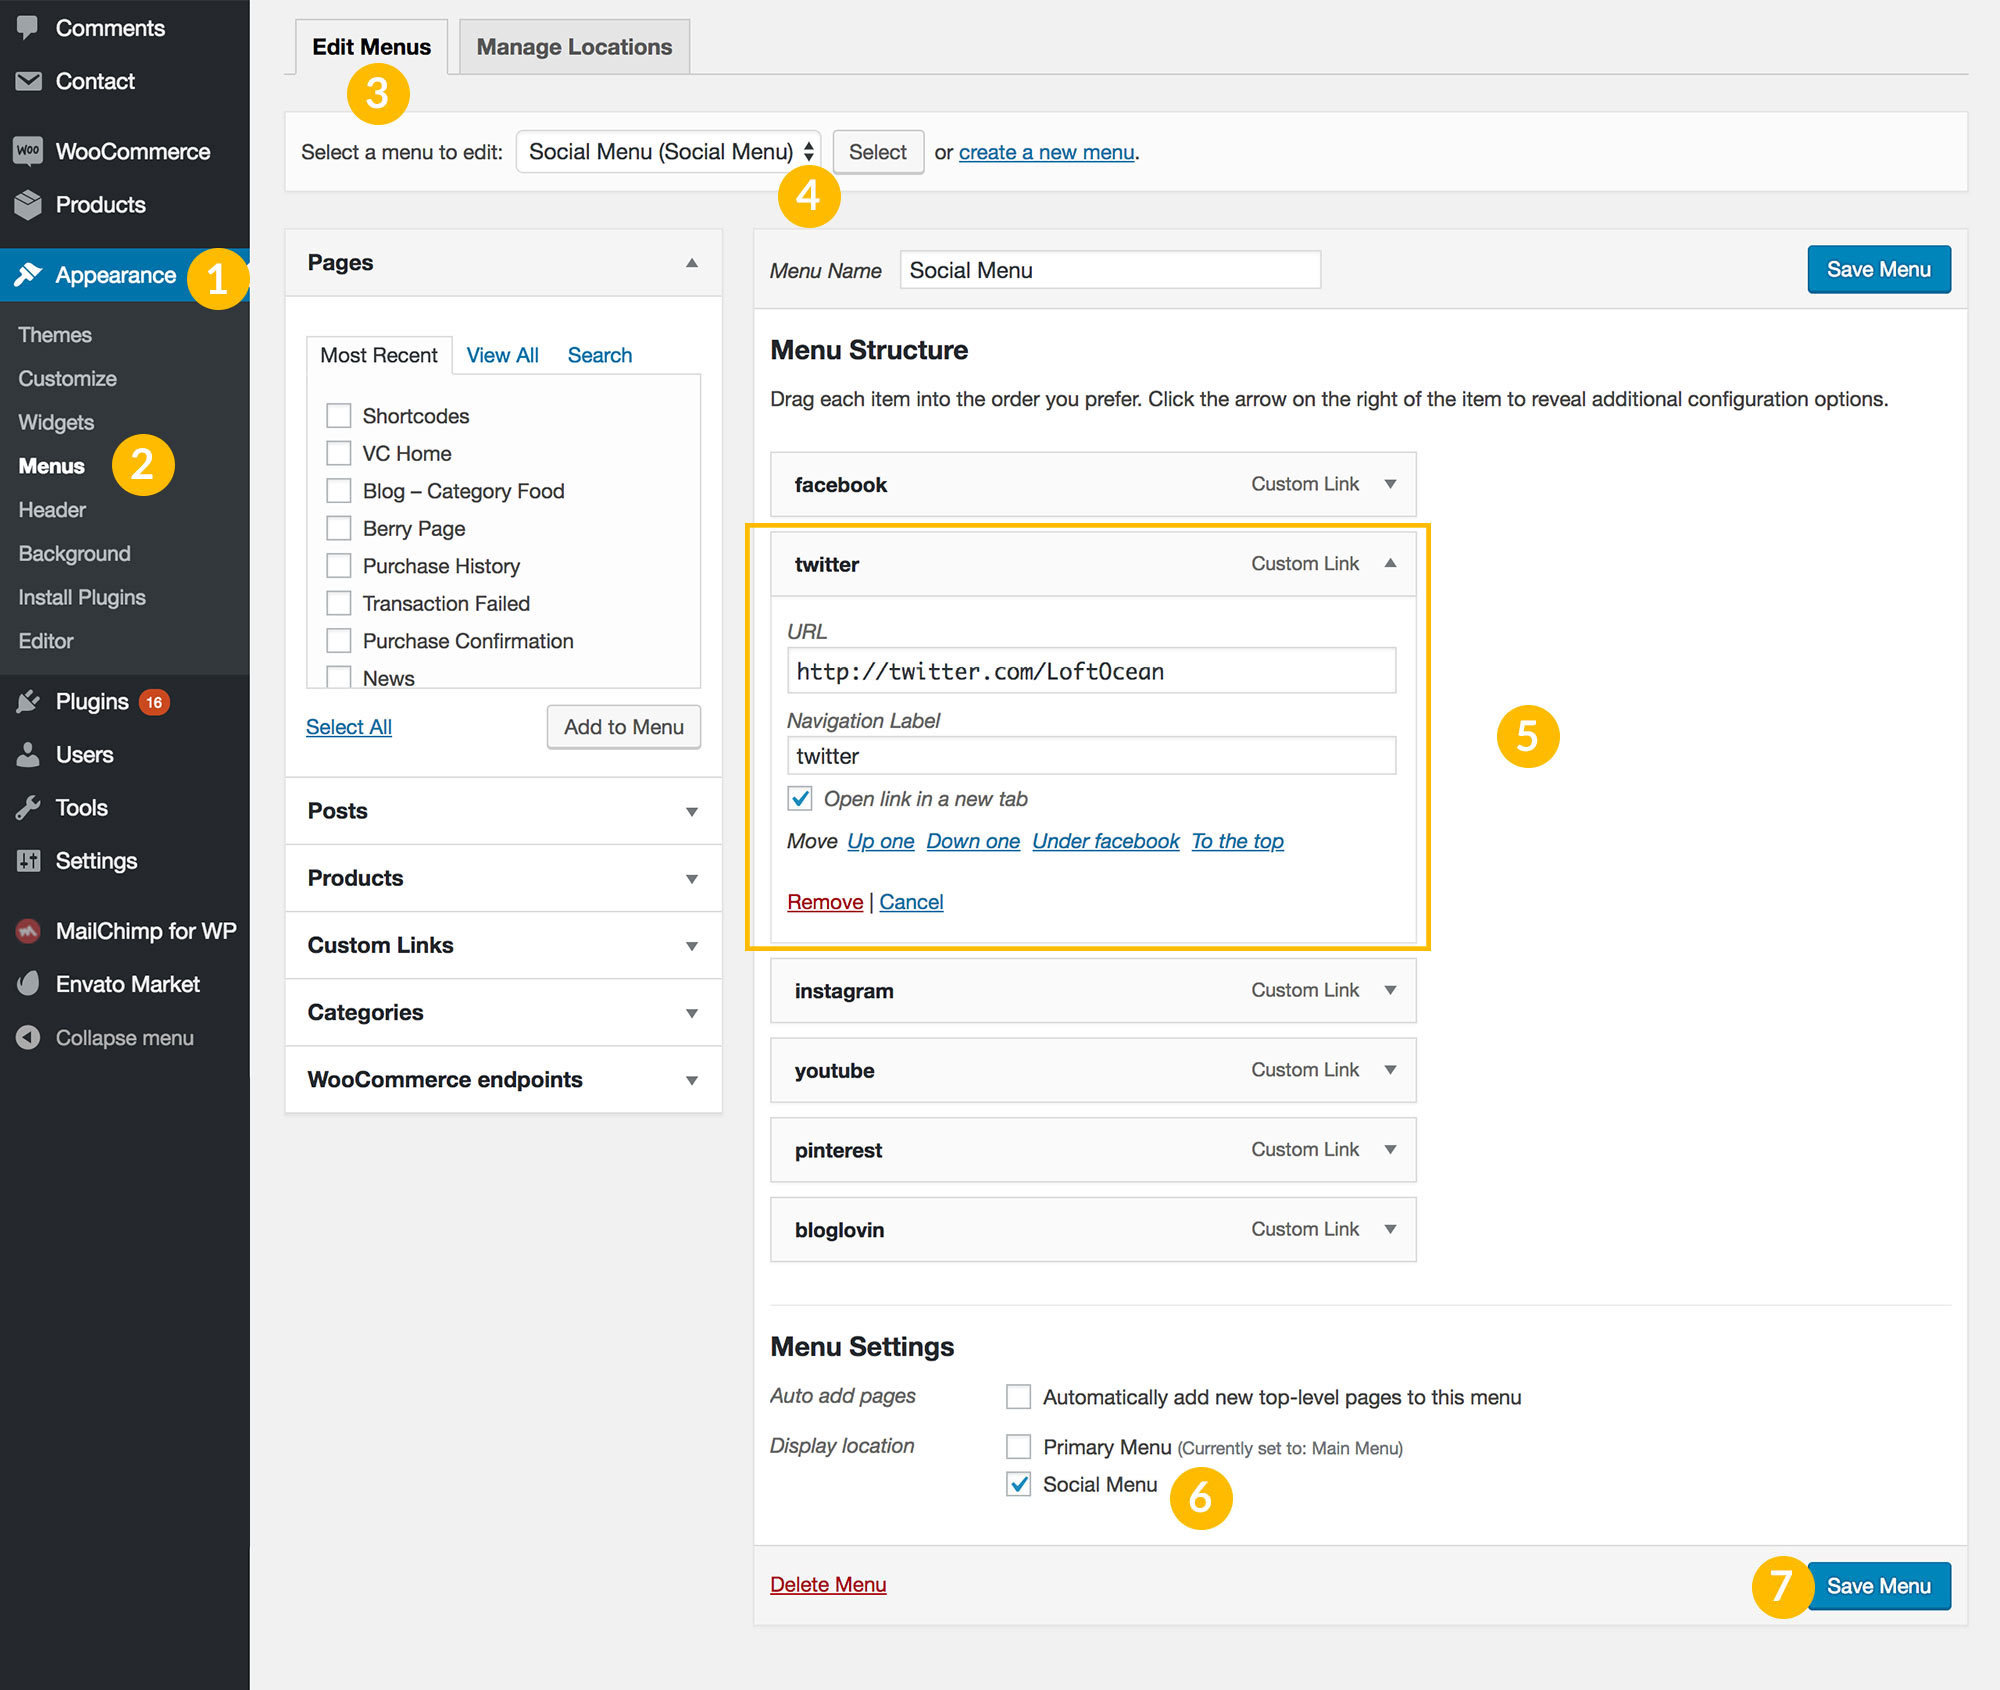
Find "Custom Links" on the left. Enter the link of your social media site, for example, "https://twitter.com/LoftOcean". And you can also enter some text into "Link Text" field, it's optional,
and you can enter any text here. Just need to give a correct URL. Click "Add to Menu" button.
Repeat to enter your other social media sites' links.
Find "Menu Settings" option > "Theme locations", check the box before "Social Menu".
Click on "Save Menu" button.
Please see the screenshot of editing the social menu as reference:
Manage Social Menu
Now your social menu is ready to use.
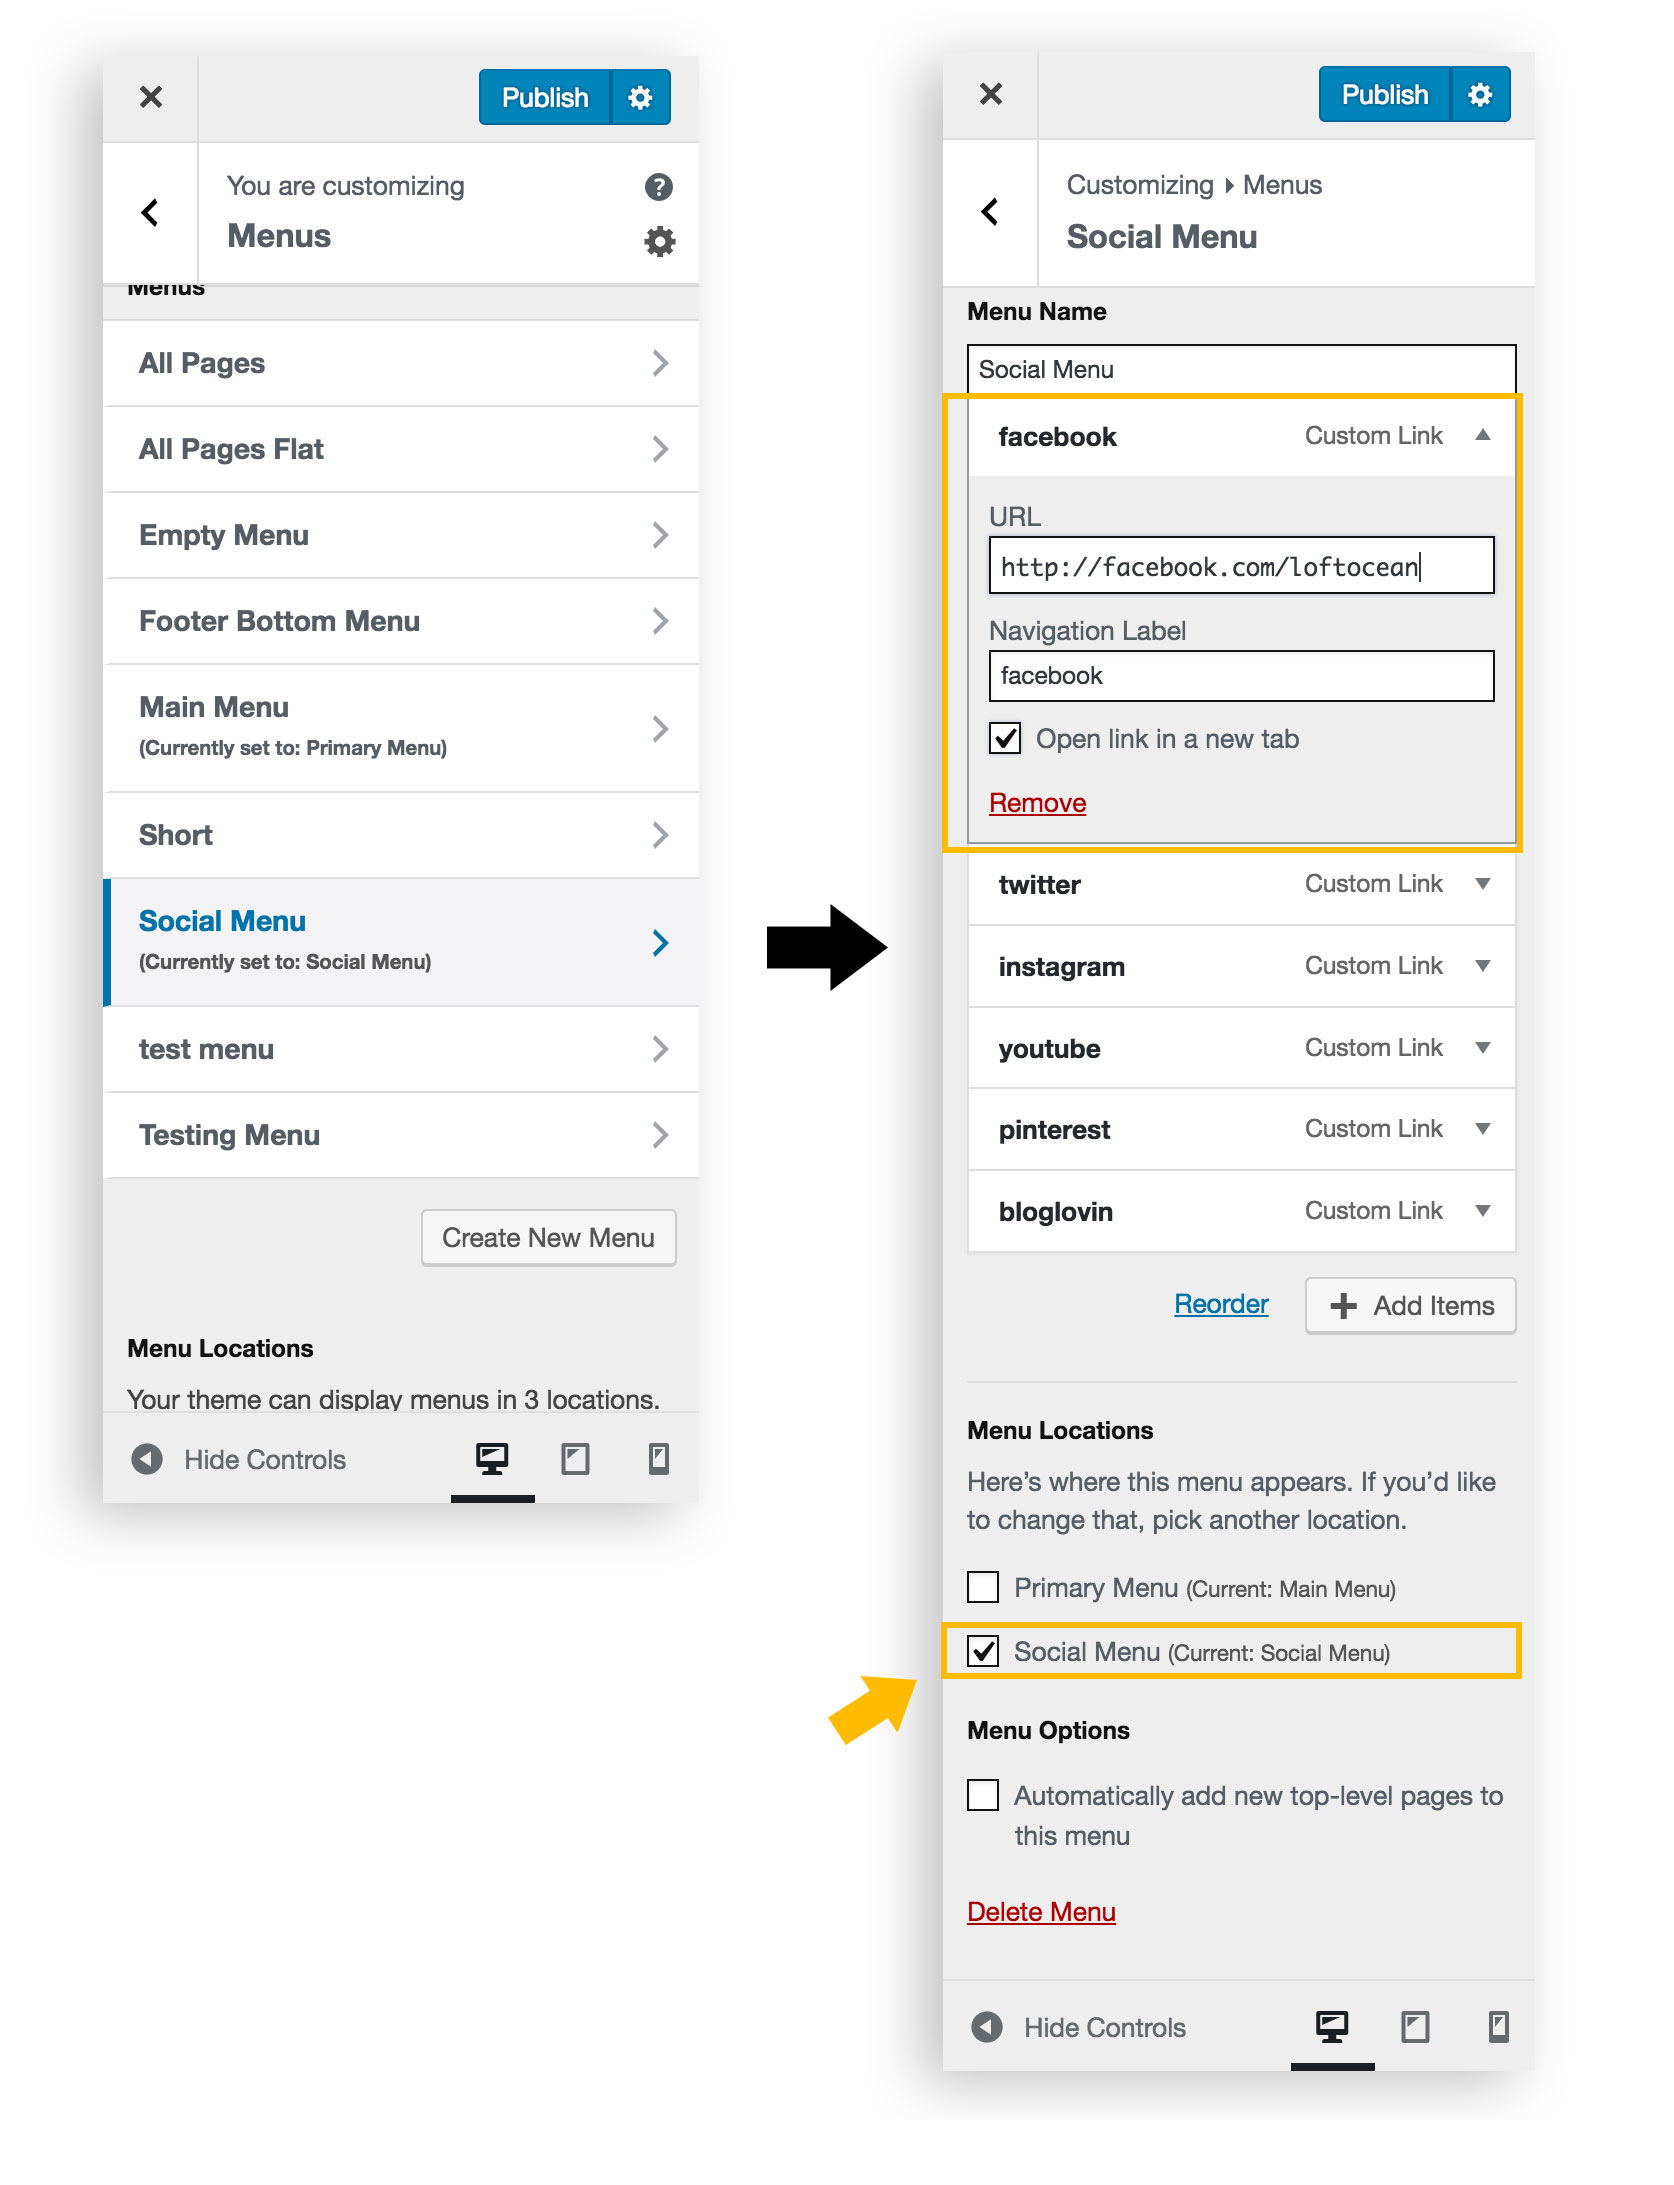
And you can also manage social menu in the customizer (Appearance > Customize > Menus > find your Social Menu).
Manage Social Menu in customizer
7.5 Mega Menu (Posts in Menu)
What is Mega Menu?
"A mega menu is typically defined as a drop down interface that is triggered by the user hovering over a link or defined area.
This dropdown usually shows all options in one main, mega-panel and oftentimes groups related topics into categories."
In short, it is a full-width dropdown menu in a navigation bar.
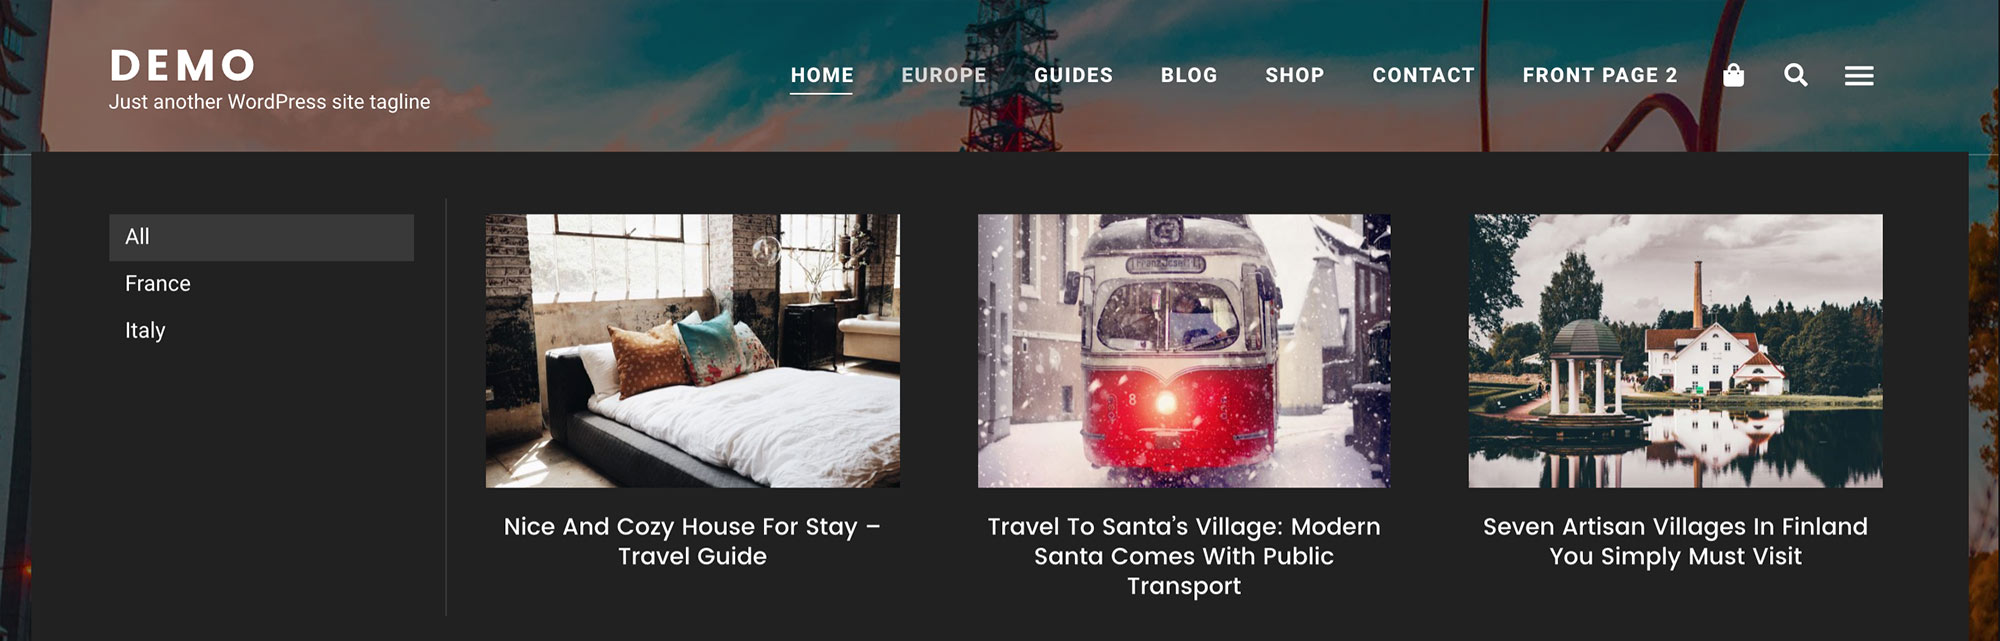
In Eaven theme, the Primary Menu supports mega menu. And you can show 2 types of mega menus:
Display at most 4 recent posts of a category.
Category mega menu - displaying 4 most recent posts of a category.
If the category item is a parent category that has several sub categories, then in the mega menu it will display at most 3 recent posts of
each (sub) category, and a list of sub categories.
Category mega menu - when it is a parent category.
Display sub nav items in 5 columns.
Set up the mega menu:
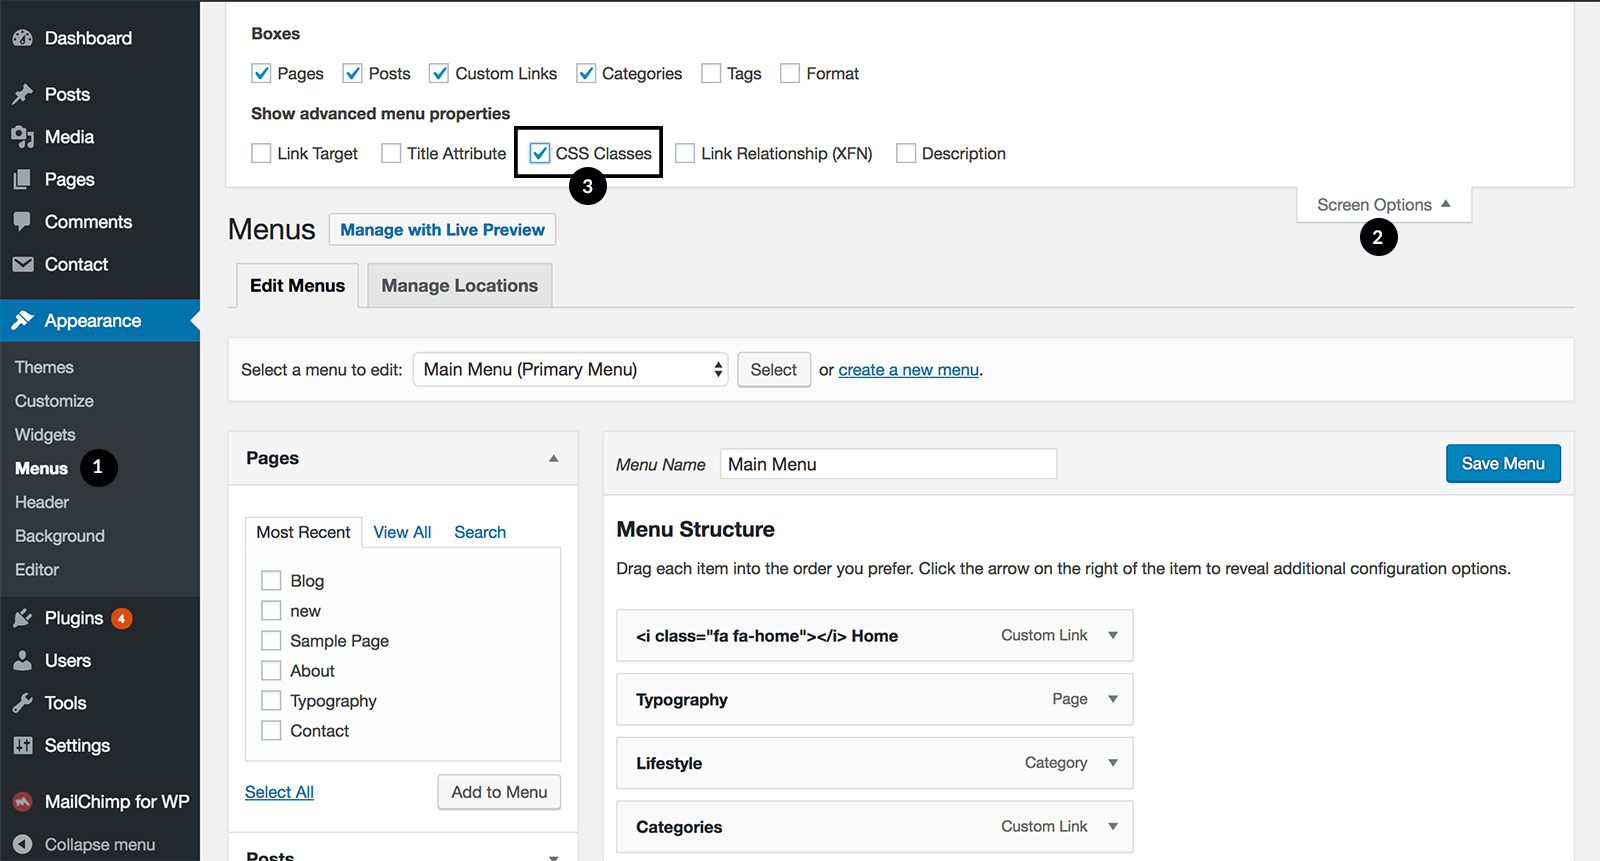
Go to Appearance > Menus, make sure you are editing the primary menu.
Click on Screen Options button located on the top right corner.
Tick the box of CSS Classes.
Menu CSS Classes Property
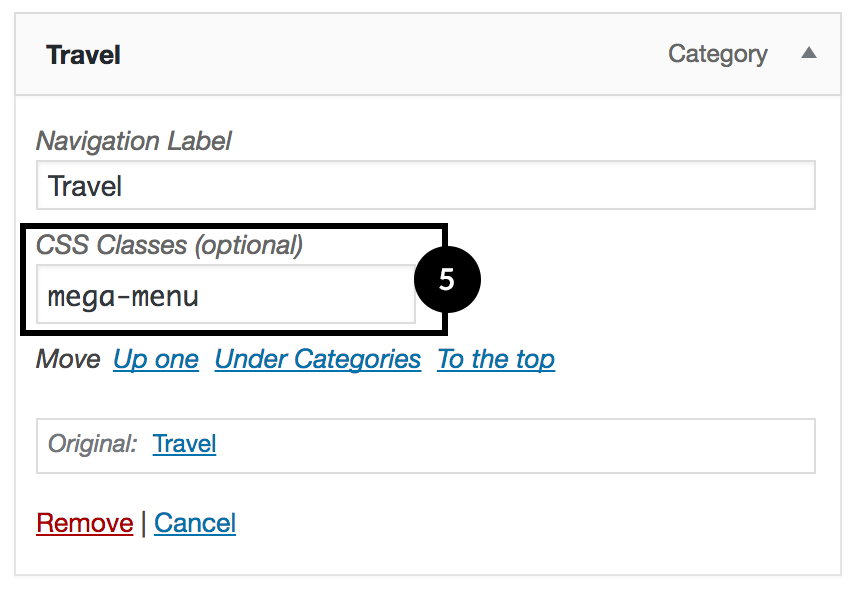
To display posts of a category in the menu, add a category into the menu.
Then click on the category item in the menu,
enter mega-menu into CSS Classes field.
Add class mega-menu
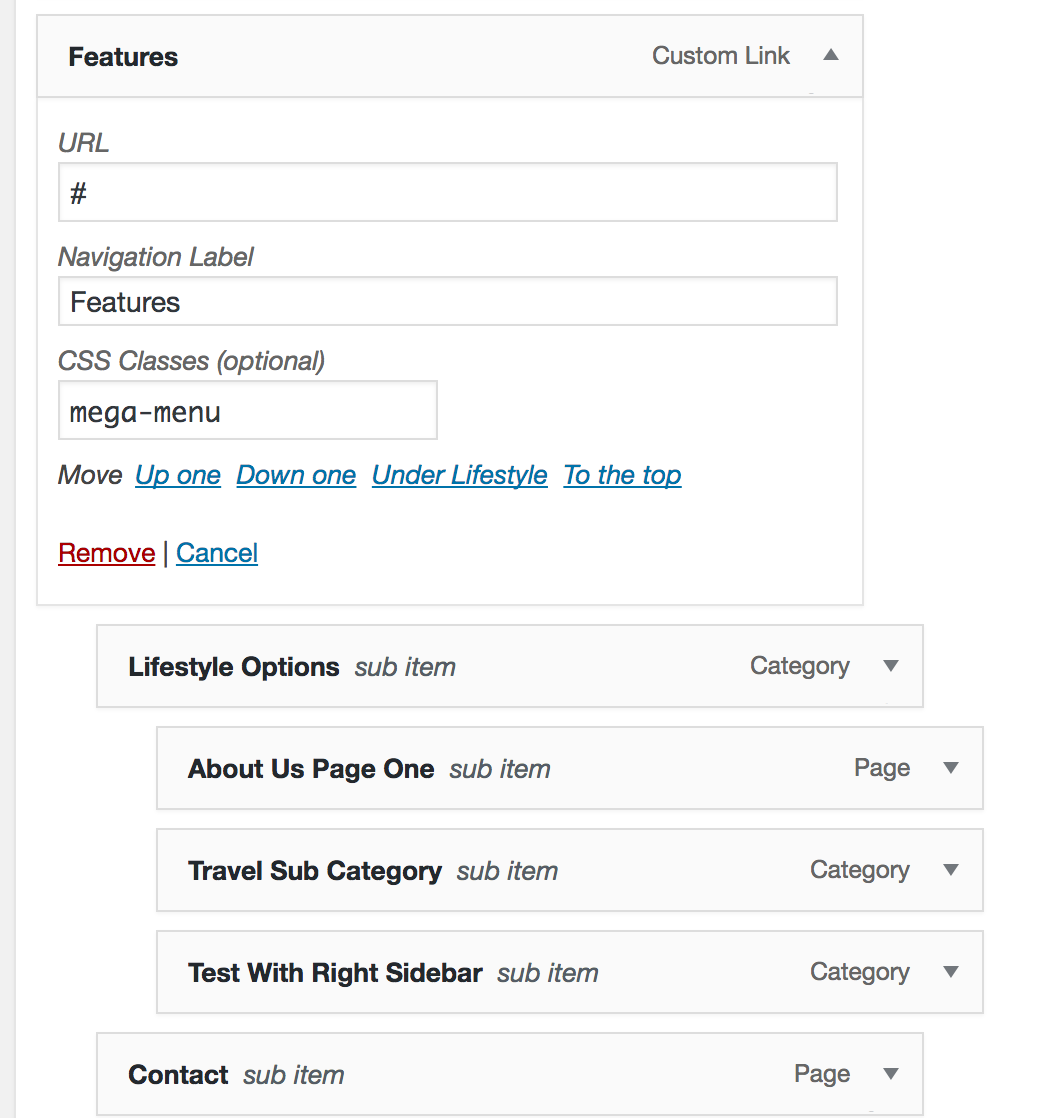
To display sub nav items in columns, just add items into the primary menu, drag and drop to create multi-level menus, then click on
the parent item, enter mega-menu into CSS Classes field.
Multi-level Mega Menu
8. Archive Pages
8.1 Posts General Options
Please go to Customizer > General > Posts General Options. There you can:
Change the text showing on the "read more" buttons.
Choose a Pagination Style for posts archive - there are 4 options:
Nav/Prev Links
With Page Numbers
Load More Button
Infinite Scroll
Load Post Meta ( Like Count & View Count ) Dynamically with AJAX - Recommend enabling this option if any caching plugins are used on your site.
(New feature added in version 1.9.0)
Change the Post Excerpt Length for each posts layout.
8.2 Static Blog Page
In your site admin panel, go to Settings > Reading panel, find the option Front page displays,
choose A static page. In the drop down menu for Posts page select a page, for example, "Blog".
The page assigned as the blog page (posts page) is the Static Blog Page.
To customize the layout of the static blog page, please go to Customizer > Archive Pages > Blog Page. There you can:
Choose the sidebar layout
Select a Posts Layout
Choose to show or hide post excerpt
Choose to show or hide "Read More" button.
Display selected post meta
Dicide the number of Posts displayed Per Page.
8.3 Category Archive
8.3.1 Edit a category
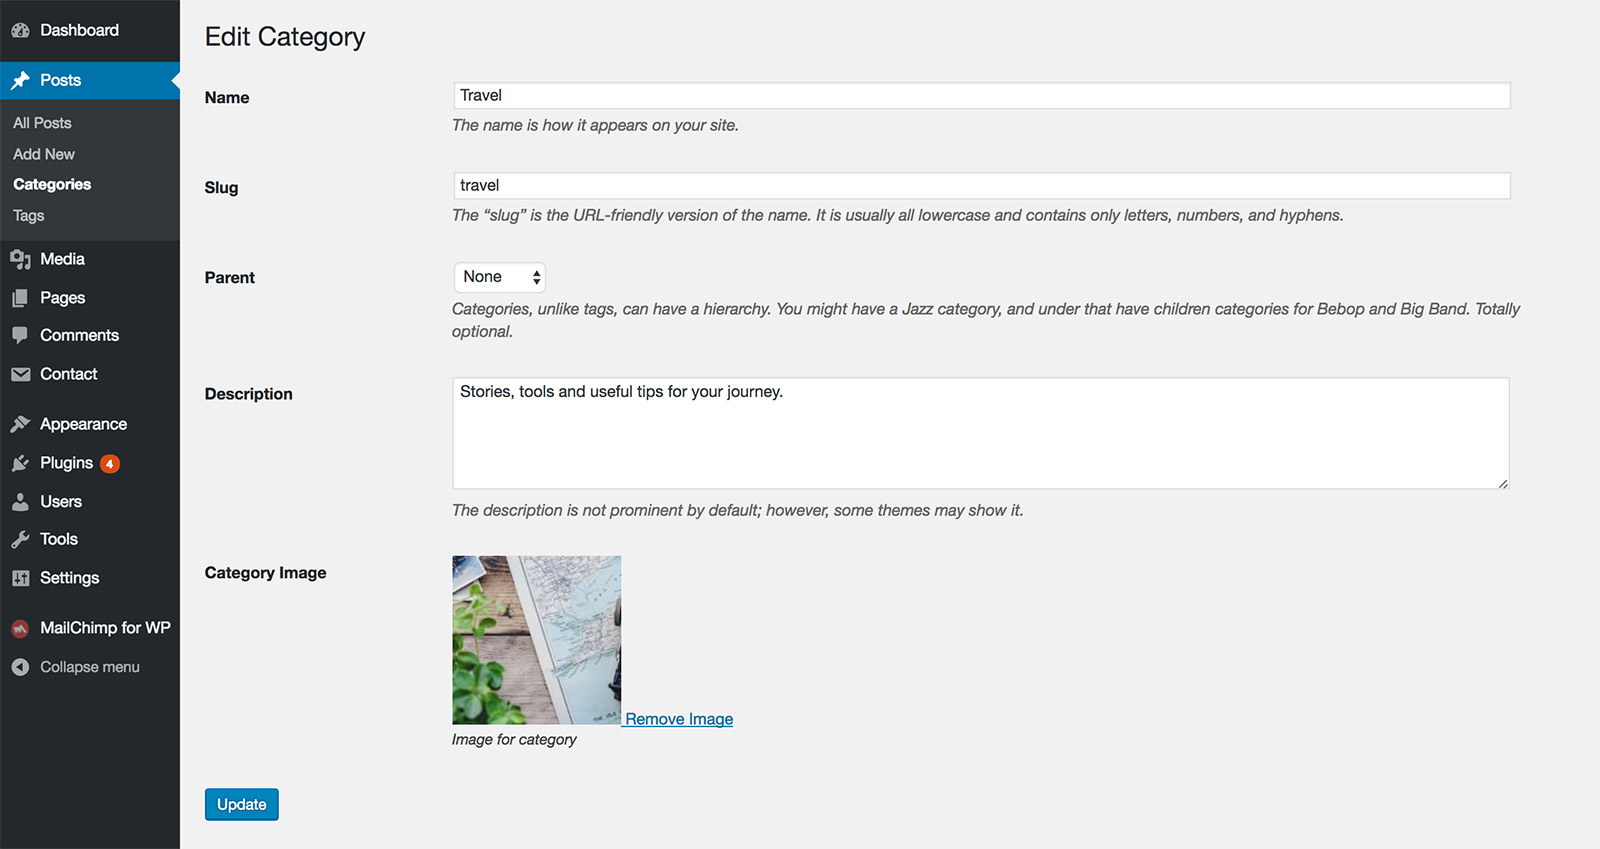
Go to Posts > Categories, when adding a new category or edit an existing one, you can upload an image for this category, then on the category archive page, this image will be used as the page header background image.
And this image will also be used for the custom widget: Eaven Category widget.
Category Image
8.3.2 Category Page Layout
To change the page layout and archive styles, please go to Customizer > Archive Pages > Category.
There you can change the following settings:
Sidebar Layout
Posts Layout
Post Excerpt - Show or hide excerpt.
Choose to show or hide "Read More" button.
Post Meta – You can choose which post meta to show in posts archive.
Number of Posts displayed Per Page
Show Posts or Sub Categories on Parent Category Page
8.4 Author Archive & Author Info
The author information will show:
At the top of Author Archive page
After single post content (the author's biographical info need to have some content)
Author information includes the author profile picture, biographical info and Social Media Icons.
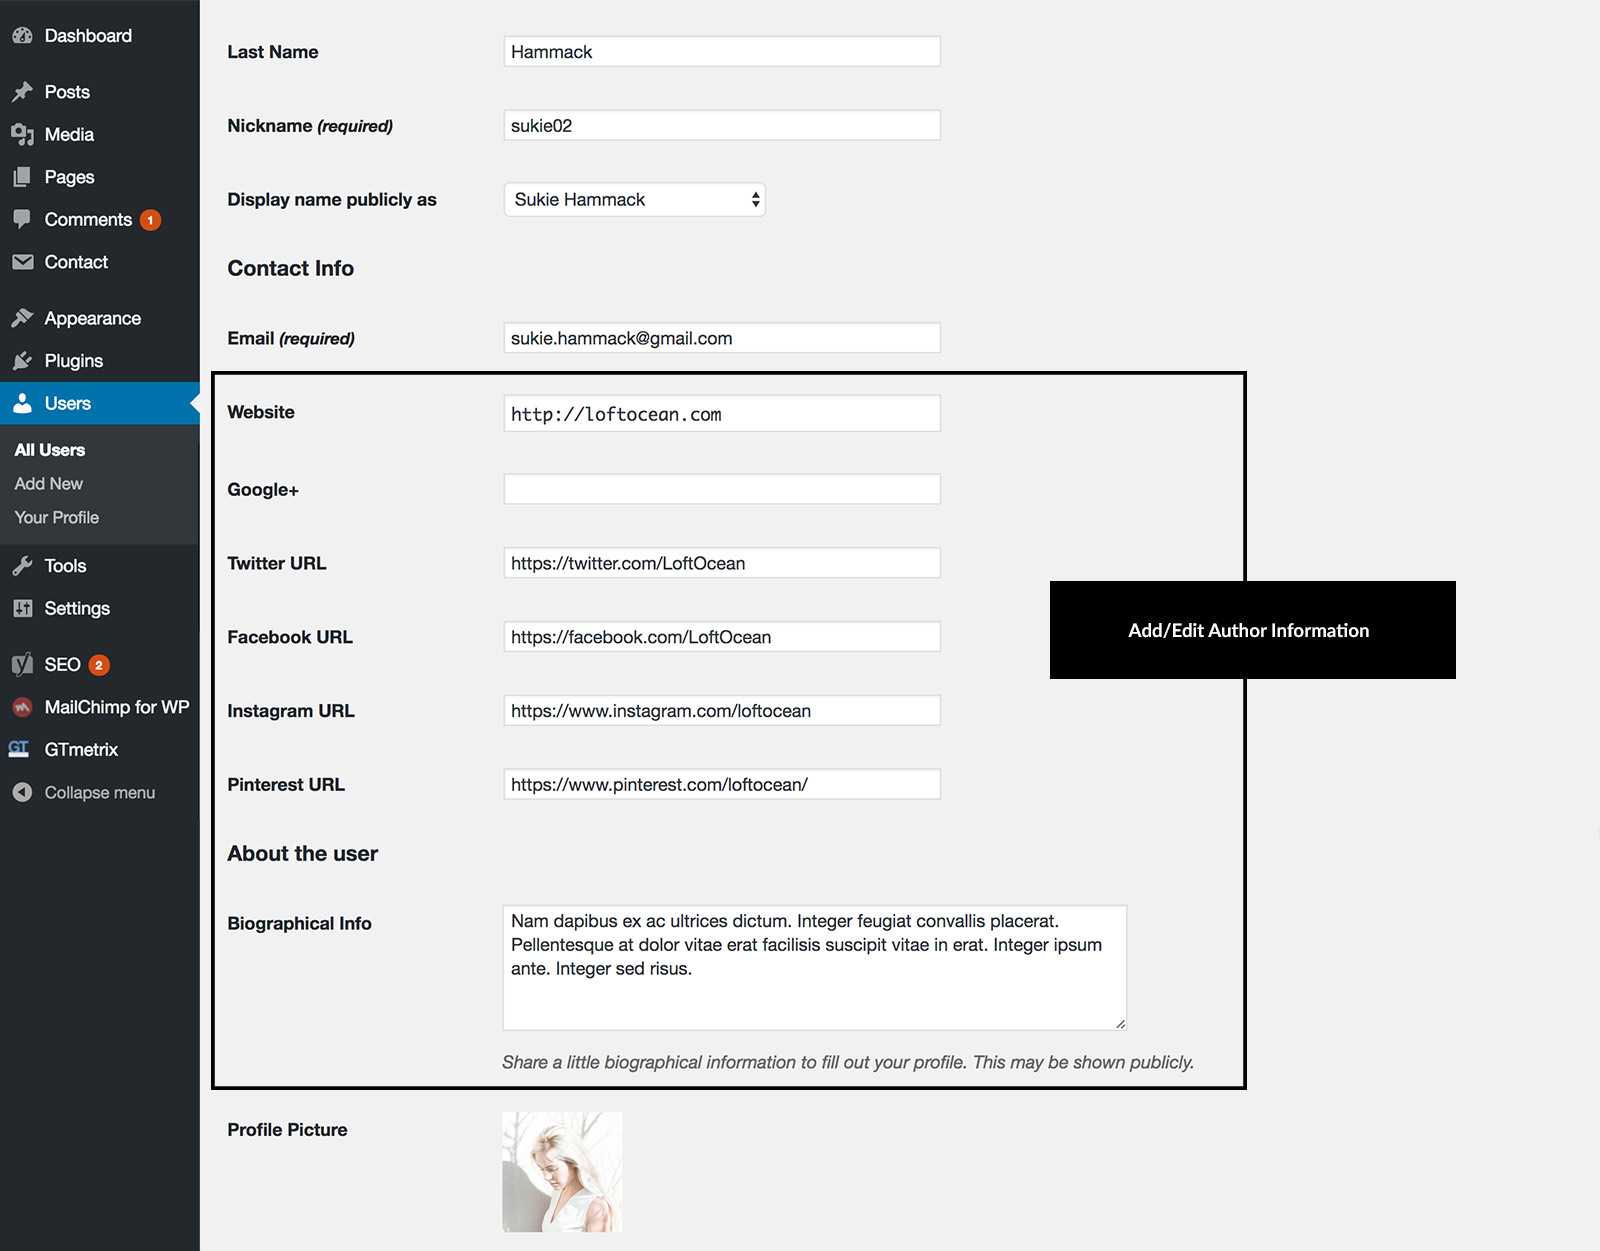
8.4.1 Edit Author Bio & Social Icons
To edit author biographical info and Social Media Icons, go to your site dashboard >
Users > All Users, find the user you are going to edit,
click to open the Edit User page, there you can edit the biographical info.
Author Biographical Info & Social Media Icons
8.4.2 Edit Author Profile Picture
To add or edit the author profile picture, please visit https://en.gravatar.com/ for more information.
8.4.3 Author Page Layout
To change the page layout and archive styles, please go to Customizer > Archive Pages > Author. There you can customize:
Sidebar Layout
Posts Layout
Post Excerpt - Show or hide excerpt.
Choose to show or hide "Read More" button.
Post Meta – You can choose which post meta to show in posts archive.
Number of Posts displayed Per Page
8.4.4. Hide Author Info Box on Single Post
To hide the author info box after single post content, please go to Customizer > Single Post > Display Author Info Box, then uncheck the box.
8.5 Tag Archive
Go to Posts > Tags, when adding a new tag or edit an existing one, you can upload an image for this tag, then on the tag archive page, this image will be used as the page header background image.
To change the page layout and archive styles, please go to Customizer > Archive Pages > Tag.
There you can change the following settings:
Sidebar Layout
Posts Layout
Post Excerpt - Show or hide excerpt.
Choose to show or hide "Read More" button.
Post Meta – You can choose which post meta to show in posts archive.
Number of Posts displayed Per Page
8.6 Date-based Archive
You can also customize the layout of date-based archive pages. Please go to Customizer > Archive Pages,
then go to Date based panel. There you can change the following settings:
Sidebar Layout
Posts Layout
Post Excerpt - Show or hide excerpt.
Choose to show or hide "Read More" button.
Post Meta – You can choose which post meta to show in posts archive.
Number of Posts displayed Per Page
9. Posts
9.1 Featured Post
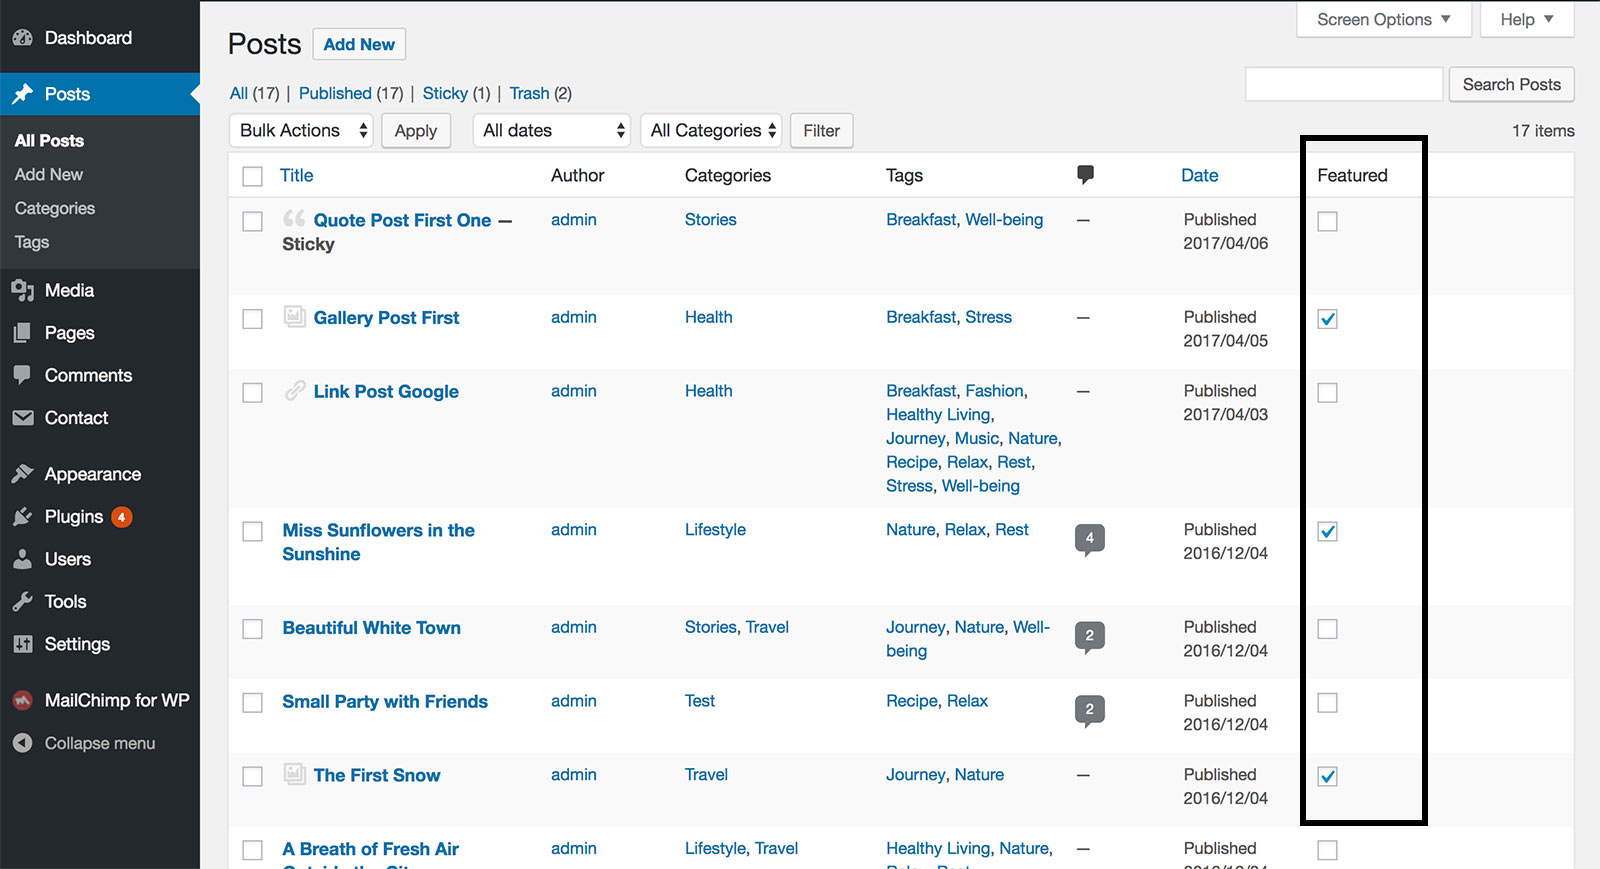
You can choose some posts and set them as "Featured Post" manually. Then you can add these posts into many different places: Homepage Featured Area, Home Widgets and Eaven Posts widget.
On your dashboard, go to Posts > All Posts, then you will see the column Featured, tick the box of some posts to mark them as the featured posts.
Featured Posts
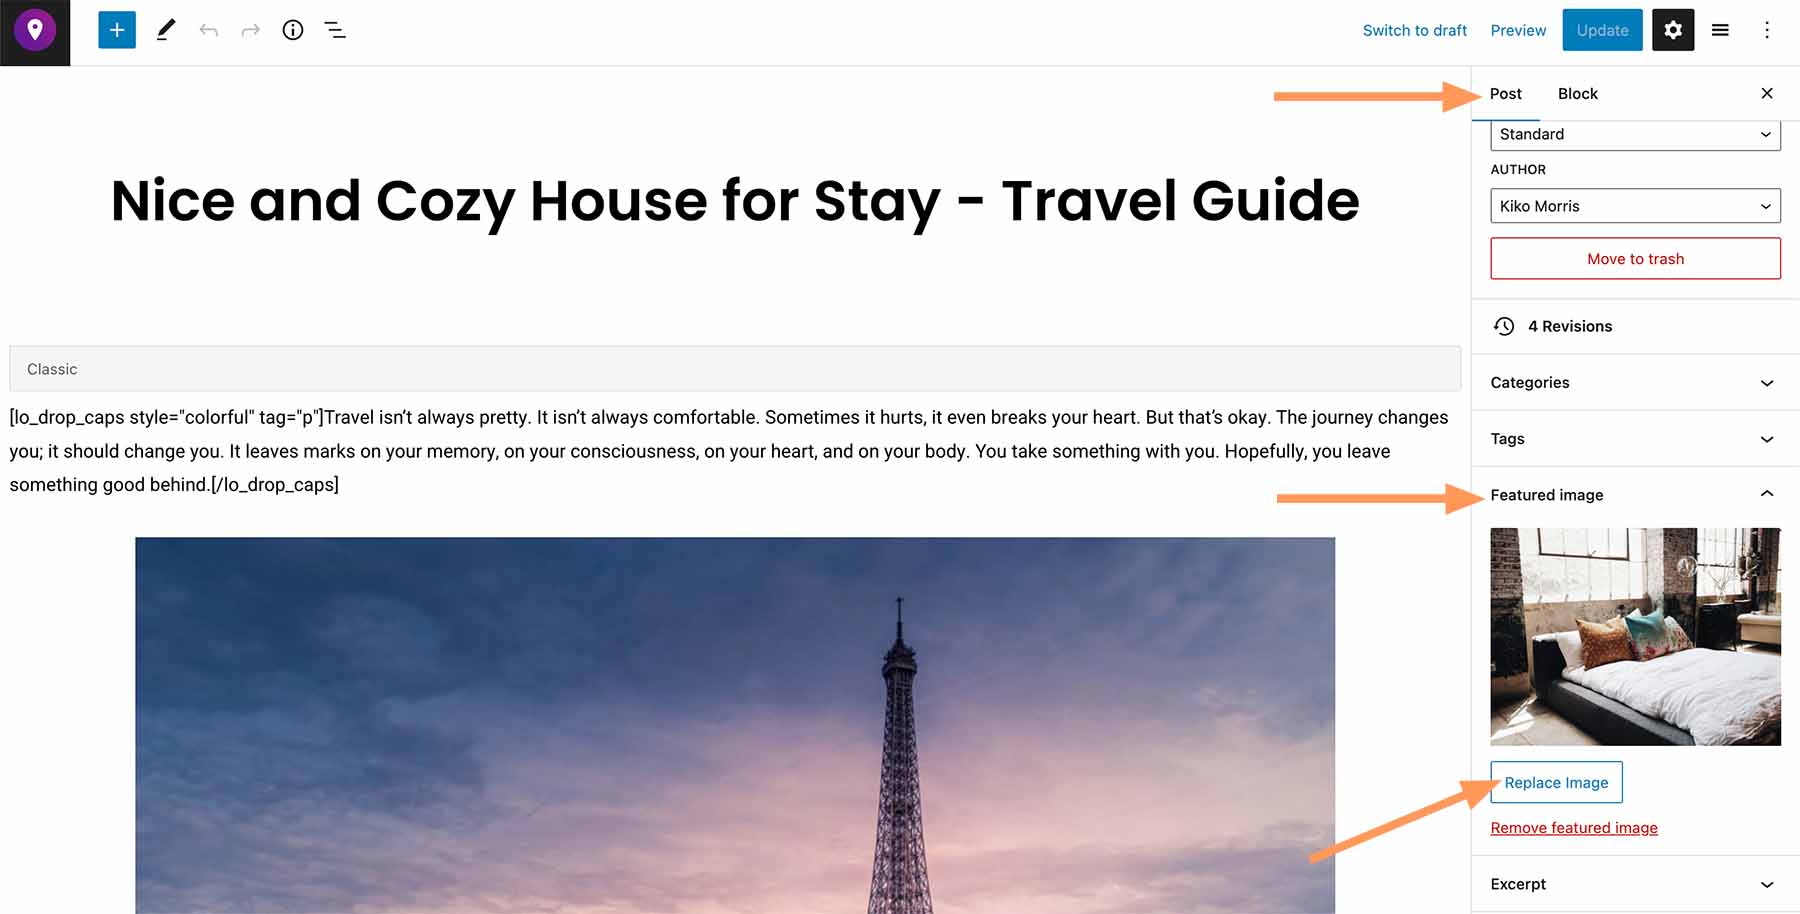
9.2 Post Featured Image
In WordPress, a featured image is the primary image for a blog post. They often appear next to each post’s heading on your home page and social media. Featured images also known as post thumbnails
To add a featured image in a WordPress post, simply edit or create a new blog post. In the content editor, you'll find the featured image tab in the right column.
Post Featured Image
If the post does not have a featured image yet: You need to click on the "Set Featured Image" area, and this will bring up the WordPress Media Library popup. From here, you can upload an image from your computer or use an existing image from your media library. Once you select the image, simply click on the Set Featured Image button.
If the post already has a featured image and you want to change it: You will see the "Replace Image" button, click it and the WordPress Media Library popup shows. From here, you can upload an image from your computer or use an existing image from your media library.
9.3 General Single Post Options
Please go to Customizer > Single Post, there you can set the default post template and sidebar layout for all single posts,
and you can control more general settings for single posts.
Options:
Default Post Template - You can change the post template for each post while editing that post. Please see the next sub-chapter Specific Single Post Options.
Default Sidebar Layout - You can change the sidebar layout for each post while editing that post. Please see the next sub-chapter Specific Single Post Options.
Header Meta - Display the selected post meta in the header of the post, including: Categories/Author Photo/Author Name/Publish Date/View Counts.
Footer Meta - Display the selected post meta in the footer of the post, including: Tags/Comment Counts/Like Counts/Social Sharing Icons.
Display Author Info Box - Please note: the author's biographical info need to have some content, or the author info box will not show.
Display Post Pagination - Show/hide the post pagination for the previous/next post.
Related Posts - Display/hide a group of related posts.
9.4 Specific Single Post Options
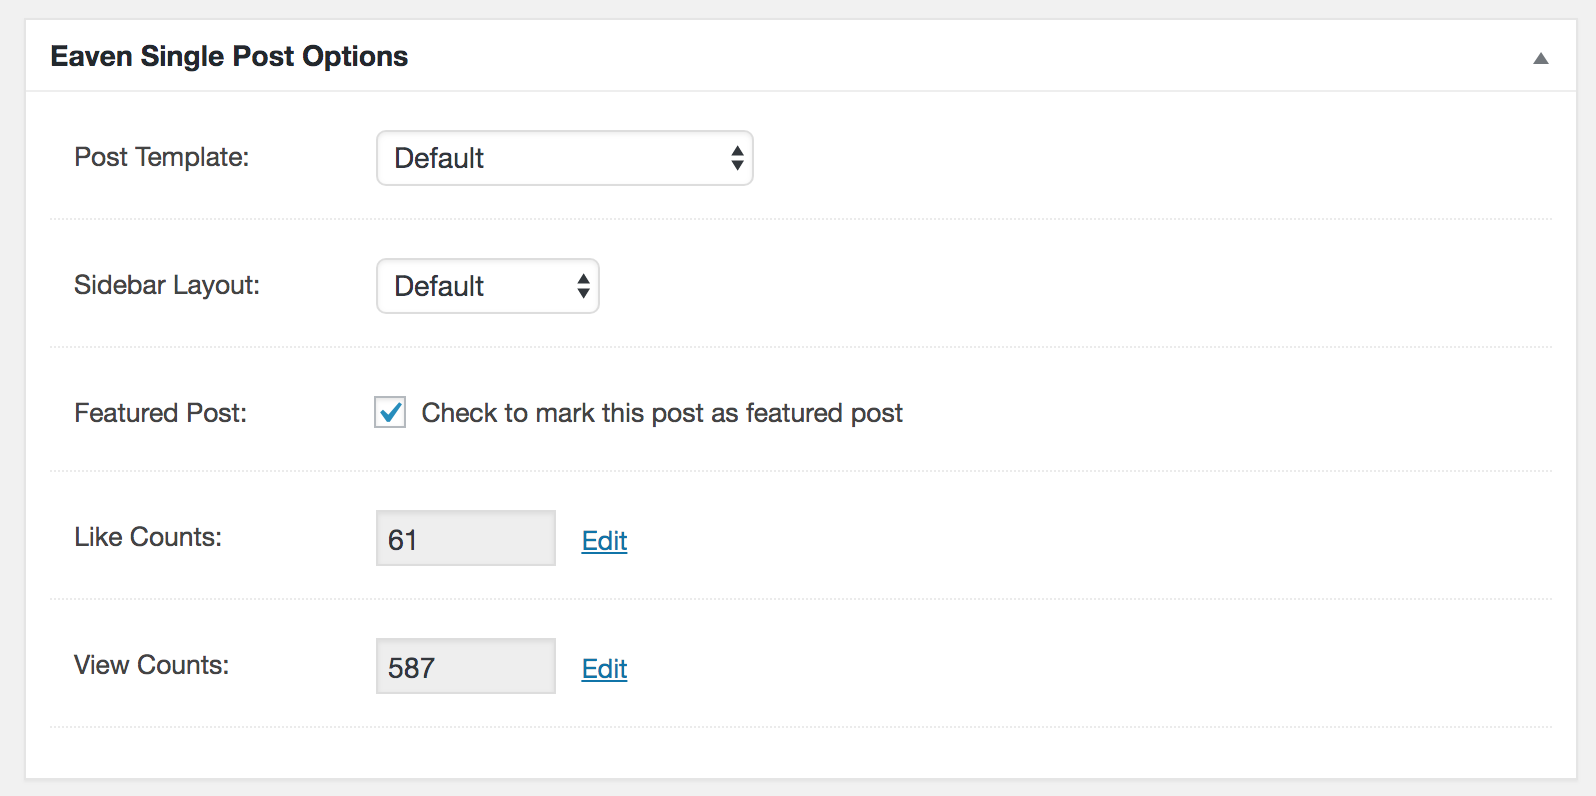
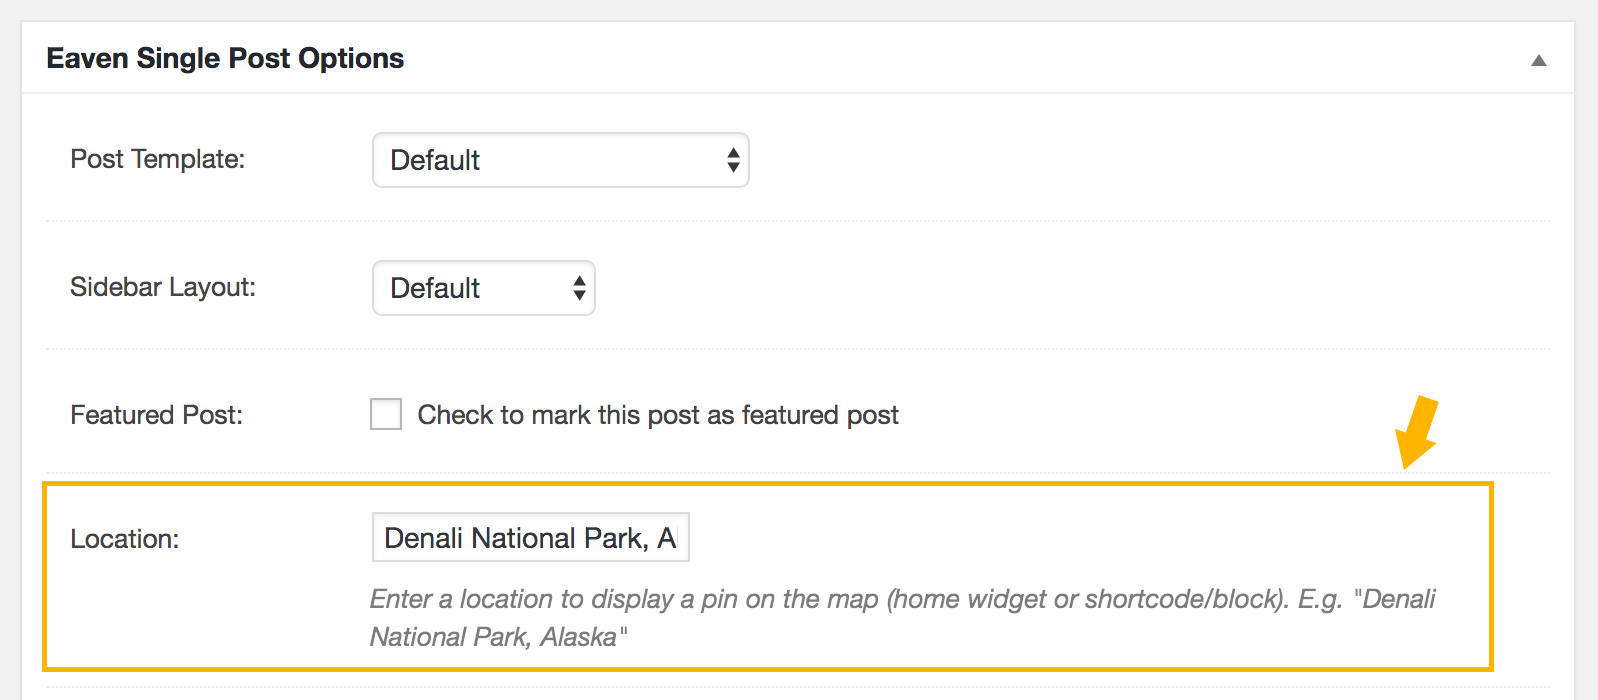
When editing a post, scroll down the page and you can find the "Eaven Single Post Options" panel. There you can:
Specific Single Post Options
Choose Post Template -
Eaven theme provides 5 post templates.
You can choose a default template for posts, and you are also able to choose different templates for different posts.
If you choose "Default", then this post will use the default template you have selected via Customizer >
Single Post > Default Post Template.
If you choose any other template, then it will ignore the default post template setting. And if you change the default post template in Customizer, the change will not affect this post.
Choose Sidebar Layout -
There are 4 options: Default / No Sidebar / Left Sidebar / Right Sidebar.
You can choose a default sidebar layout for posts, and you are also able to choose different sidebar layouts for different posts.
If you choose "Default", then this post will use the default sidebar layout you have selected via Customizer >
Single Post > Default Sidebar Layout.
If you choose any other value, then it will ignore the default sidebar layout setting. And if you change the default sidebar layout in Customizer, the change will not affect this post.
Check the box to mark this post as a featured post.
Like Counts - Click the "Edit" link first, then you can edit the like counts value.
View Counts - Click the "Edit" link first, then you can edit the view counts value.
10. Newsletter Signup Form
10.1 Setup Newsletter Signup Form
Eaven theme supports creating subscribe form with the plugin MailChimp for WordPress. It is one of our recommended plugins when installing the theme.
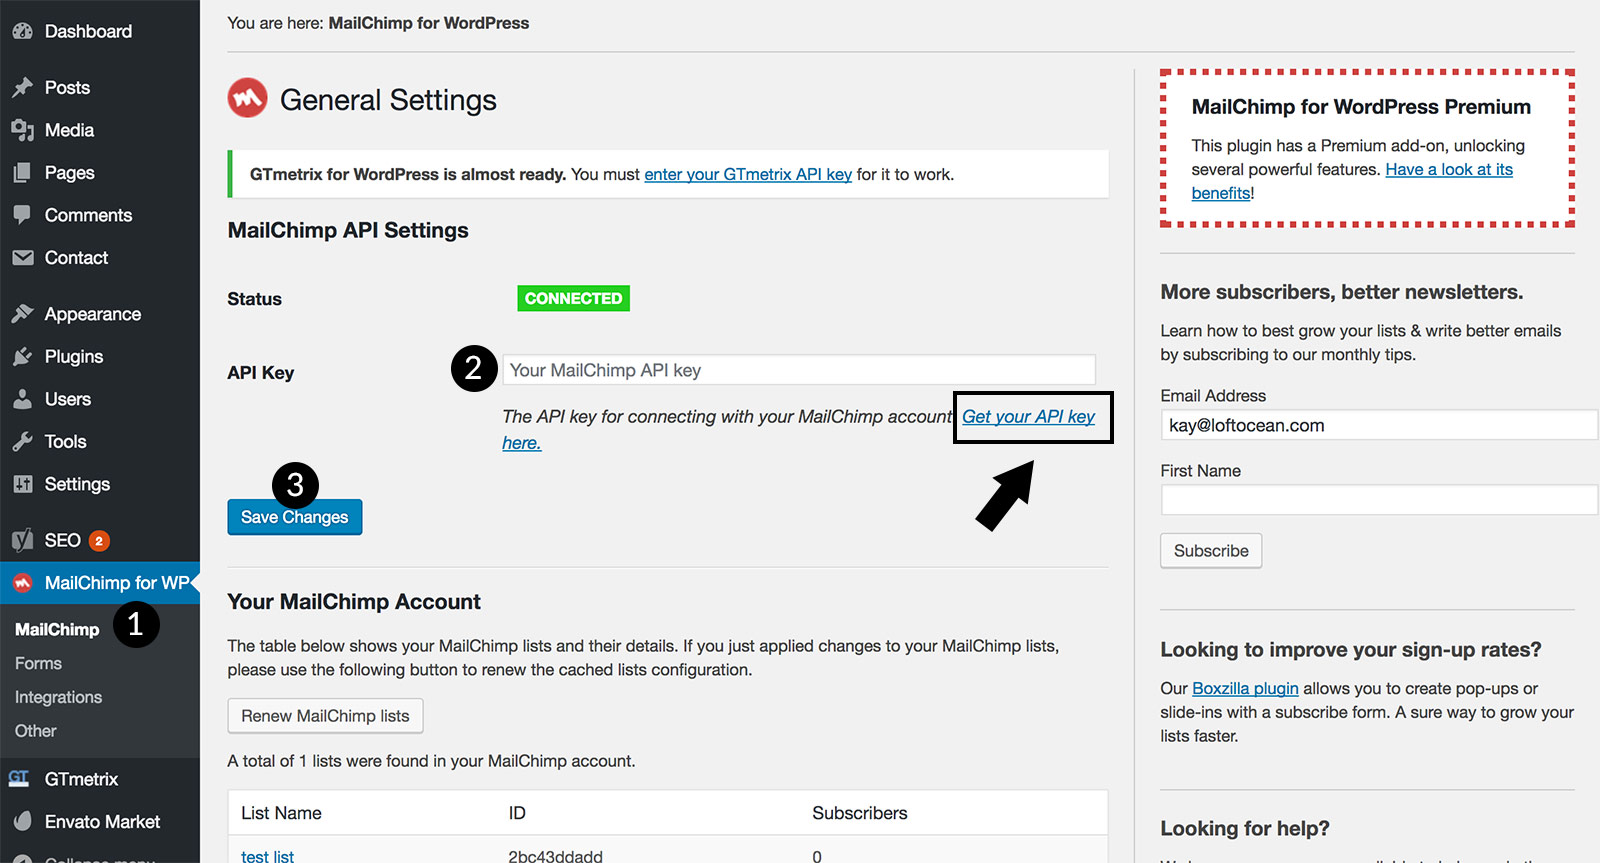
Enter MailChimp API
Please make sure you have installed and activated the plugin. Then get to the settings page of the plugin, and enter your MailChimp API key.
Enter MailChimp API
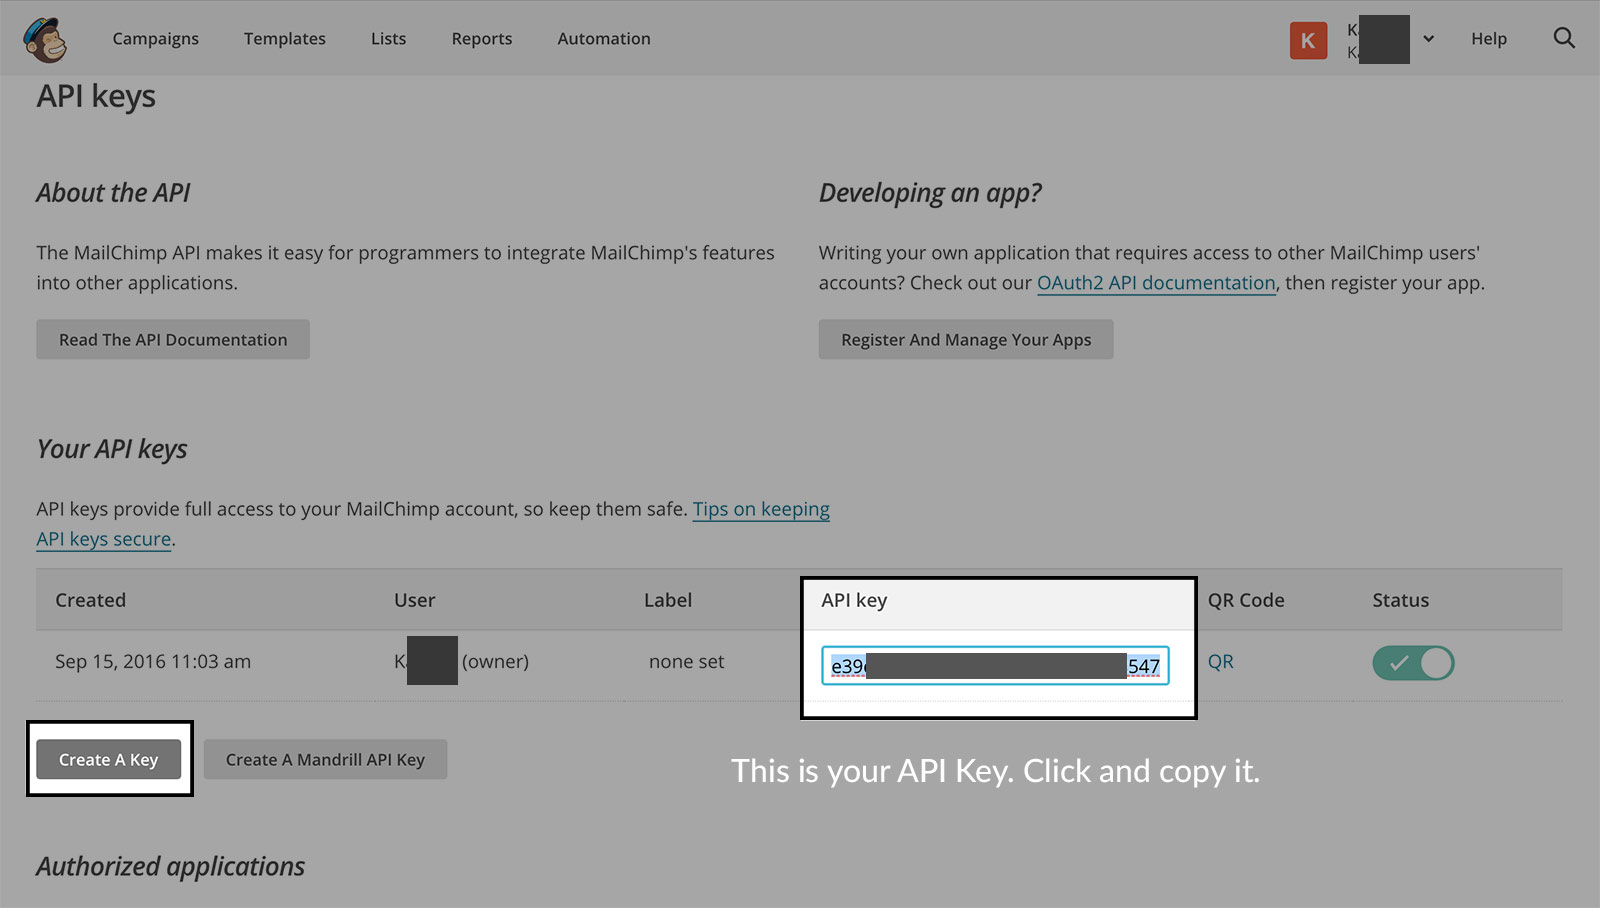
To get your MailChimp API key, you can click on the link "Get your API key here" to get to MailChimp site, log into your MailChimp account, and create a key.
Get MailChimp API Key
Create the subscribe form
Please go to MailChimp for WP > Form to create and edit your signup form.
You can also choose to copy the code below and paste into the form field:
<p>
  Subscribe to my weekly newsletter to get more interesting stories on my journey.
</p>

<div class="fields-container">
  <input type="email" name="EMAIL" placeholder="Your Email" required="">
  <input type="submit" value="Subscribe">
</div>

<p>
  <label>
    <input name="AGREE_TO_TERMS" type="checkbox" value="1" required=""> <a href="#" target="_blank">I have read and agree to the terms & conditions</a>
  </label>
</p>
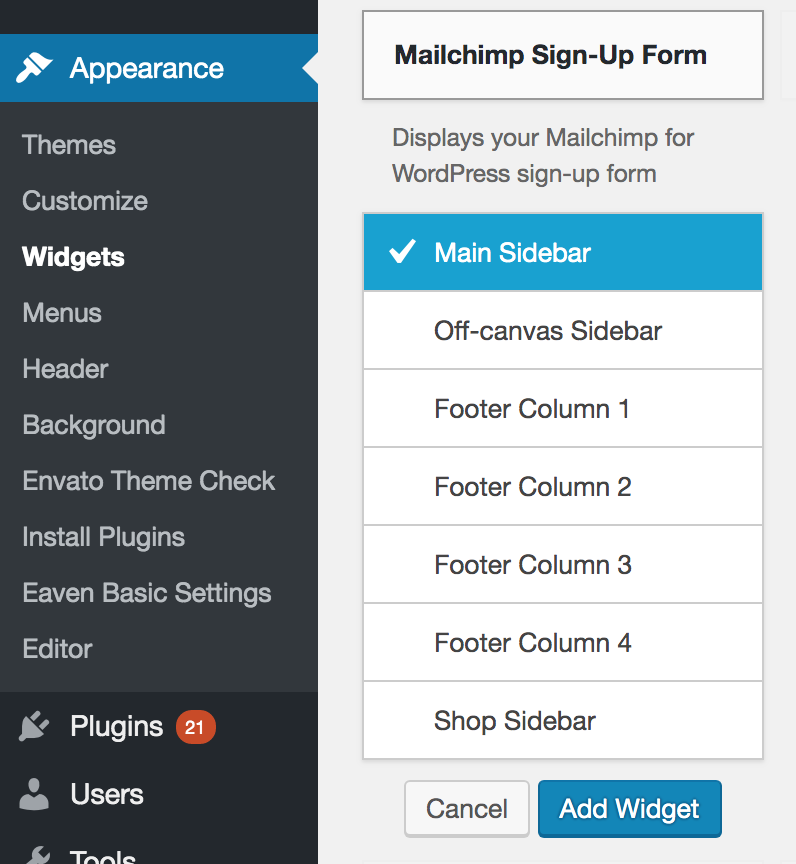
10.2 Add signup form in sidebar or footer widget areas
On your site admin panel, please go to Appearance > Widgets. On the page you can see all of the available widgets are listed at the left
side of the page. Find the widget "MailChimp Sign-Up Form", drag and drop it into a widget area, or click on the widget and choose
a widget area to put it in.
MailChimp Sign-Up Form Widget
10.3 Add signup form to homepage
You can add the newsletter signup form to your homepage (only for Multi-content Homepage" - find out more).
Please go to Customizer > Home Page > Content Area Before Latest Posts > Home Widgets, click on the button "Add a Widget",
then click on "MailChimp Signup Form".
And you can tweak the home widget's colors, background, and more styles.
10.4 Add Newsletter Signup Form to site footer
Please open the customizer and navigate Site Footer > Footer Signup Form and then check "Display Signup Form" and select a form.
The newsletter signup form will be displayed in the site footer on all pages. And there are more options for you to adjust the appearance of this section.
Upon installation, WooCommerce creates the following 4 new pages via its Onboarding Wizard:
Shop – No content required.
Cart – Contains [woocommerce_cart] shortcode and shows the cart contents
Checkout – Contains [woocommerce_checkout] shortcode and shows information such as shipping and payment options
My Account – Contains [woocommerce_my_account] shortcode and shows each customer information related to their account, orders, etc.
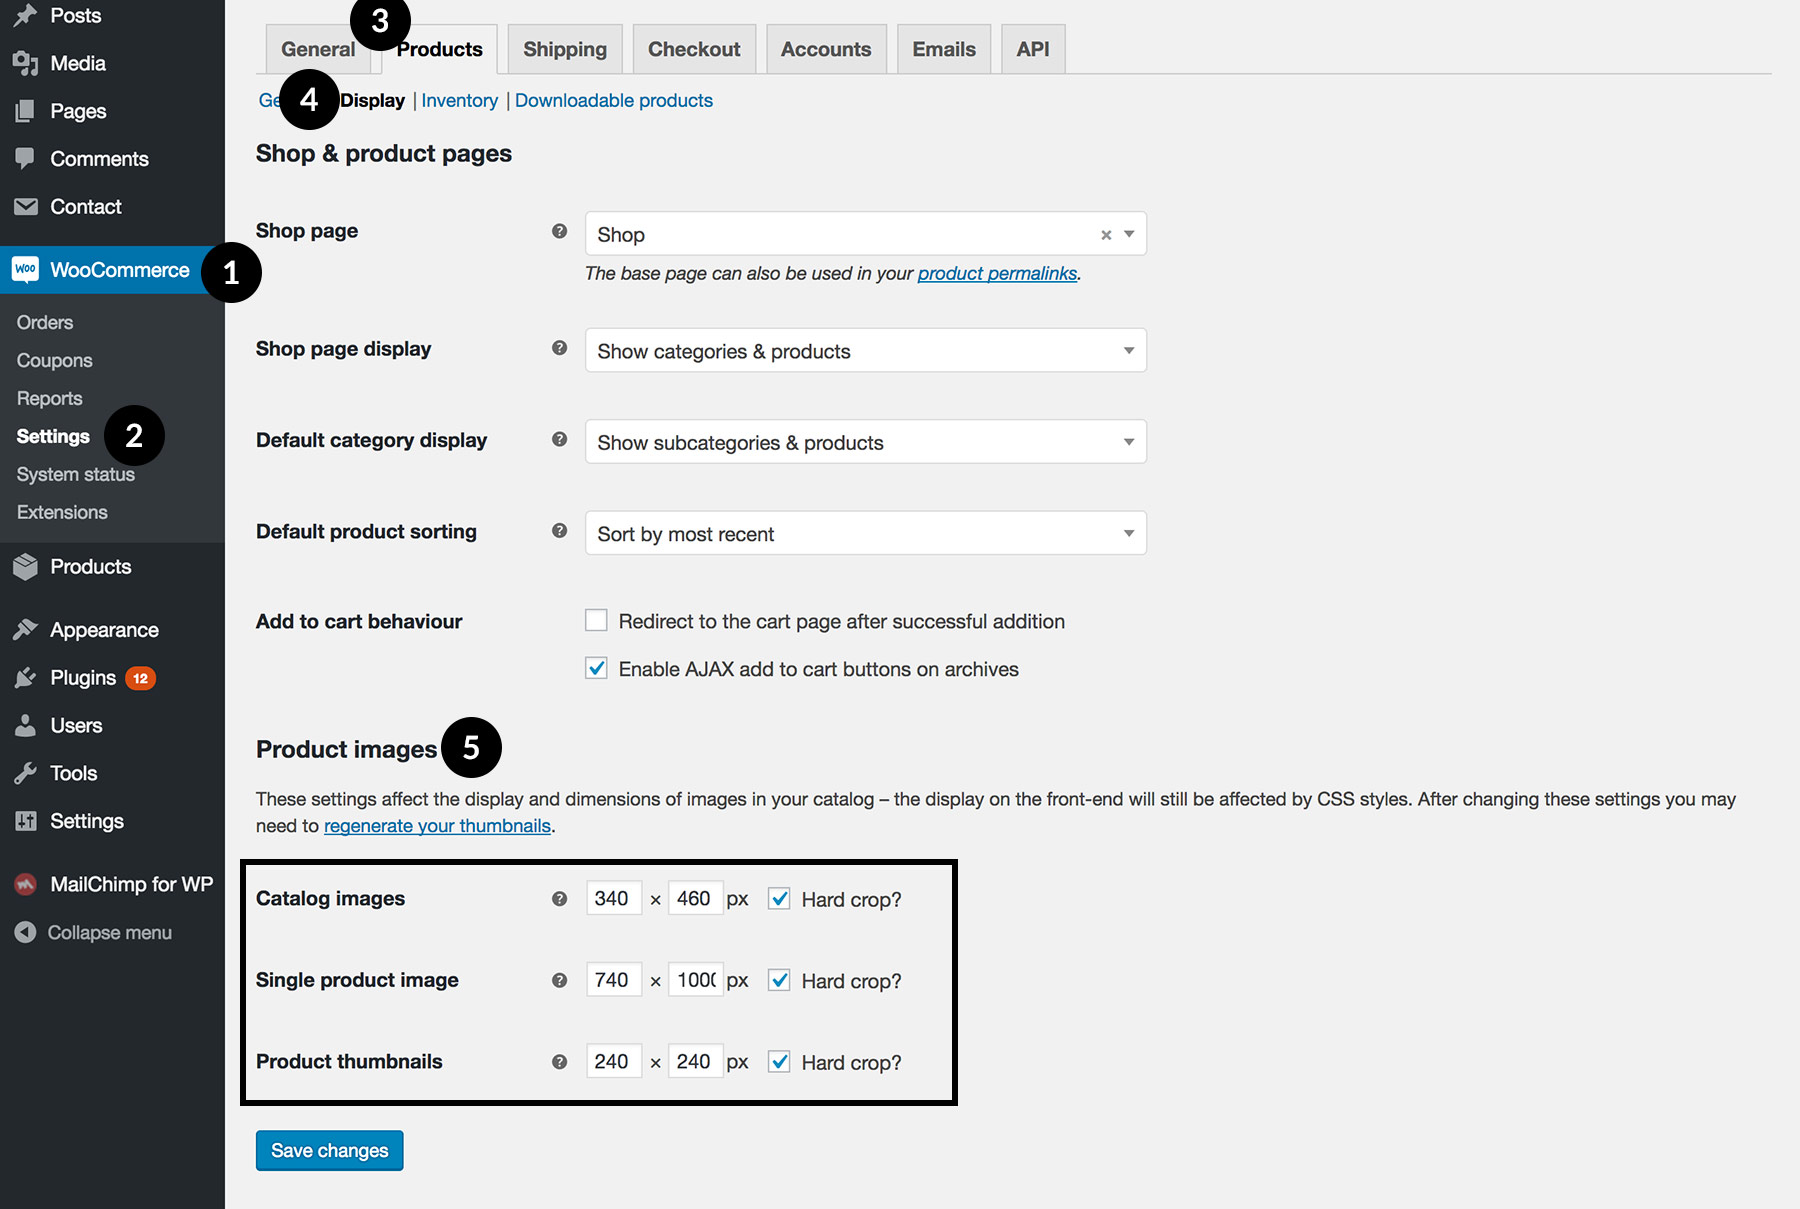
To set up the shop page, on your site dashboard, please go to WooCommerce > Settings > Products tab > Display tab, there you
can find the option Shop Page, select what page you want to be the default shop page (you can choose the shop page created by
WooCommerce, or create a new page and choose it). Please check WooCommerce official documentation Configuring WooCommerce Settings
about this part.
Import WooCommerce Dummy Content
Right after installing WooCommerce you may find you have an empty store. There are no products, orders, reviews, and more by default.
You can start to create your own products, or perhaps you’d like to see what sample orders and products look like, then you can choose to
import some dummy content. Please check this article Importing WooCommerce Dummy Data
to know details.
And to setup your product image dimensions, please go to WooCommerce > Settings > Products > Display. And after changing image sizes, please don't
forget to regenerate your thumbnails.
Product Image Size
11.2 Shop Customization
After you have set up your online store and created some products, you can tweak the layout of the shop index page and single product page
via WordPress customizer. Please go to Customizer > Shop to customize your shop pages.
12. Item Customization
12.1 Not included in item support
Please note: according to ThemeForest Support Policy,
Item Customization is not included in item support:
Item support does not include services to modify or extend the item beyond the original features, style and functionality described on the item page.
For customization services that will help you tailor the item to your specific requirements, we recommend contacting the author to see if they privately
offer paid customisation services or checking out the great service providers on Envato Studio.
And as we don't provide any customization service, when you need help with item customization, we recommend hire a developer to do
the customization work for you. And you can check Envato Studio –
there are many developers providing theme customization service. You can search with keywords “Theme Customization” to find the suitable developers for your project.
12.2 Additional CSS
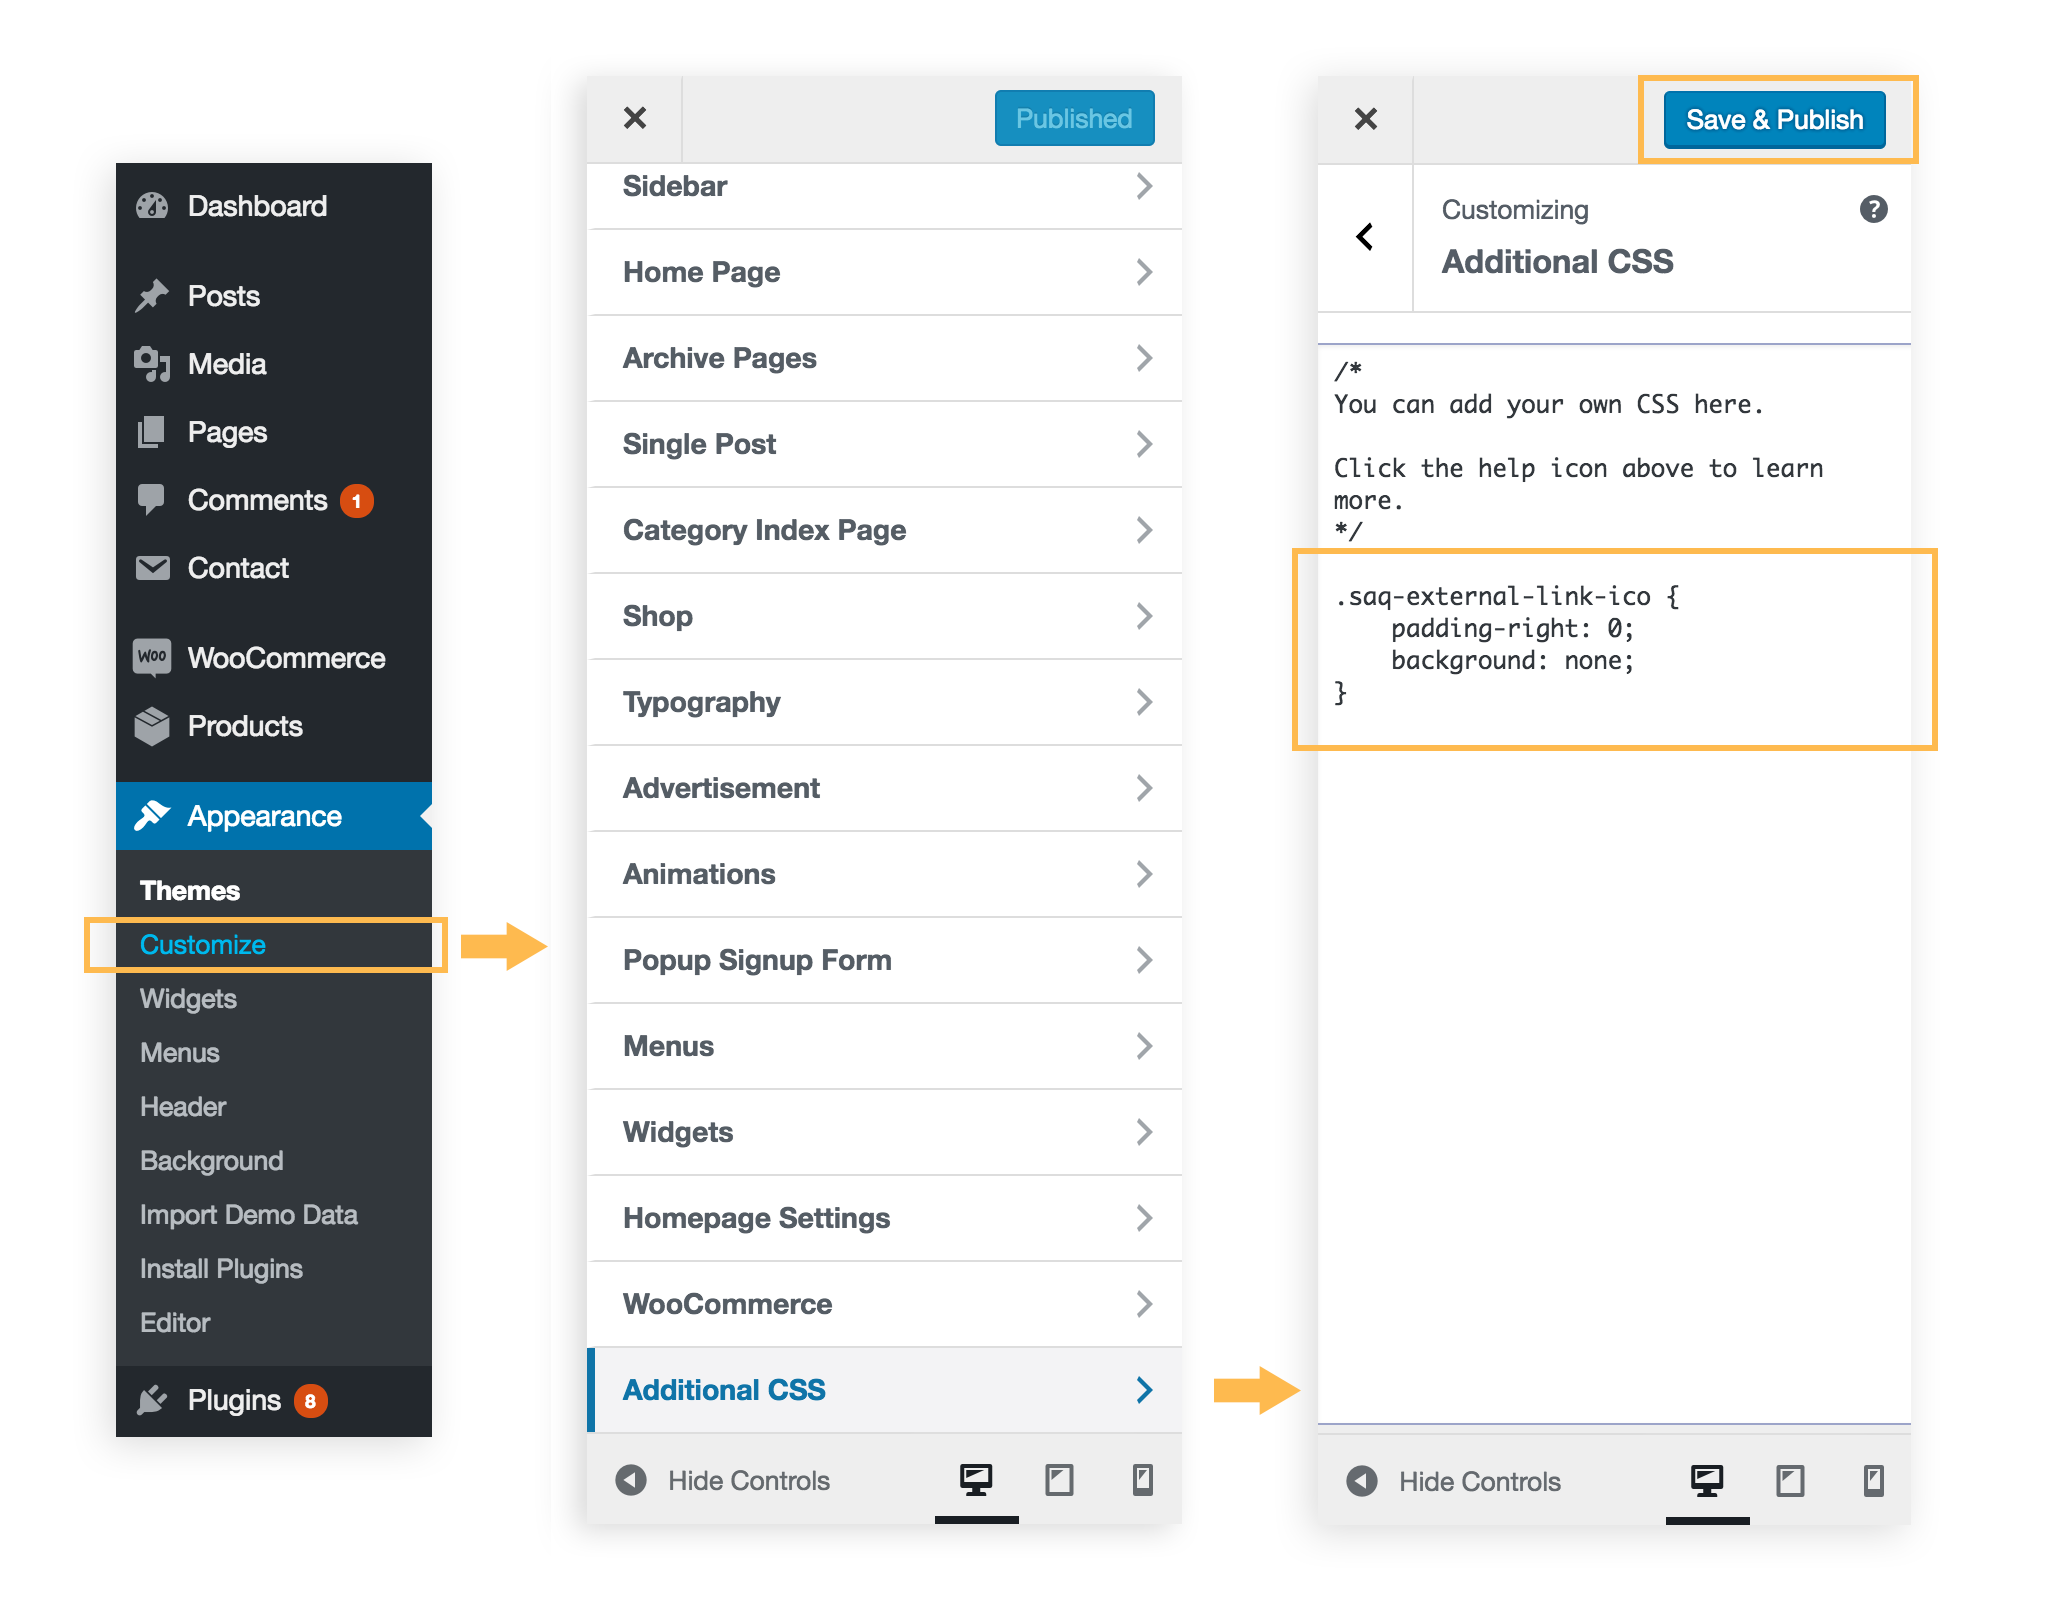
Sometimes you might like to add some custom CSS to your site to personalize some elements' styles. In the customizer,
please locate to Additional CSS sub section and add your custom CSS code. Like the example showing in the screenshot below:
Add custom CSS to your site
This is a default feature of WordPress since WordPress v4.7. If you can’t find Additional CSS sub section in your
customizer, then it means your WordPress version is lower than 4.7, please update your WordPress to the latest version.
And after adding custom CSS code, if you don't see any changes, please clear your site cache and your browser cache, then refresh the pages and check again.
12.3 Child Theme
If you are going to write custom code for the theme, please use Child Theme.
A child theme is a theme that inherits the functionality and styling of the parent theme. Child themes are the recommended way of modifying an existing theme.
Please download the whole package of Eaven theme (not just the installable WordPress theme zip file), unzip it and you will find WordPress Child Theme > eaven-child.zip.
Install the parent theme first, then install the child theme, and activate the child theme.
Then you can change code or write your own custom styles for the theme in the child theme files. Later when you need to update the theme, just update eaven.zip (the parent theme),
so your custom code changes will not be overwritten (because they are all in the child theme).
Please note: Writing custom code for your child theme is related to Item Customization which is not included in the support we could provide.
More details can be found here.
14. Shortcodes
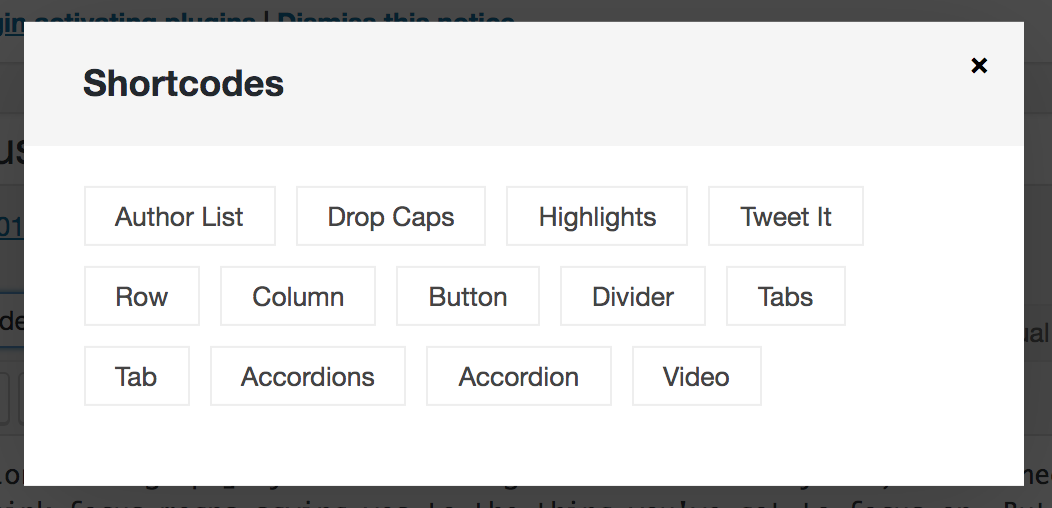
Currently we have provided 13 shortcodes for content:
Author List - Display authors of your site. 5 layouts to choose from. And can show all authors or choose by name/role.
Drop Caps - Style the first letter of a selected paragraph. 5 styles to choose from.
Highlights - Select some words to add marker pen highlight effect. 2 styles to choose from.
Tweet It - Select content and allow readers to tweet the sentence by one click. Selected content can be inline or a whole paragraph.
But please keep it short because Twitter only allows 140 charcaters.
Row - Create column layouts on your pages/posts. You need to wrap the column shortcodes within row shortcodes.
Column - Create column layouts on your pages/posts. This shortcode allows to add a column into an existing row easily.
Button - Add buttons. 4 different sizes. Unlimted colors.
Divider Line - Add divider lines. You can choose line's style, size and color.
Tabs - Create a single content area with multiple panels, each associated with a header in a list.
Tab - Add a single tab into an existing tabs block. You need to wrap the tab shortcodes within tabs shortcodes.
Accordions - Displays collapsible content panels for presenting information in a limited amount of space.
Accordion - Add a single accordion into an existing group of accordions. You need to wrap the accordion shortcodes within accordions shortcodes.
Video Block - Display an image with a video play button on it. Click the play button to pop up the video.
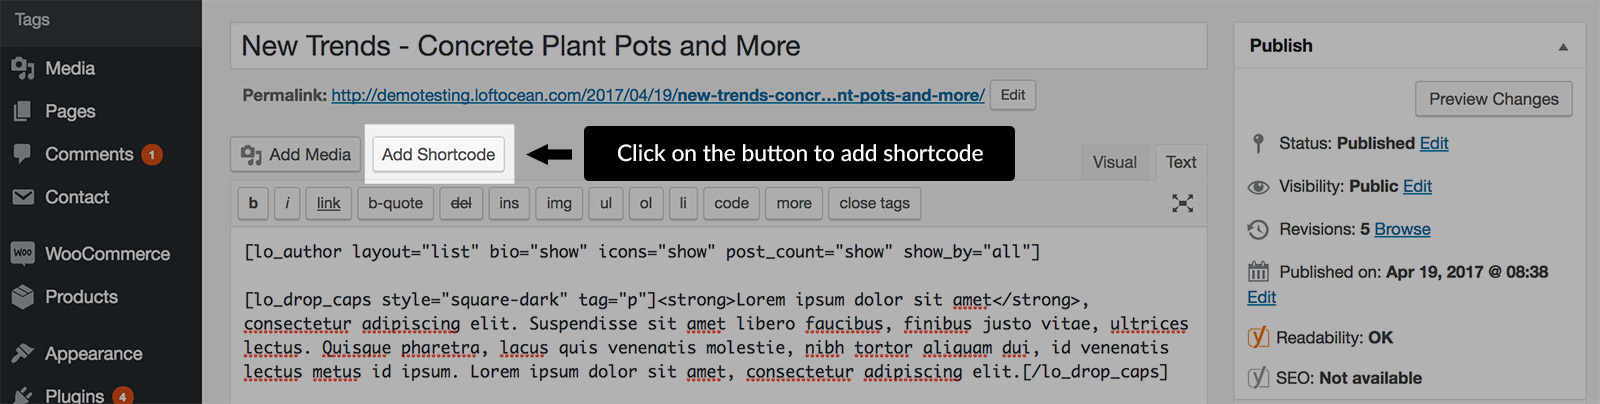
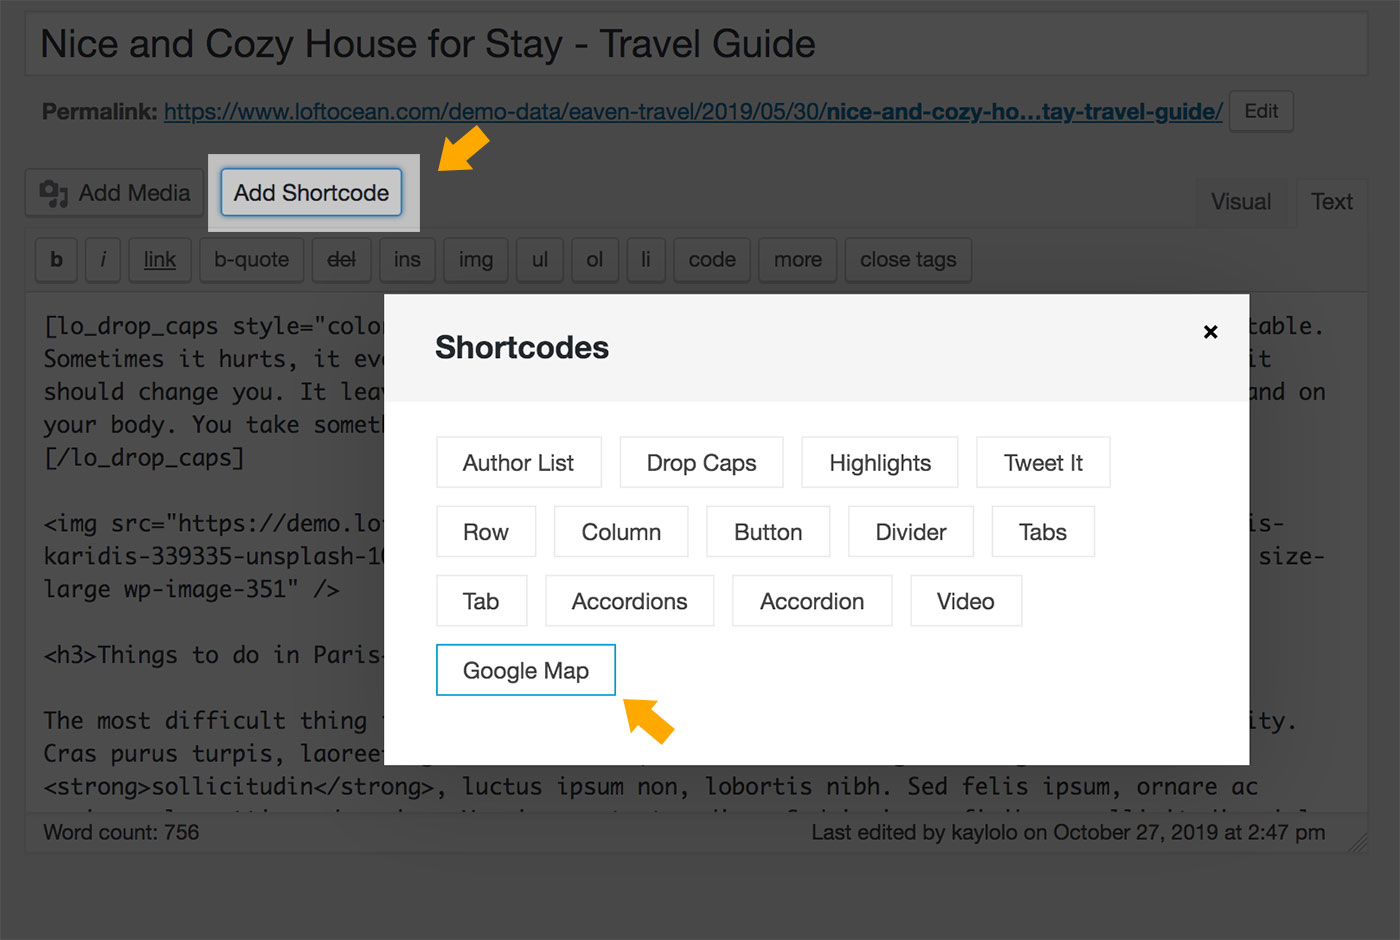
To add shortcodes into content, when edit a post or a page, click on the Add Shortcode button above the editor.
Add Shortcode Button
Then choose which shortcode you'd like to add in the popup panel, then choose which style of this shortcode you want to use.
Shortcode Panel
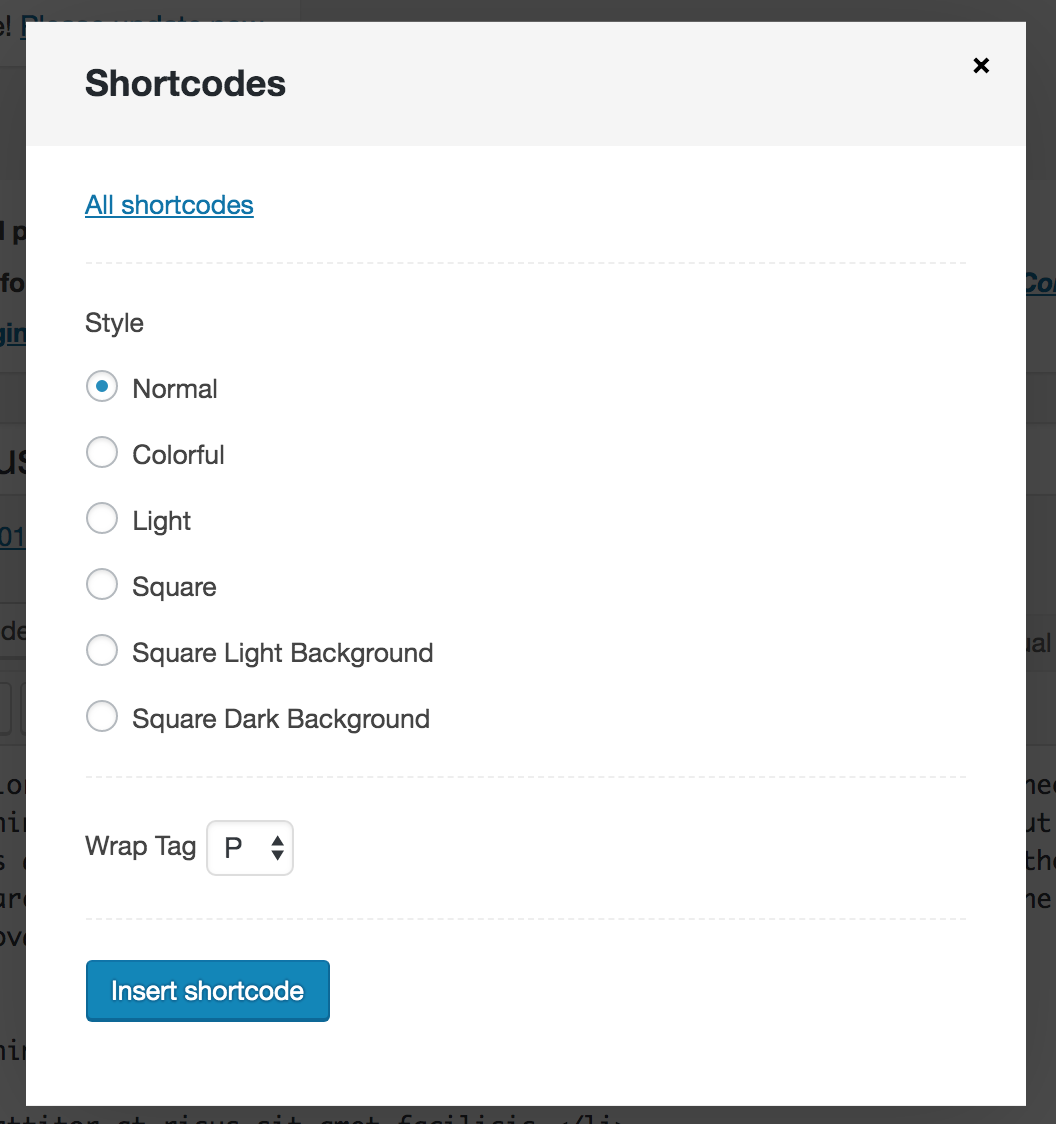
For example, if you'd like to insert a shortcode of drop cap, you can select a paragraph, and then click on the "Add Shortcode"
button to open the shortcodes panel, then click on "Drop Caps", there you will see the options you can choose for a
drop cap. Click on "Insert Shortcode" button to wrap the selected content with this shortcode.
Shortcode settings - Drop Caps
The shortcode for drop caps will look similar to this:
An example of the shortcode of drop cap.
Please note: most of the shortcodes have an opening tag and a close tag
and text content needs to be put between them. Please see below:
[lo_drop_caps] Content goes here. [/lo_drop_caps]
Or,
[lo_button size="large" url="#"] Contact Us [/lo_button]
The shortcodes for Author List and Divider Line don't have a close tag because you don't need to add any text content for these 2 shortcodes.
15. Gutenberg Ready
15.1 About Gutenberg
Gutenberg is the new editor of WordPress core.
If you are new to Gutenberg, you may like to read this doc first.
How to get Gutenberg?
Gutenberg is added into WordPress core since WordPress 5.0. You can update your WordPress to the latest version.
If you are not going to update your WordPress, you can download and install Gutenberg Plugin version.
If you also want to keep the Classic Editor, you can download its plugin version.
Theme built-in features + Gutenberg
Because there are many differences from the Classic Editor, some theme built-in operations also change in the new editor.
Please continue reading for more details.
Please note: Gutenberg is still improving (fast and frequently), its code/logic may change in a newer version.
Therefore, sometimes new issues may arise after updates. We will pay close attention to it and we will be grateful for any problem report.
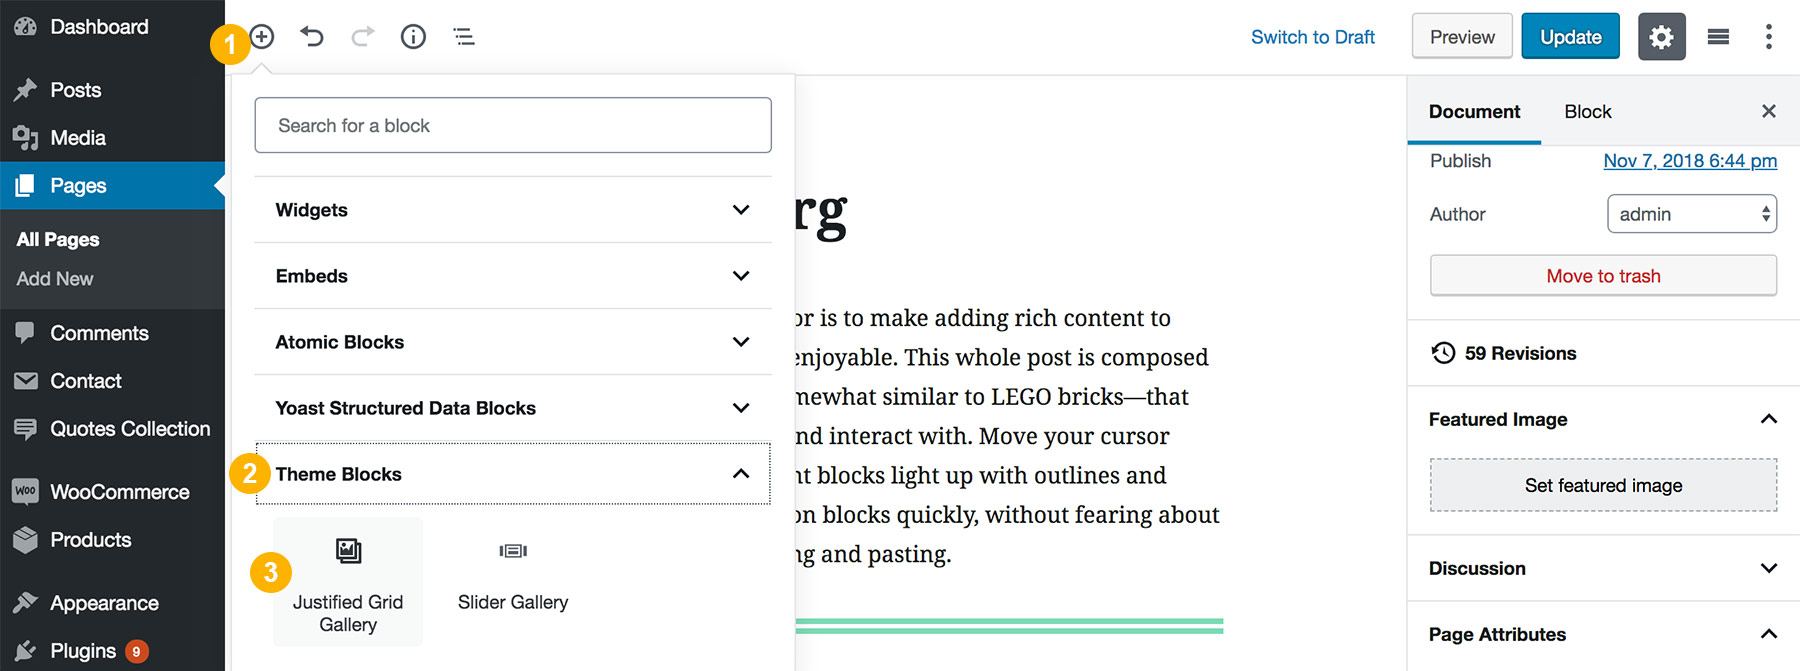
Eaven theme built-in image galleries - Slider Gallery & Justified Gallery have been converted into Gutenberg Blocks.
Let's take the Justified Gallery Block for example:
Step 1 - When adding a block, find Theme Blocks, click the Justified Grid Gallery to add it to the content area.
Theme built-in Justified Gallery Block in Gutenberg Editor
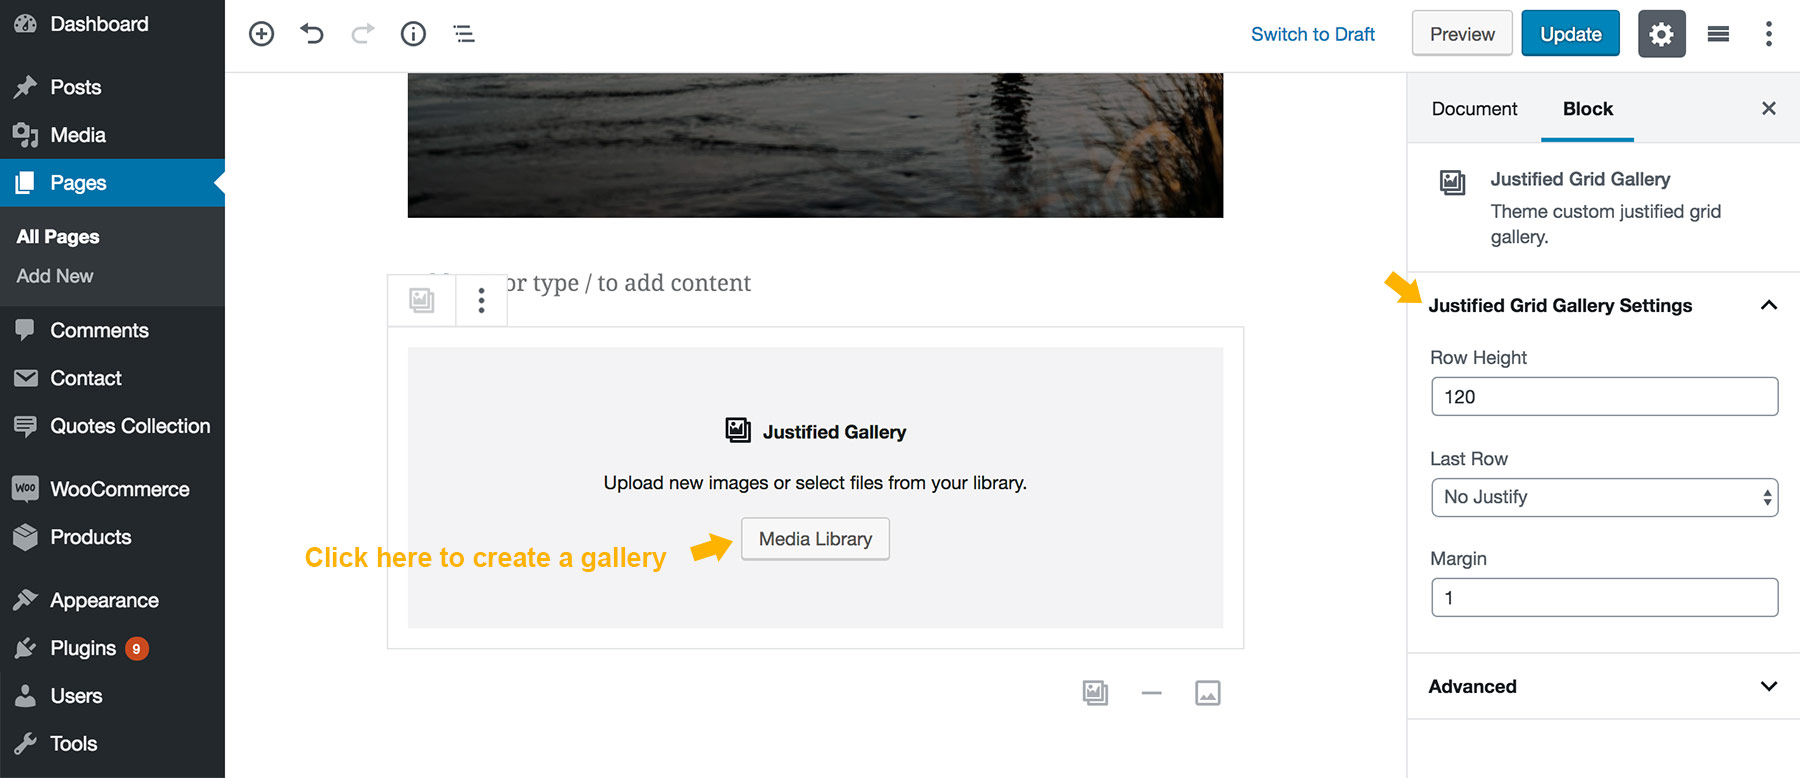
Step 2 - Then you will see the block has been added. When selecting this block, the settings for this gallery will show in the right sidebar. Click on the "Media Library" button
to open the Media Library where you can create a new gallery.
Justified Gallery Block Settings
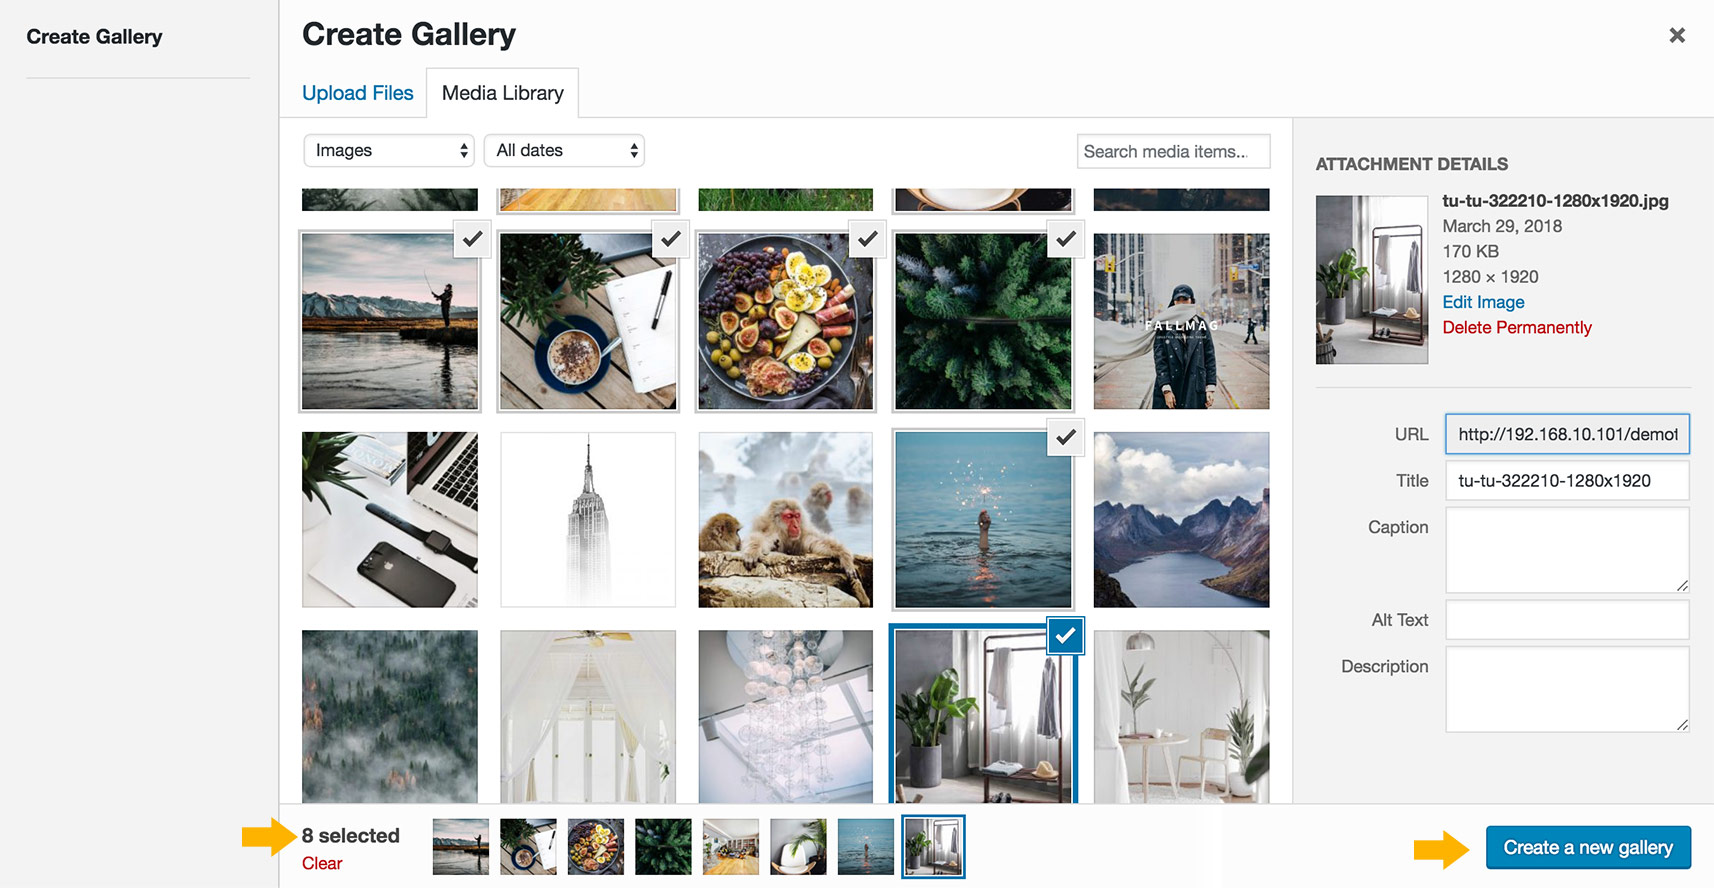
Step 3 - In the Media Library panel, you can upload new images, or select some existing images, and then click "Create a new gallery" button.
Select some images to create a gallery
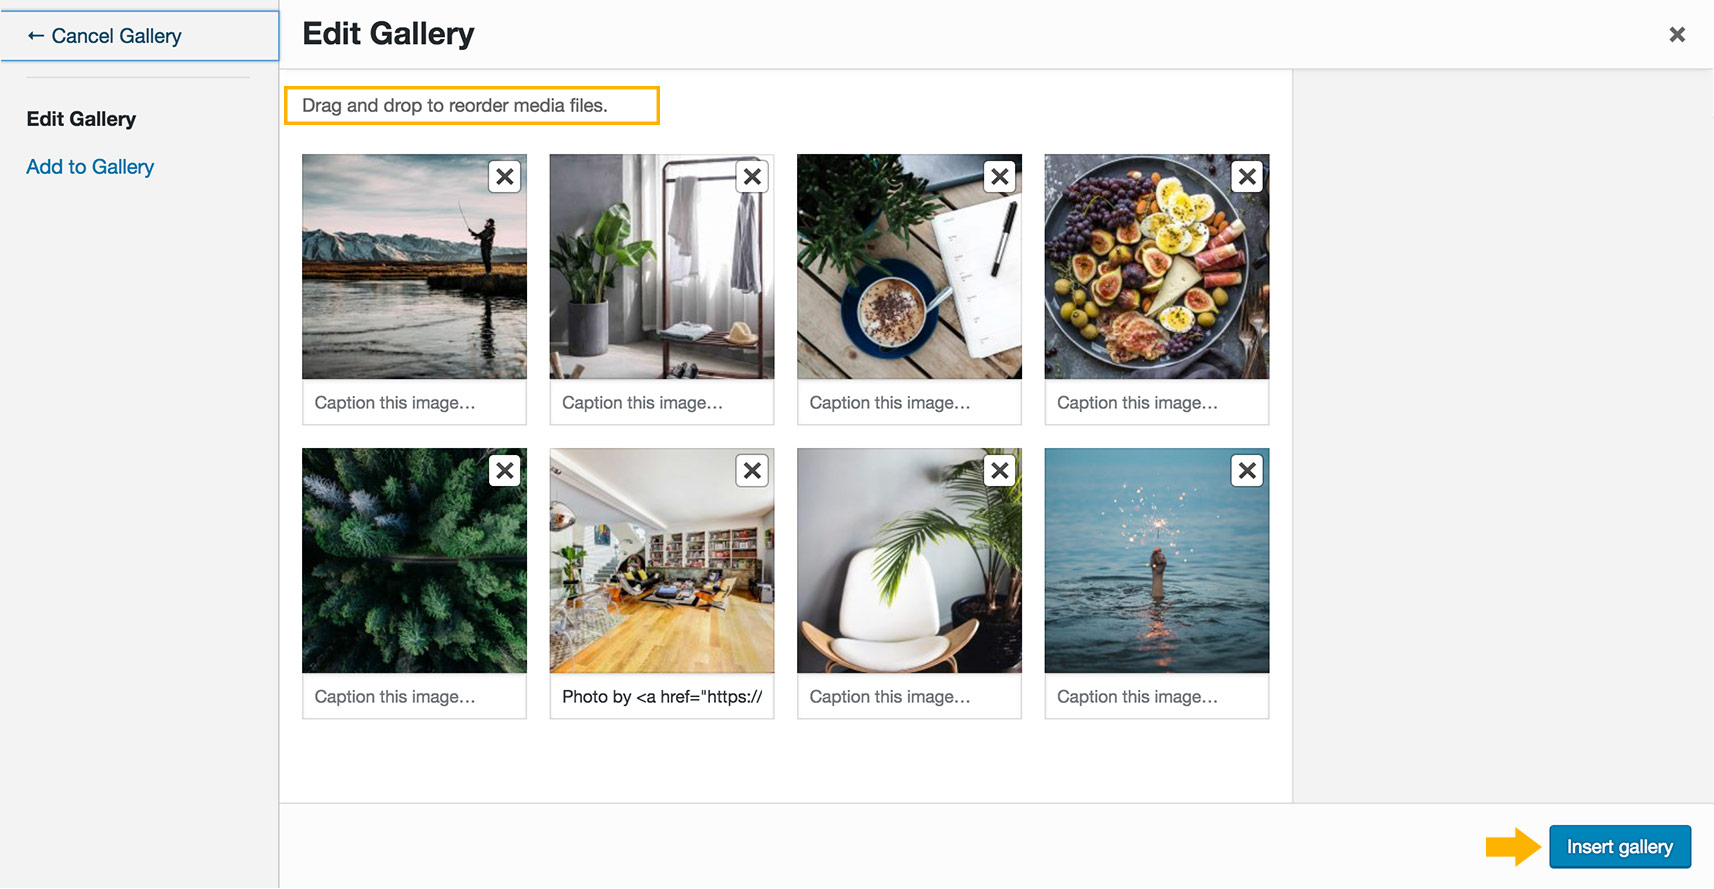
Step 4 - Then you can edit this gallery: reorder images, remove images, add captions, add new images into this gallery. Then click "Insert gallery" button.
Edit a gallery
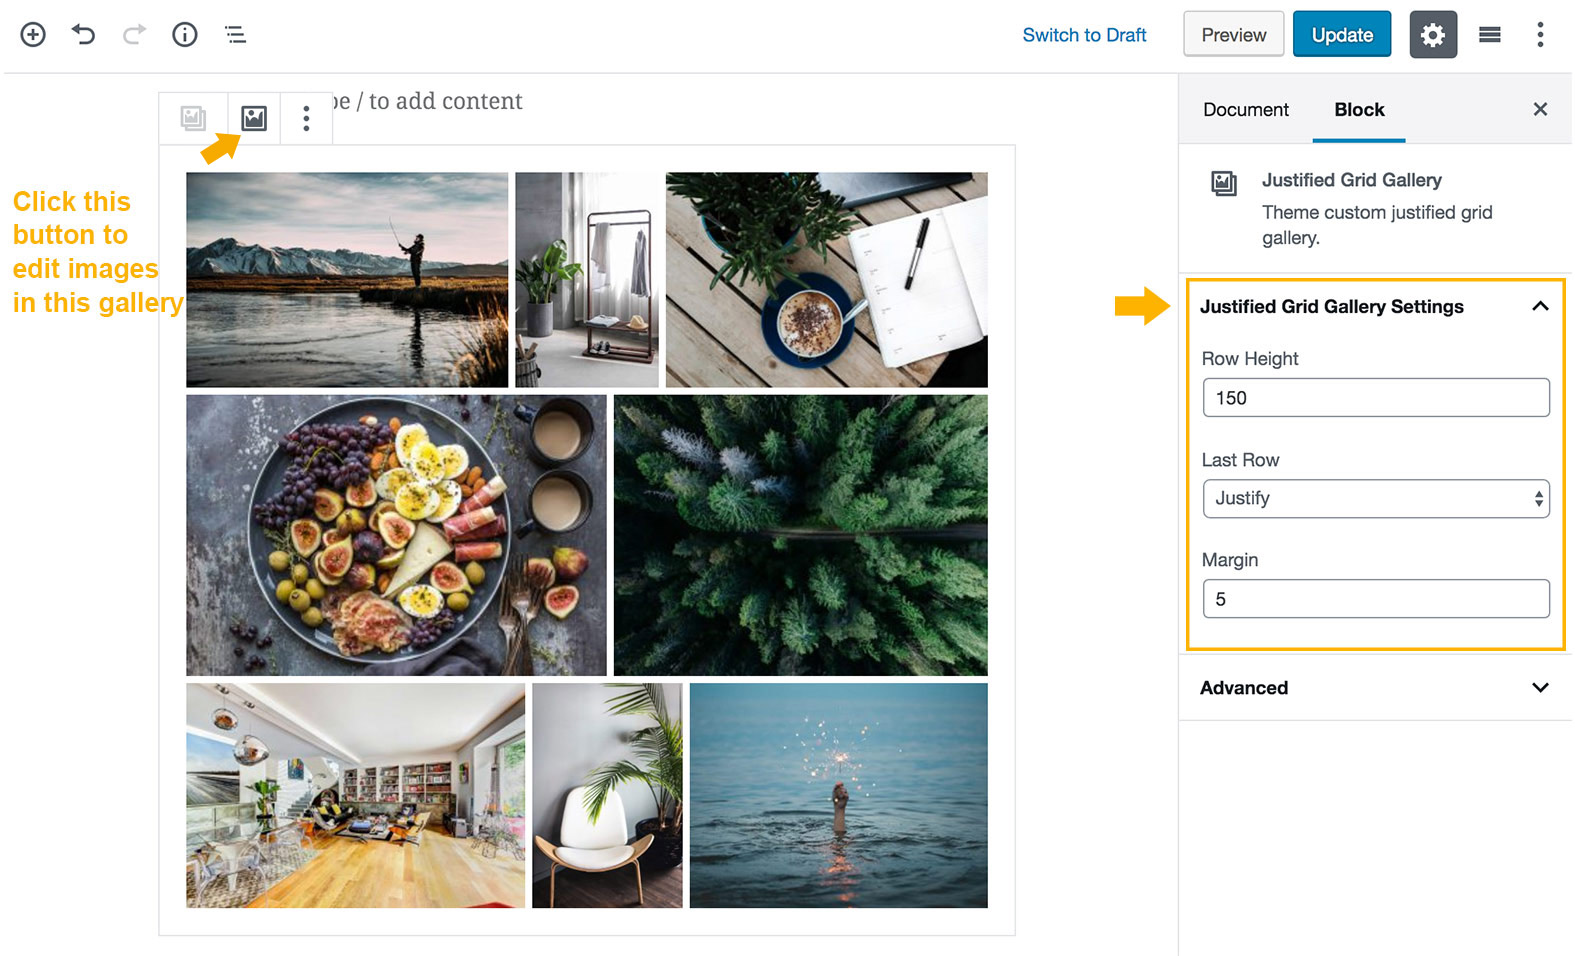
Step 5 - Now the gallery can be previewed in Gutenberg.
Justified Gallery Block preivew in Gutenberg Editor
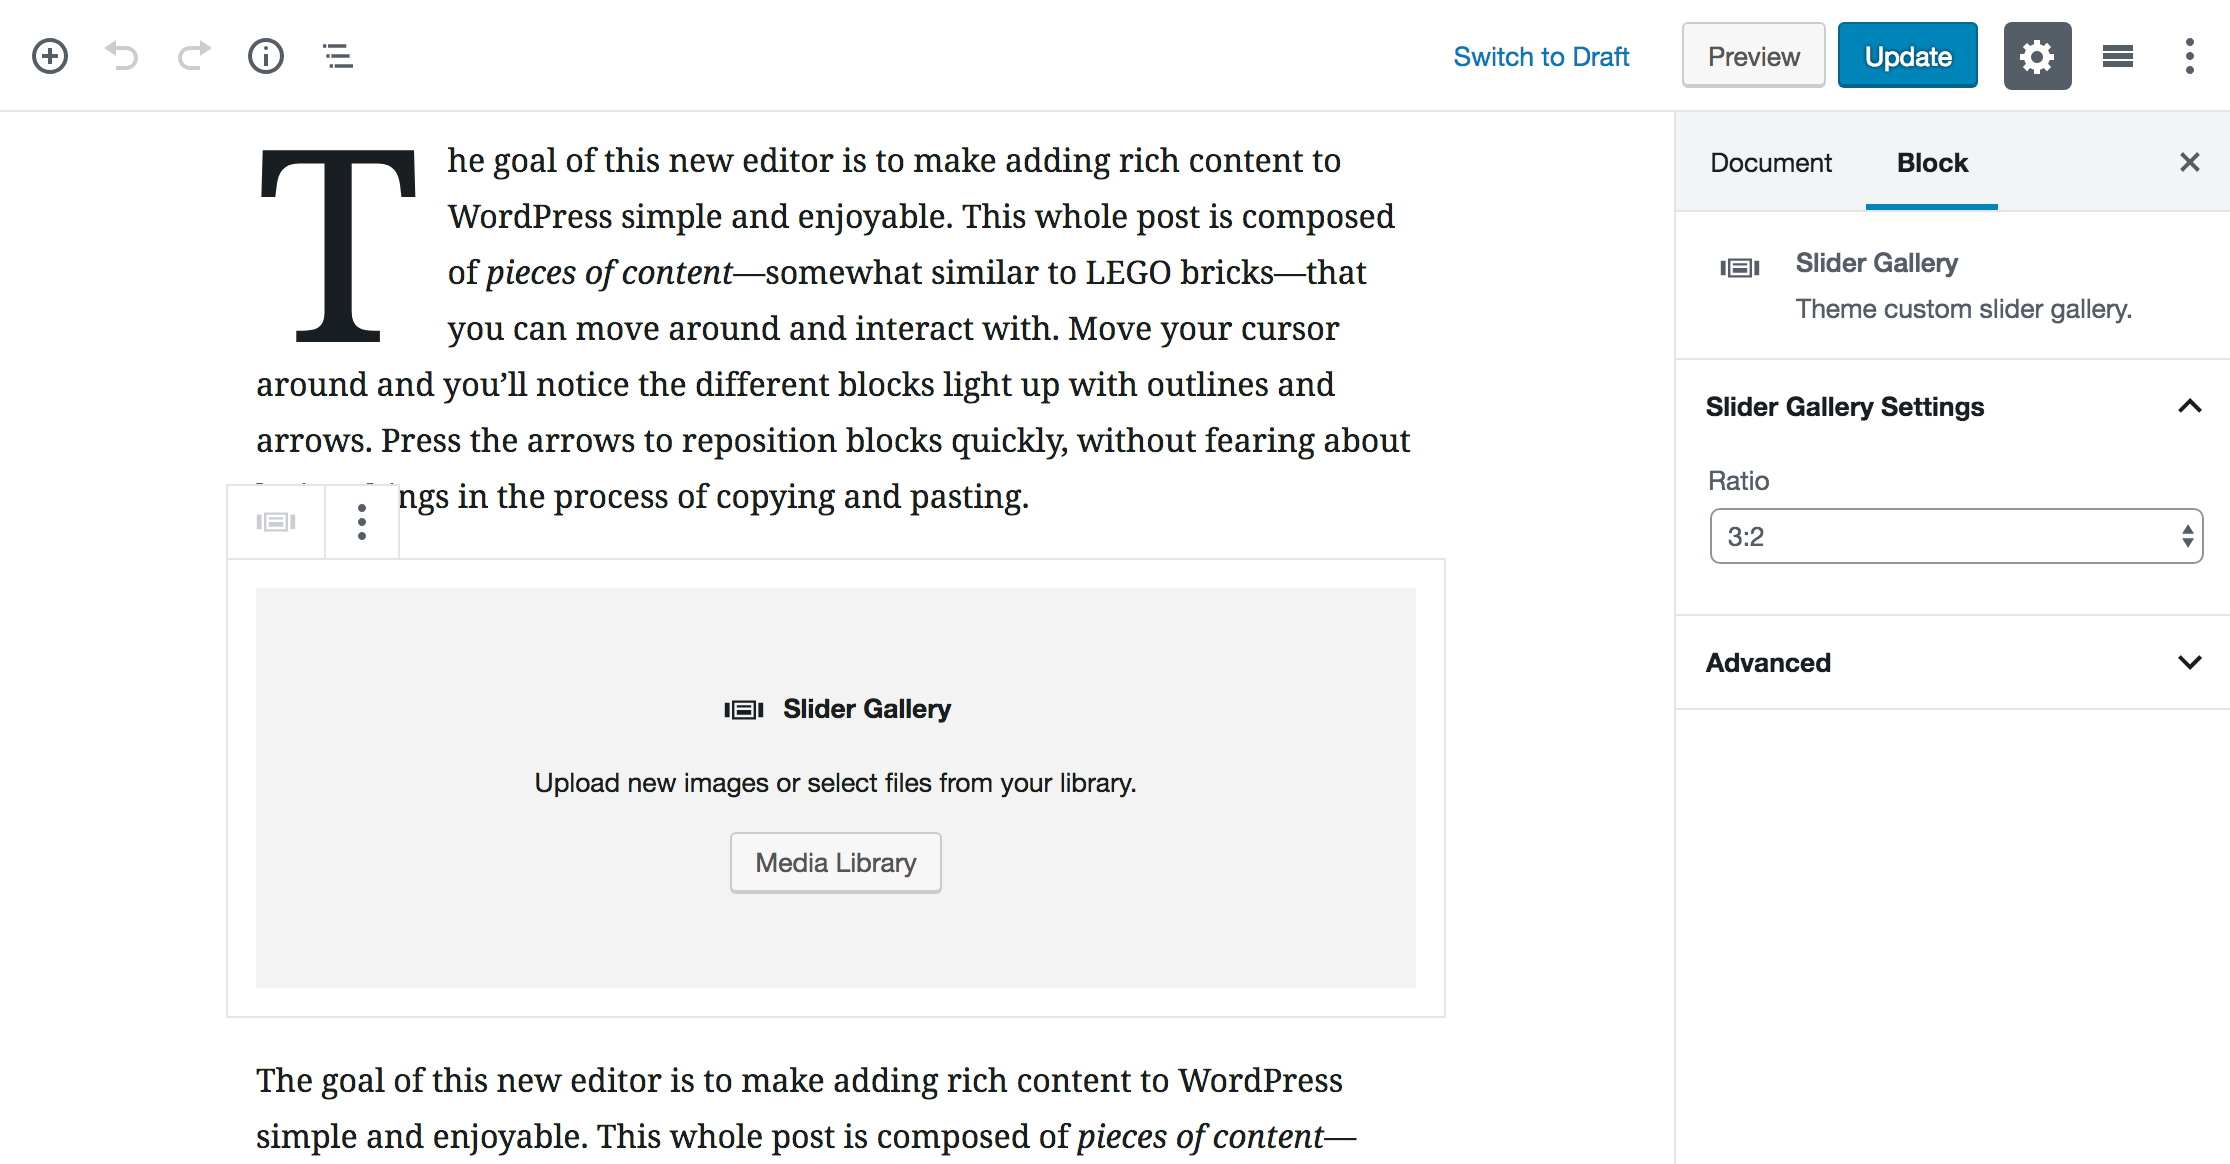
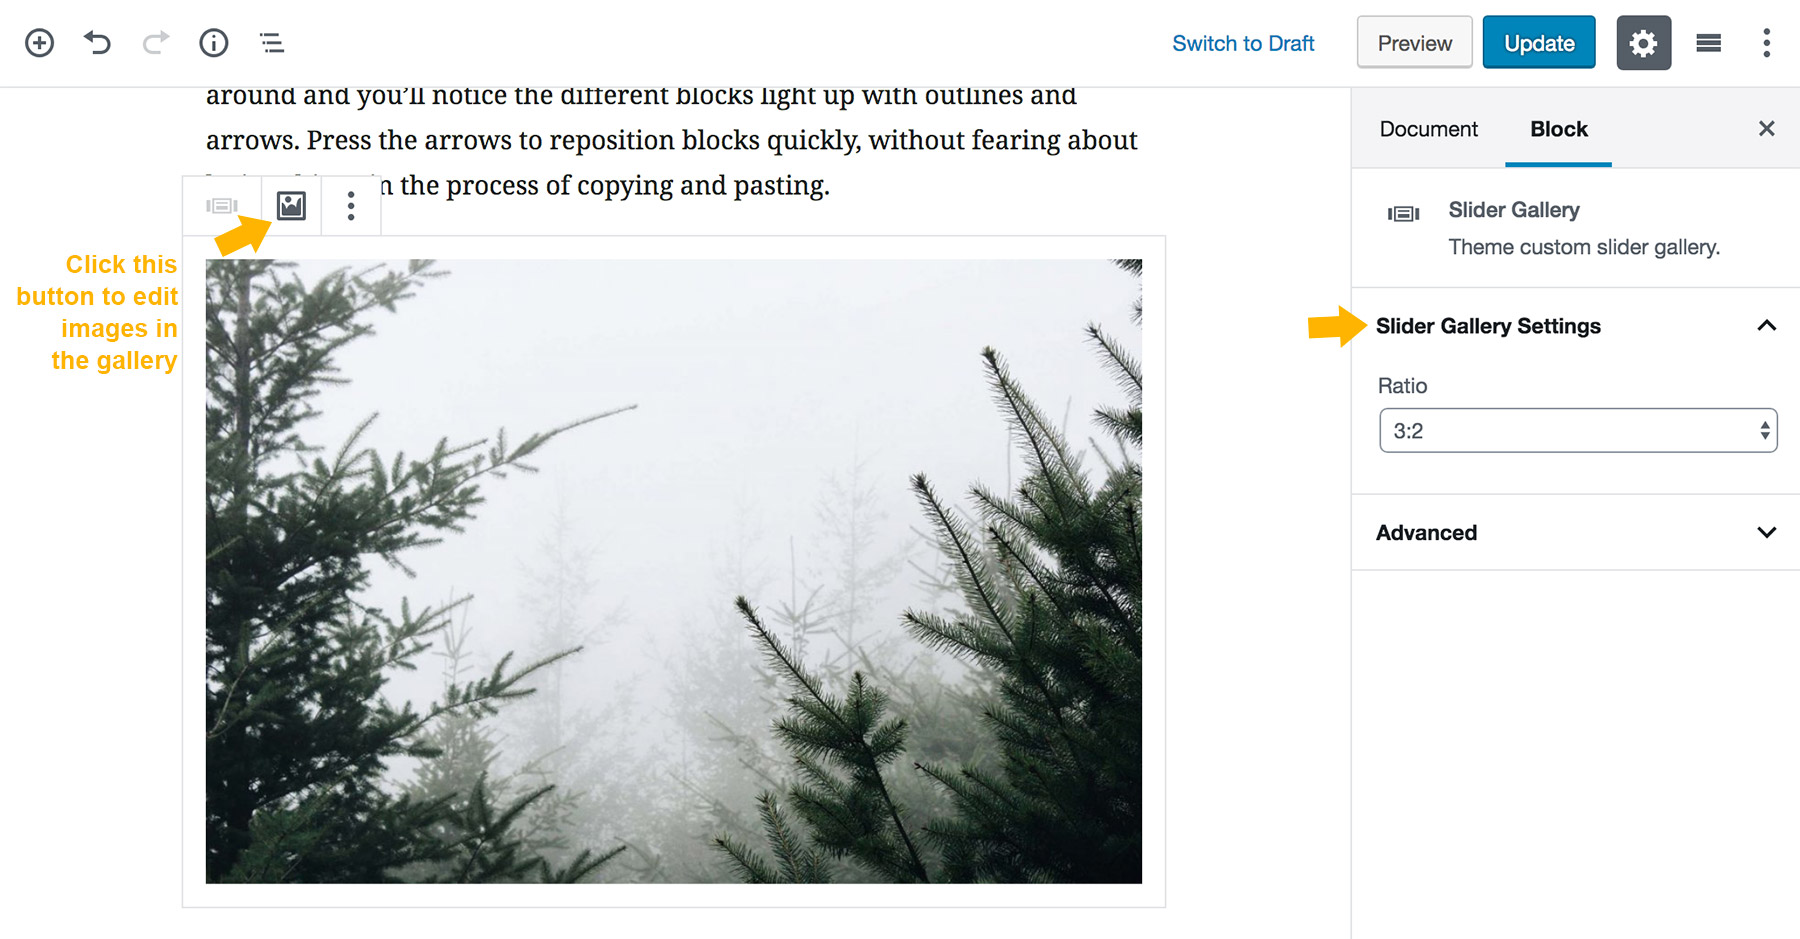
It is similar when adding a Slider Gallery:
Slider Gallery Block is added in Gutenberg EditorSlider Gallery Block preivew in Gutenberg Editor
15.3 Eaven Single Post/Page Options
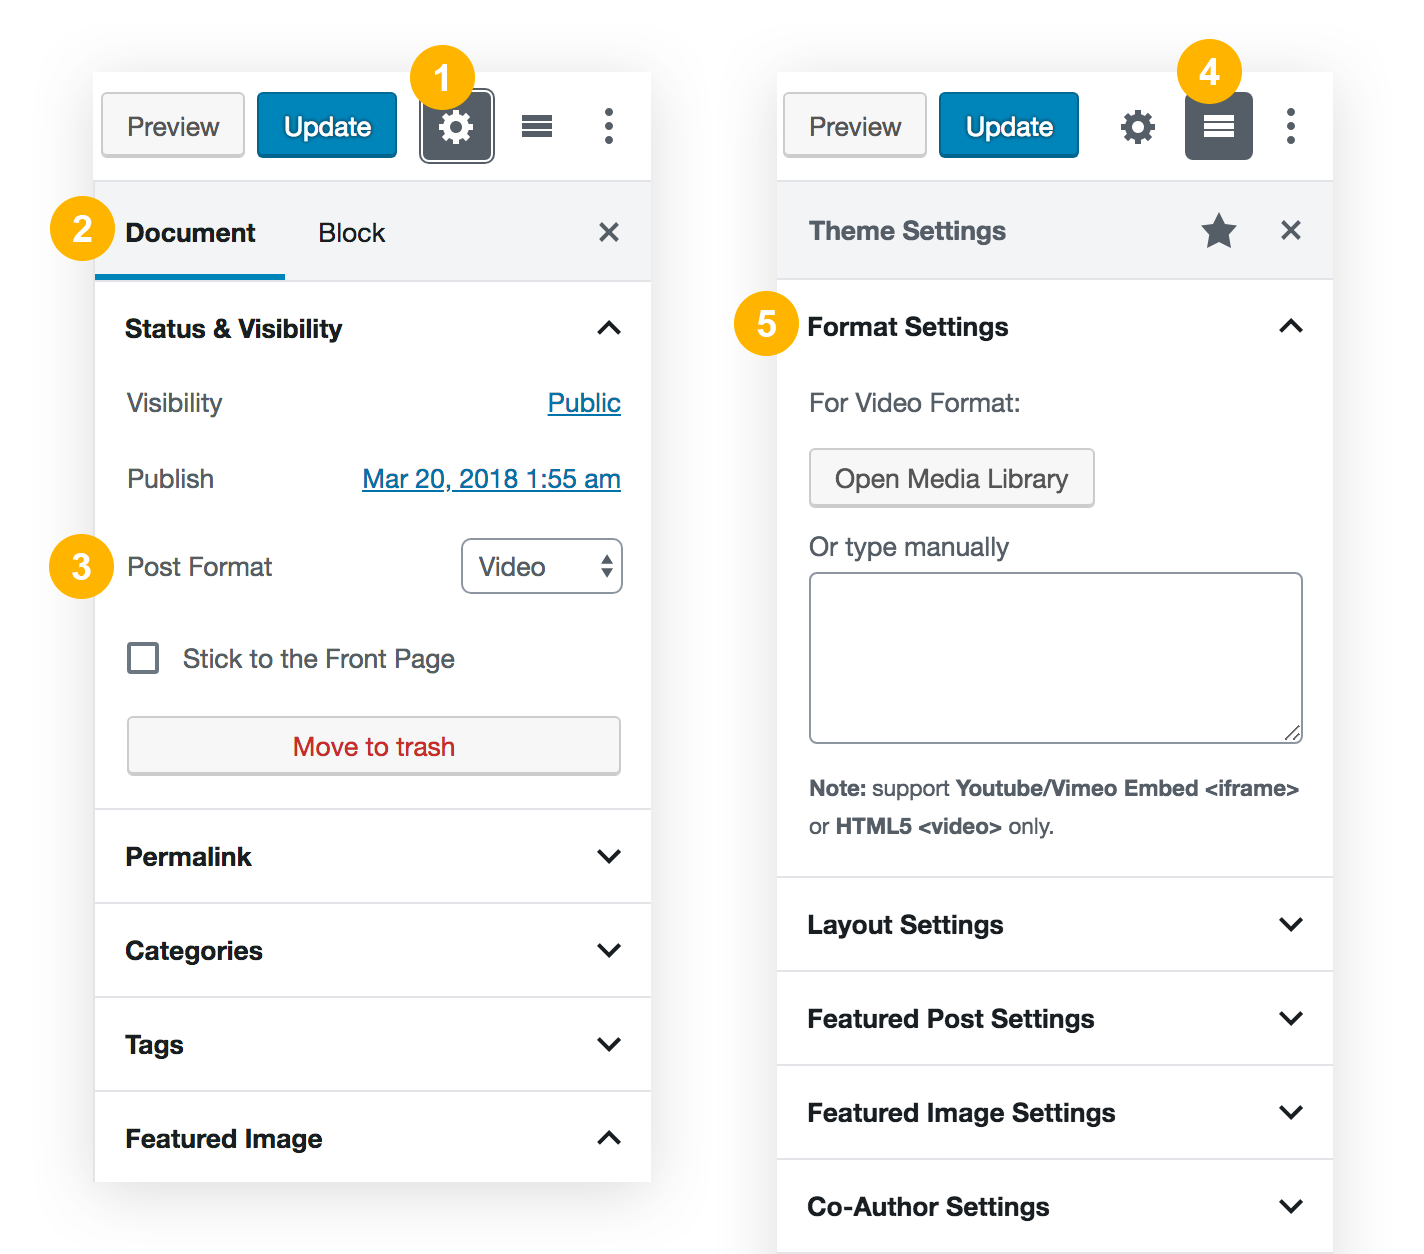
In the Classic Editor, Eaven Single Post/Page Options are meta boxes which were displayed below the post editor. Since Eaven v1.2.0, we redesigned these settings
to fit in the Gutenberg UI - Sidebar. So, if you edit a post/page in Gutenberg, you can find the Single Post/Page Options in the editor sidebar.
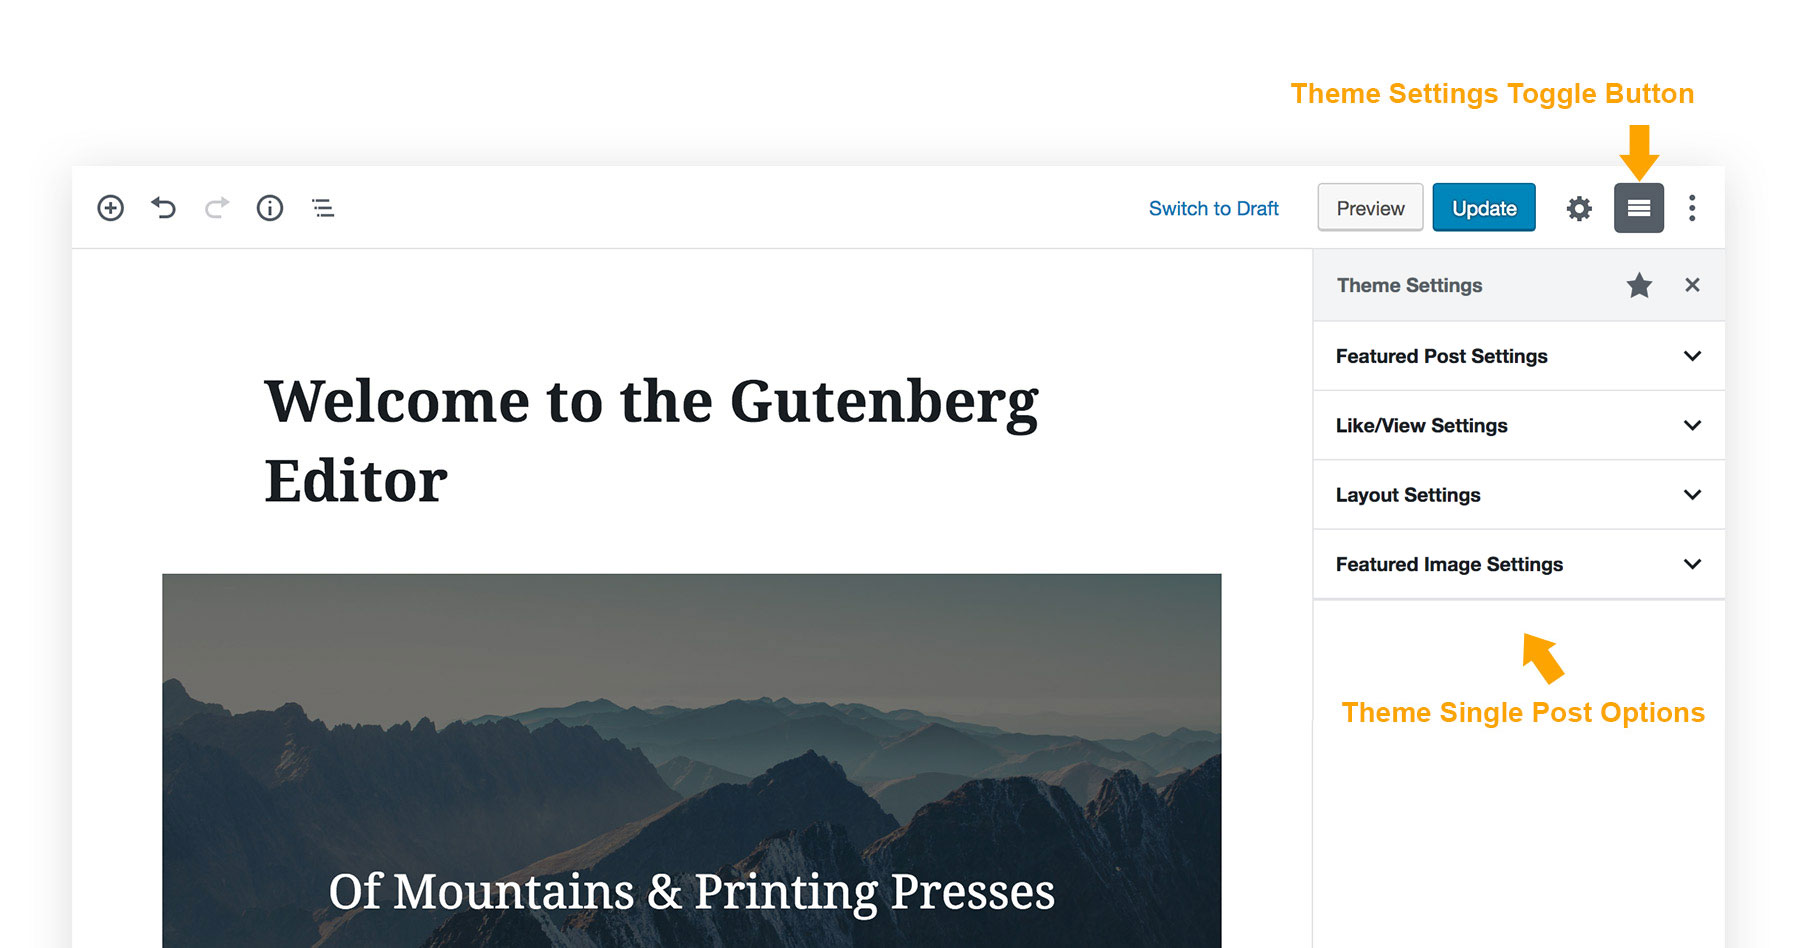
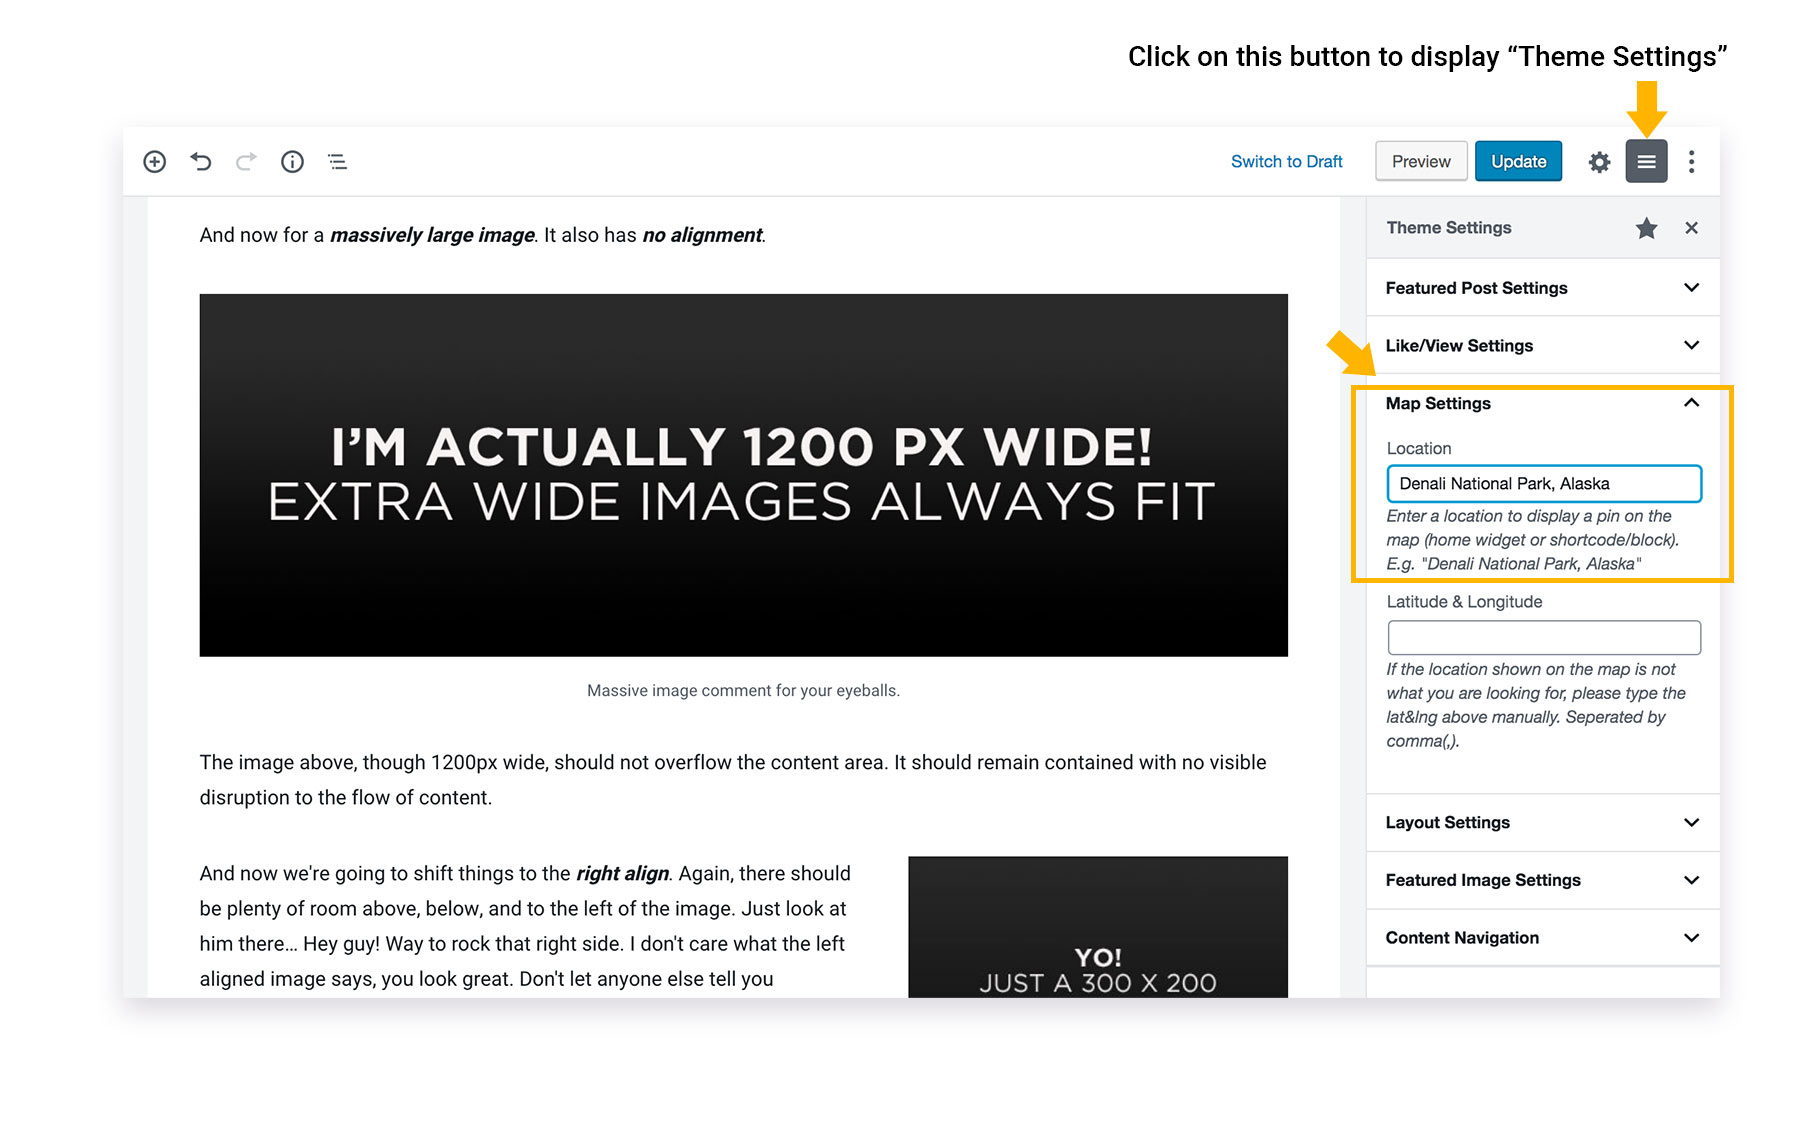
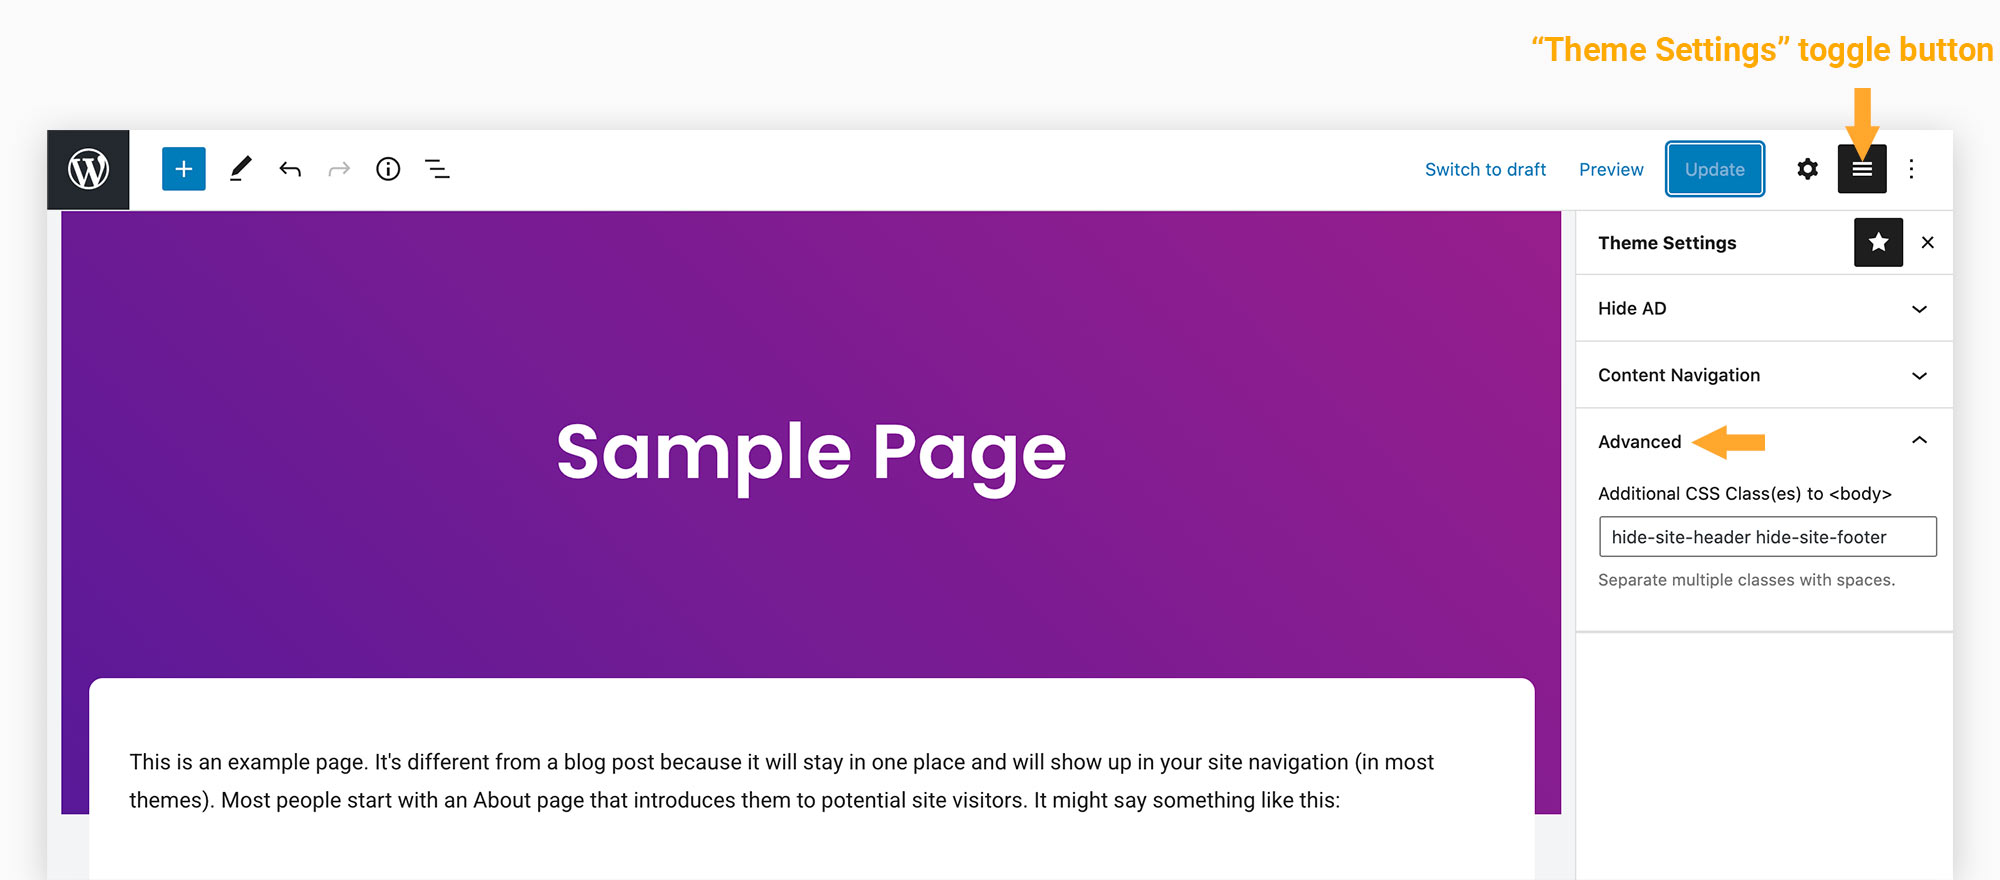
For example, when editing a post in Gutenberg editor, please click on the "Theme Settings" toggle button to display the Single Post Options.
(When editing a Page, the "Theme Settings" will show Single Page Options.)
Eaven theme Single Post/Page Options integrated to Gutenberg Sidebar
The options are organized into groups, click on each group heading to expand the group and show its settings.
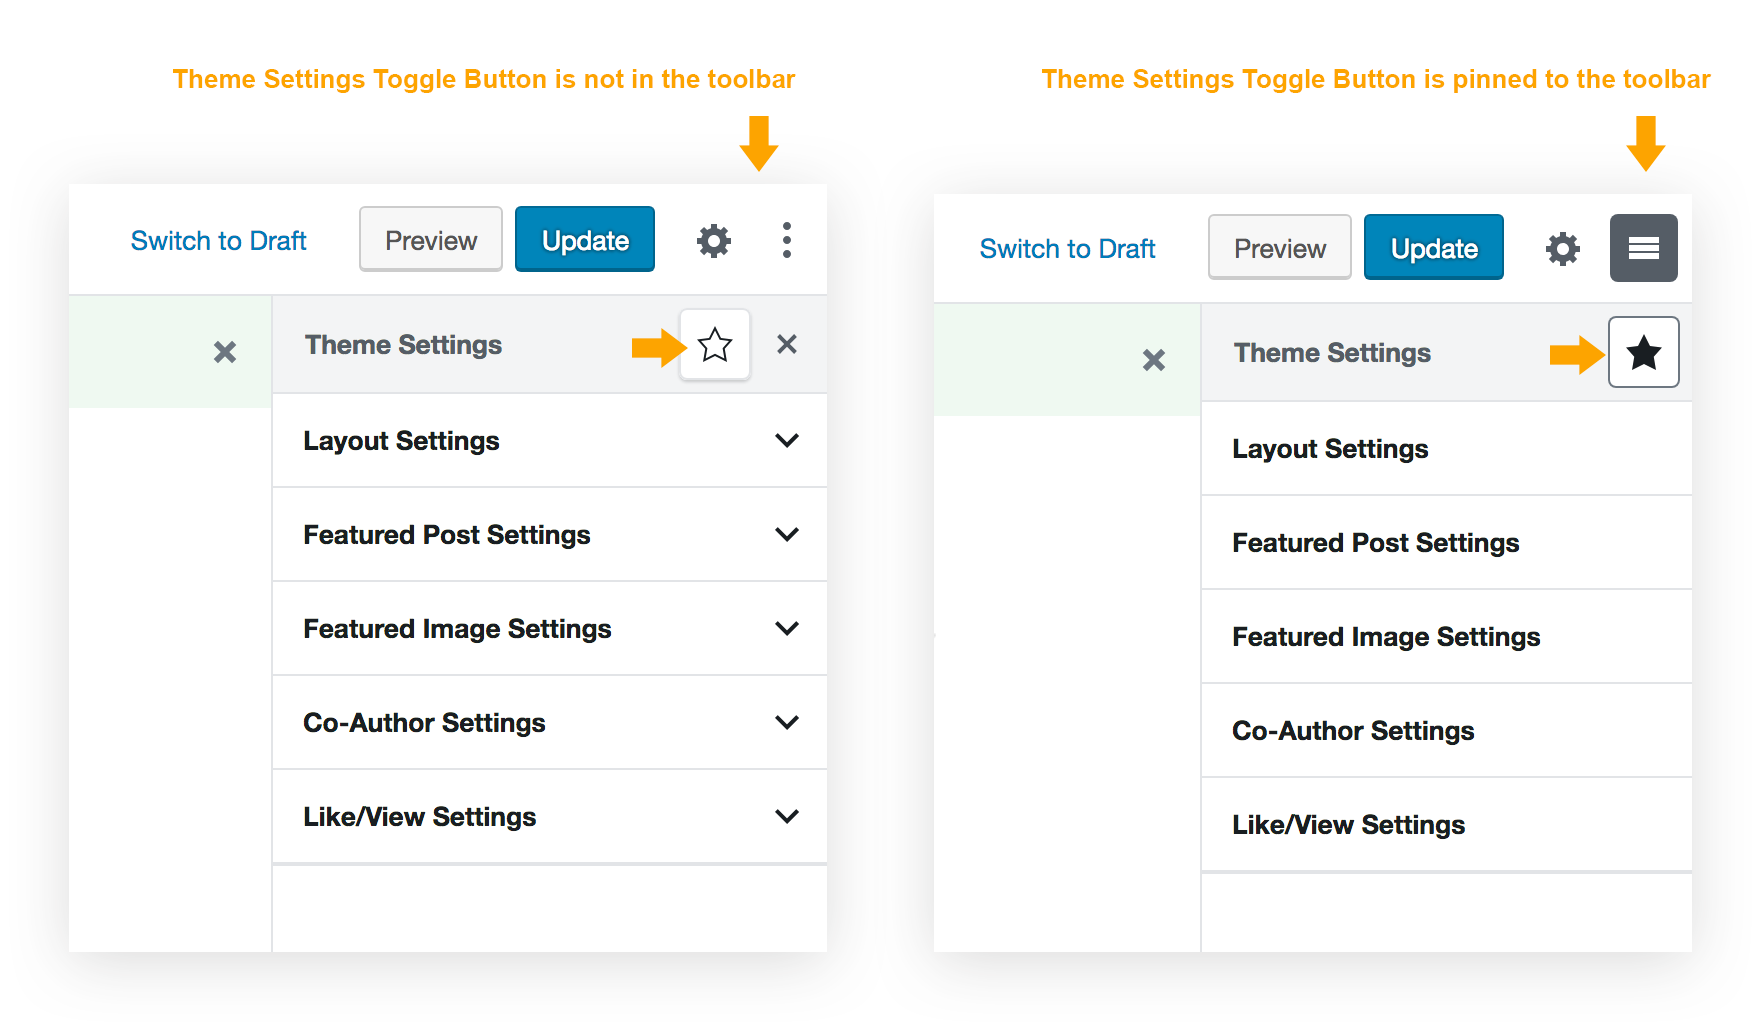
Please make sure the "star" icon is enabled to pin Theme Settings toggle button to Gutenberg Toolbar:
Theme Settings toggle button - Pin to Toolbar
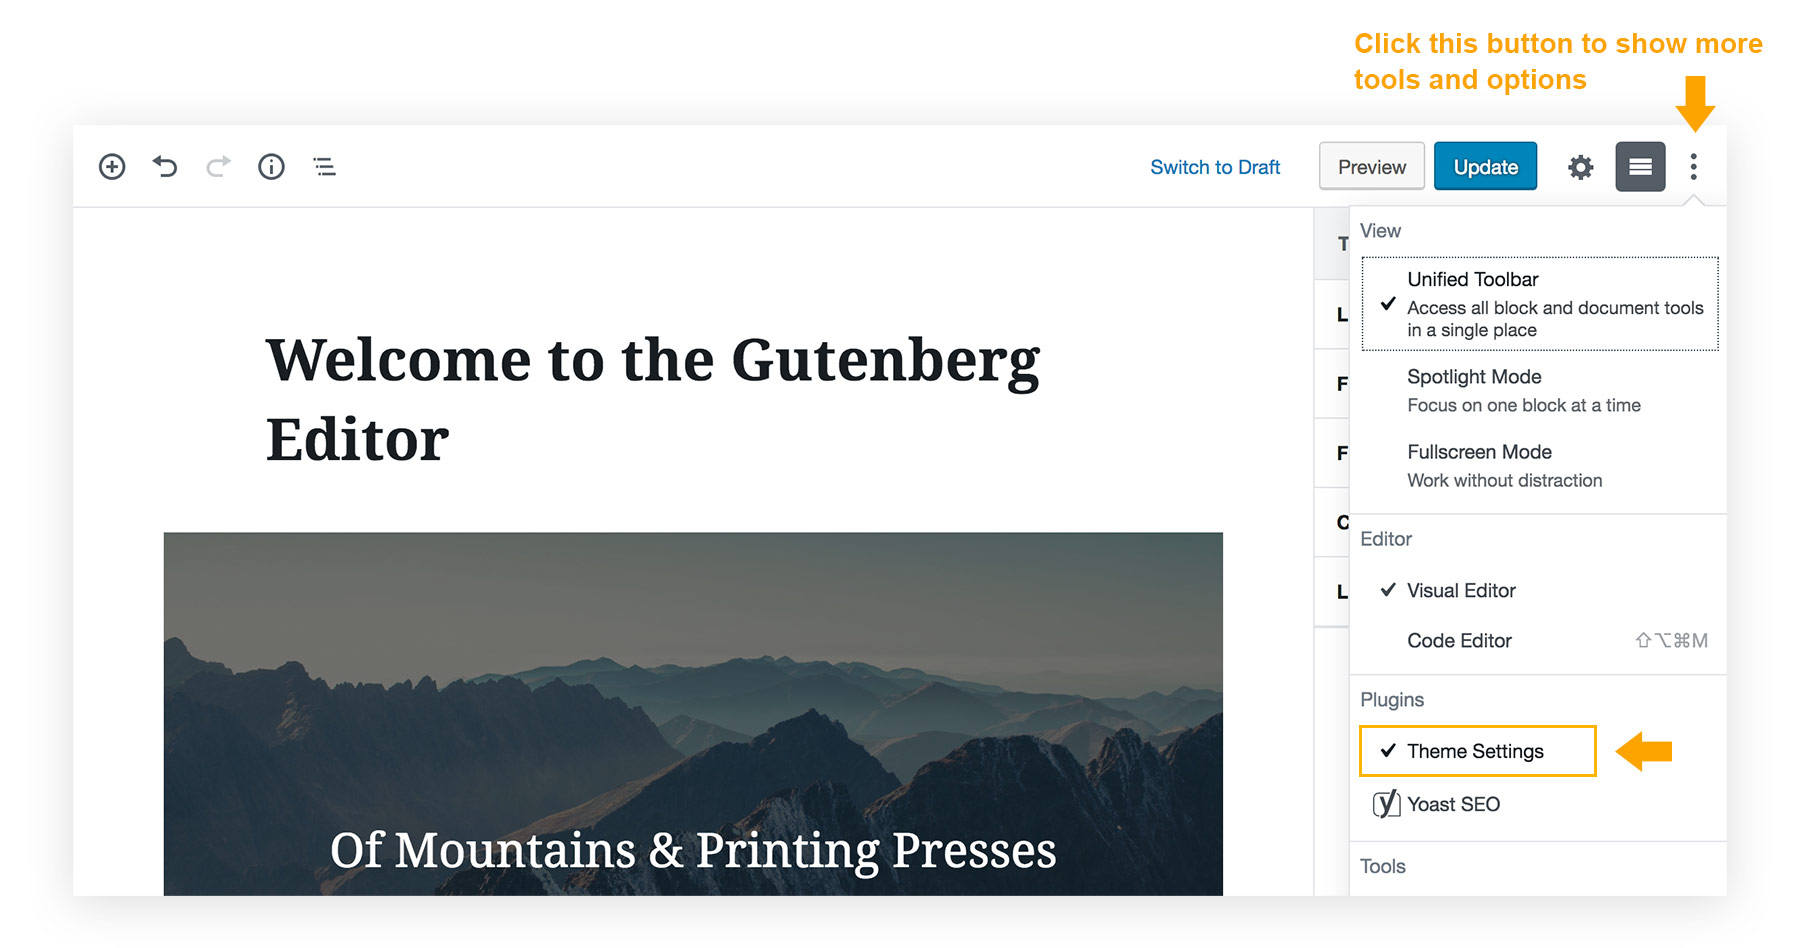
If the "Theme Settings" is unpinned from the toolbar and you cannot find it, please click the "Show more tools and options" icon, then
you can find "Theme Settings" in "Plugins".
Theme Settings toggle button - Pin to Toolbar
15.5 Post Format Media
If the post format is Gallery / Video / Audio, the media files can be picked in Theme Settings section. Please
see the screenshot below as reference:
Set media for Post Format
15.5 Theme Shortcodes are converted to Blocks
The theme built-in shortcodes have been converted into Gutenberg Blocks.
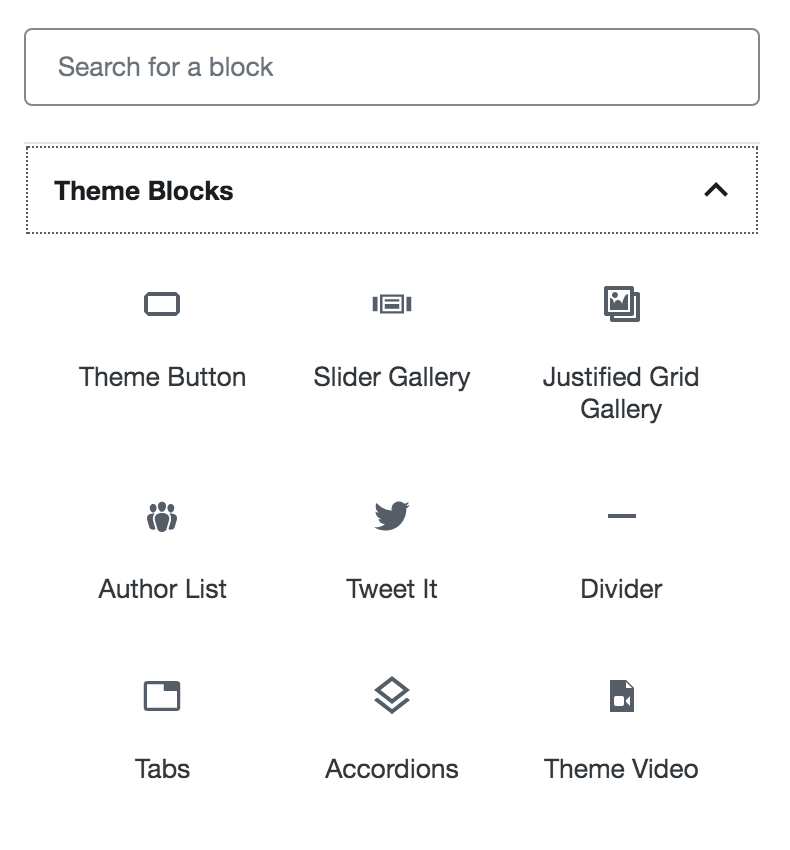
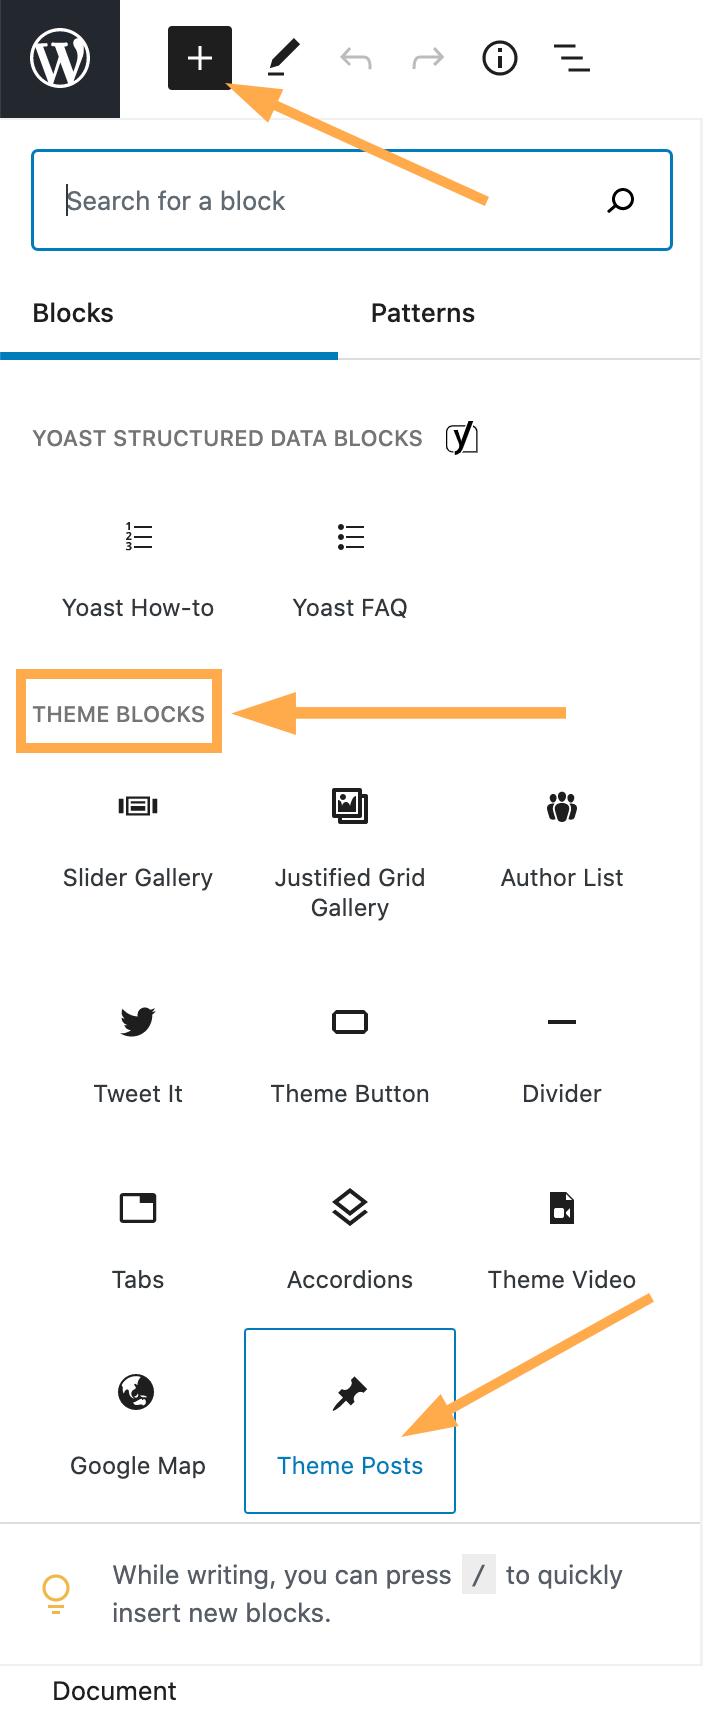
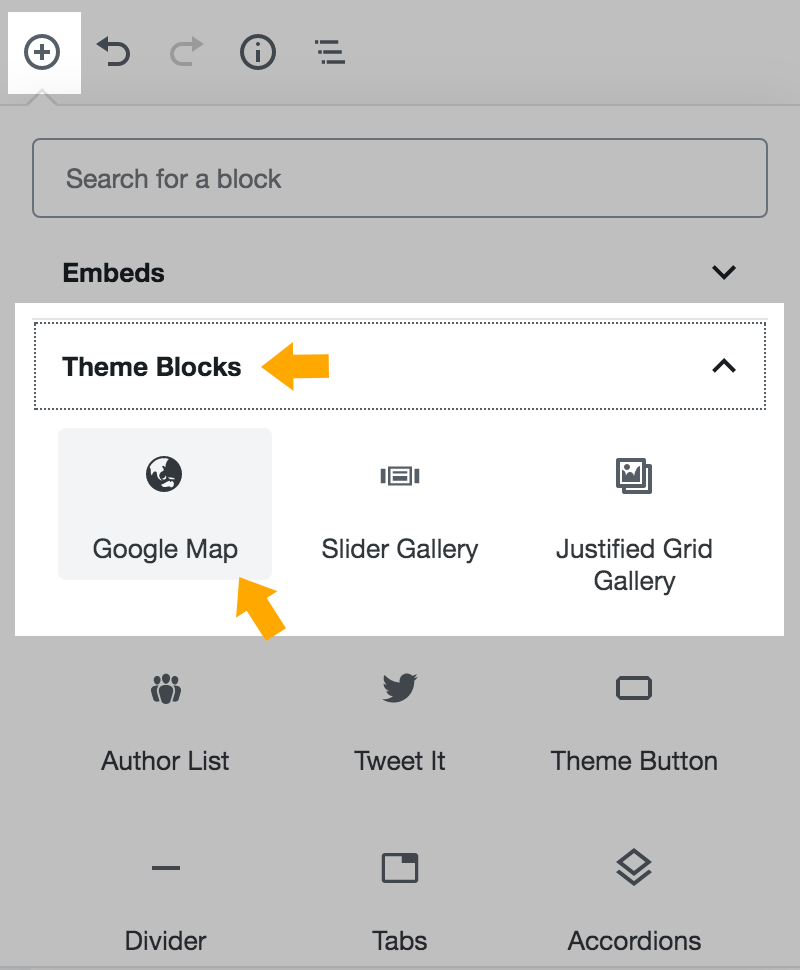
15.5.1 The following 8 shortcodes can be founded in "Add Block" > "Theme Blocks".
Author List
Divider Line
Theme Button
Tweet It (paragraph)
Tabs
Accordions
Google Map
Video
Theme Shortcodes are converted to Gutenberg Blocks
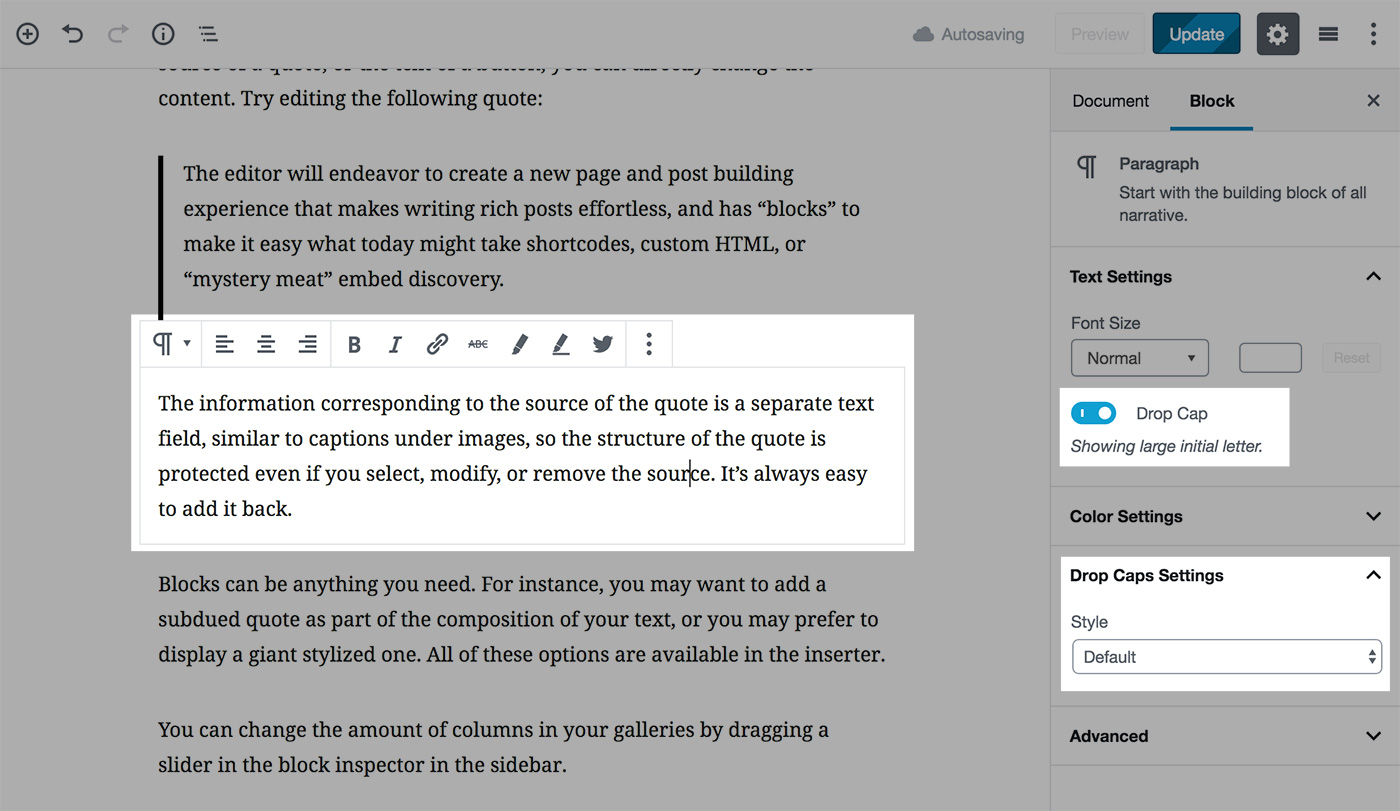
15.5.2 The following 3 shortcodes are integrated with Gutenberg built-in block: "Paragraph".
Drop Caps
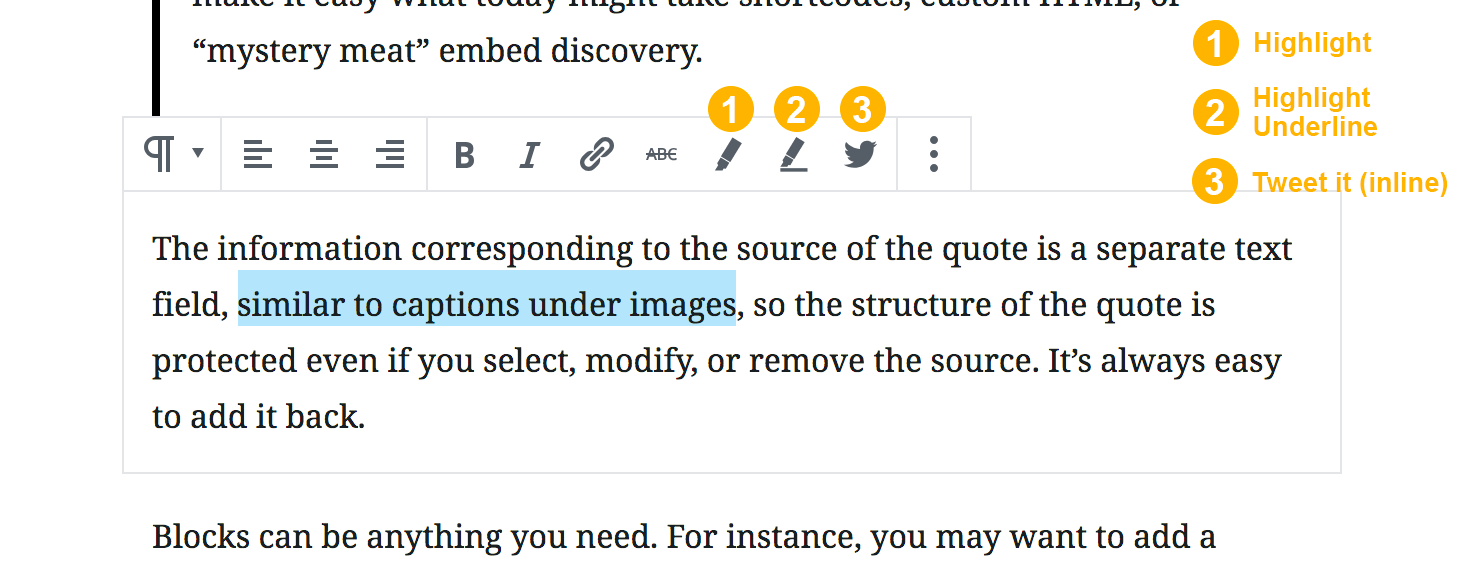
Highlight
Tweet It (inline)
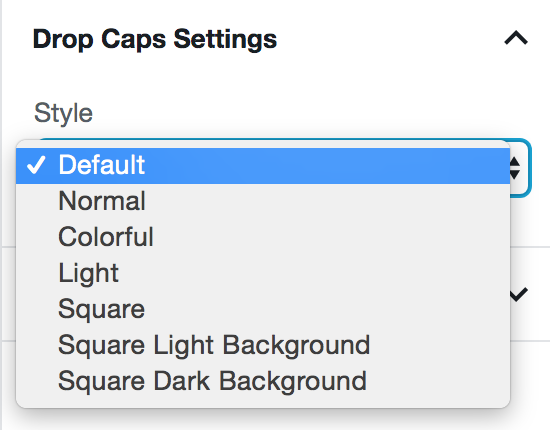
Drop Caps - when editing a paragraph, enable the "Drop Cap" option, then select a style from "Drop Caps Settings" drop down list.
Drop Caps shortcode in Gutenberg editorDrop Caps Settings
Highlight & Tweet It (inline):
Highlight & Tweet It (inline) shortcode in Gutenberg editor
15.6 Theme Block - Posts
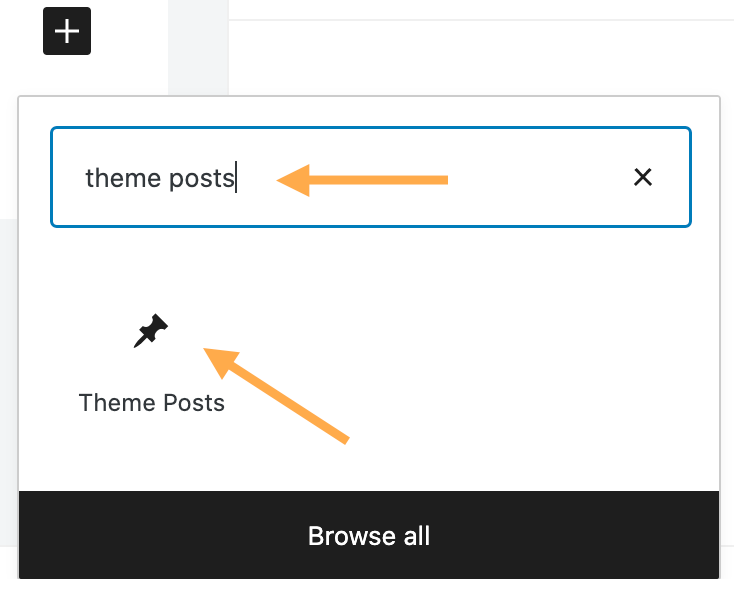
In version 1.6.0, we added a new block in Gutenberg: Theme Posts. Users can use this block to add selected posts to the content of any post or page.
When editing a post or page in the Gutenberg editor (Block editor), search "Theme Posts". After adding this block to the content, you can select the post source, and
customize the list layout, displayed meta, and etc.
Search "Theme Posts" in Gutenberg editor
Or, you can click the "Add Block" button to display all available blocks, and then scroll down to find Theme Blocks >
Theme Posts.
Find Theme Blocks in Gutenberg editor
How to select multiple categories/tags?
When selecting posts from categories/tags, you can select multiple categories/tags.
If you are using Mac, please press and hold the "Command" key on your keyboard and click the categories.
If you are using Windows, please press and hold the "Ctrl" key on your keyboard and click the categories.
Select multiple categories/tags
Please note: This block has not been converted into a shortcode in the classic editor. Therefore, if you want to add selected posts to the content of any post or page,
please use the Gutenberg editor.
16. Content Navigation
16.1 What is Content Navigation
Since Eaven v1.1, we added a new feature "Content Navigation". It allows users to generate special-styled table of contents for posts and
pages by parsing the headings ( < h1 > to < h6 > ) in the content.
You can choose to display it as "Sticky to Side", or "Sticky to Top".
Content Navigation. Position - Side.Content Navigation. Position - Top.
16.2 Add in Gutenberg Block Editor
When you edit a page or a post in the Gutenberg Block editor, please click on the "Theme Settings" button and find the sub section "Content Navigation".
Edit the Content Navigation in the Gutenberg Block Editor.
Enable Content Navigation - Check to enable this feature, more options will show when it is enabled.
Position - Side / Top.
Heading - Choose which heading is used to generate the content navigation. You can only choose one from the dropdown list.
The content navigation doesn't support sub levels.
Generate Button - Click this button to generate the content navigation. And the navigation will be regenerated automatically
if you select another Heading.
Editable Label - The labels will be the same as the headings after generating the navigation. You can edit it, for example, the heading is "Where to find a lovely hotel in Paris?"
You can change the label to make it shorter: "Recommended Hotels".
Icon - Choose an icon for each item of the content navigation. Please note: if the navigation is regenerated, you need to edit the icons again.
16.3 Add in Classic Editor
When you edit a page or a post in the classic editor, you will find the panel "Content Navigation" below the editor.
Edit the Content Navigation in the Classic Editor.
Enable Content Navigation - Check to enable this feature, more options will show when it is enabled.
Position - Side / Top.
Heading - Choose which heading is used to generate the content navigation. You can only choose one from the dropdown list.
The content navigation doesn't support sub levels.
Generate Button - Click this button to generate the content navigation. And the navigation will be regenerated automatically
if you select another Heading.
Editable Label - The labels will be the same as the headings after generating the navigation. You can edit it, for example, the heading is "Where to find a lovely hotel in Paris?"
You can change the label to make it shorter: "Recommended Hotels".
Icon - Choose an icon for each item of the content navigation. Please note: if the navigation is regenerated, you need to edit the icons again.
16.4 Change Color
We added this feature in v1.4. Now users can change the background color, icon and text color of the content navigation.
Change color for Content Navigation
Please open your WordPress Customizer, and then go to General > Content Navigation > There you can find the options to
change its background color and text color. The custom colors will be applied to all content navigations.
Custom color for Content Navigation
16.5 On Mobile Devices
This is a new feature added in v1.8.2.
By default, on mobile devices, since the screen is small, so the text of Content Navigation will be hidden, only the icons are visible. However, if you
still want to show the text on mobile devices, please open the Customizer and navigate to General > Content Navigation >
find the option "Show Label Text on Mobile Devices" and enable it.
Show Label Text on Mobile Devices
17. Google Map
As a WordPress theme for traveller blog and magazine, display a Google Map with destinations is an essential feature. In this section, we will explain the steps of
how to add a Google Map with Eaven theme.
Starting from June 11, 2018, Google requires new API key to use Google Map. To get the API key, you need a Google Cloud Platform
billing account.
Please kindly note that there may be charges for using Google Maps
When using Google Map services, you will be charged based on your specific monthly usage. This fee is collected by Google. Please visit the Google Map Pricing page for details.
Please watch this video to know how to get your Google Map API Key:
When you get your Google Map API Key, please copy it, and open your website Customizer, then go to General >
Google Map > Paste the key into "API Key" field. Then save the changes.
Add Google Map API Key to your site
Now your map is ready to display. But, to display pins on the map, you need to add locations to your posts first.
Please read the following section.
17.3 Add locations to your posts
In Classic Editor
When you write a post, scroll down the edit page and then you will find the Eaven Single Post Options panel > Location field.
If you are writing a post about a destination (country/states/city/etc.), you can add the name of this destination to the Location field, such as
"Sydney, NSW, Australia".
Please note: Do not add same location to different posts, otherwise, the post
information cannot be displayed on the map when clicking on the pin.
Add a location to a post
Latitude & Longitude
After adding a location to a post, when saving the changes to this post, the Latitude & Longitude values will be generated automatically
from the location added. The Latitude & Longitude values are required to display a pin on the map. You can add custom Latitude & Longitude values
if the map pin location in incorrect.
Latitude & Longitude
Please note: The Google Map API key is required to auto generate Latitude & Longitude values.
If you added some locations before adding your Google Map API key, please:
Method 1 - Re-save the posts to auto generate the Latitude & Longitude values.
Method 2 - Or, on the post list page (dashboard > Posts > All Posts), find the "Map Location" column, then click on the "Generate Latitude & Longitude" button
for each post.
Generate Latitude & Longitude
In Gutenberg Block Editor
If you use Gutenberg Block Editor, you can find the field for adding location in Theme Settings > Map Settings > Location field.
Add a location to a post - in Gutenberg
Then, when you add a Google Map to your homepage (using the home widgets "Google Map"), or add a Google Map to your post/page content
(using Google Map shortcode or Gutenberg block), you will see a pin shown on the map. Click on this pin to display the thumbnail
(featured image) and title of this post. Click it to go to this post.
Pin of a post on the map
17.4 Display a Google Map on homepage
Please open your WordPress customizer, go to Home Page > Content Area Before Latest Posts > Click on "Add a Widget" button,
select Google Map. Then the map will display on your homepage.
There are some options:
Width - Normal or Fullwidth
Height - Enter a height for the map.
Number of Displayed Pins - Enter a number to limit the maximum number of pins displayed on the map (because each displayed pin will cost a certain amount of Geocoding API credits). Enter "0" to display all pins.
Preset Style - Select a preset style for your map. Currently there are 4. More styles will be added in future updates.
Zoom Level - Enter a number to decide the map resolution. (0: World; 15: Streets; 20: Buildings. More info can be found here.)
Centered Location (optional) - Add a location to ensure the center point of the map. It can be the name of a city/street/building.
17.5 Add a Google Map to page/post content
You can also add a map with all the destinations (posts with locations) in to the content of single posts or pages.
In Classic Editor
In classic editor, just click on "Add Shortcode" button, then click "Google Map".
Add Google Map Shortcode
In Gutenberg Editor
In Gutenberg Block Editor, when adding a block, find "Theme Blocks" > "Google Map", then add it to the page.
Add Google Map Block
Please note:
To save your Google Map Geocoding API credits, it only shows a map placeholder image in Gutenberg editor. Please save your settings
and check the results in the front-end.
When editing in Gutenberg, to change the map width, please click on the map placeholder, then you can choose between "Wide Width" and "Full Width".
To maintain a normal width (same as text paragraphs), do not select either of these two.
Change the width of Google Map Block
17.6 How to display a map with a specific location, not posts?
You can simply embed a map. You don't need to add a Google Map API key to embed a map. And it will not cost your Geocoding API credits.
Note: Traffic and other Maps info is sometimes not available in the embedded map.
When adding a Google Map to your homepage ("Google Map" home widget), or to a single post or page ("Google Map" Gutenberg Block or Shortcode), you can
change the map style.
Click on Expand Code, then copy the code.
Click on "Expand Code".Copy the code.
When adding a map home widget or block, find Map Style option, choose "Custom Style".
Paste the code into the Custom Style From Snazzy Map box.
Add custom map style code.
18. Single Page Advanced Options
You can add custom CSS class(es) to a specific page.
What is this for?
This is an advanced function and is usually used by users with knowledge of writing code. You can add specific CSS classes to the "body" tag
of a specific page, and then add corresponding CSS code or JavaScript code for these classes to achieve specific results.
In the Eaven theme, we have provided some preset styles for the following 5 special CSS classes. You can choose to add some of these CSS classes to a page according to your needs.
When entering multiple classes, please separate the classes with spaces.
hide-site-header -
After adding this class, the entire site header (including the logo, site title, tagline, menus) will be hidden for this page.
hide-site-footer -
After adding this class, the entire site footer will be hidden for this page.
hide-footer-widgets -
If you just want to hide the widgets area in site footer for a page, you can add this class to the page.
hide-footer-signup -
If you just want to hide the signup form in the site footer for a page, you can add this class to the page.
hide-footer-ins -
If you just want to hide the Fullwidth Instagram Feed in the site footer for a page, you can add this class to the page.
Please read the following instructions to learn how to add custom CSS classes to the page.
In Gutenberg Editor
In the Gutenberg editor, click on the "Theme Settings" toggle button. Then click on "Advanced" to expand the sub panel,
and then you can add custom classes. The class(es) entered here will be added to the <body> tag of this page.
Advanced Feature - Add custom classes to a page.
In Classic Editor
When editing a page, scroll down the page and you can find the "Eaven Single Page Options" panel. Then enter custom CSS classes into the
"Additional CSS Class(es)" input box.
Add custom classes to a page in Classic Editor
19. Translation
When working with Eaven theme, you can translate everything to any language.
Please install this third-party plugin on your website and translate the theme text directly from your website dashboard: Loco Translate.
Please read the plugin's documentation for the detailed user guide:
When using Loco Tranlate, on your website dashboard, please go to "Loco Translate" > "Themes" > find "Eaven" (or "Eaven Child",
depending on which theme is activated). Click on "Eaven" then you will be able to add a new language,
or edit the translation of an exisiting language.
And then, please follow the steps below:
Click "Create Template".
Create Template - 1
It will take you to the "Themes / Eaven / New template file" page. Please click "Create Template".
Create Template - 2
Now, please click "New Language".
New Language.
Choose a location for translations
Now, you need to "Choose a language" and "Choose a location".
When "Initializing new translations", please find "Choose a location": you will choose where to save your translation file.
(More details can be find here.)
Custom - Recommended. This is Loco's protected folder under "wp-content/languages/loco/" which is safe from automatic updates.
If this folder doesn't exist you may need to create it and ensure it has the correct permissions.
System - Files saved here can be overwritten by WordPress's own language installer.
If you have disabled WordPress automatic translation updates, you can select this option.
Author - Please do not select this option. If you select this option, your translation file will be saved in the theme folder.
Every time you update the theme, all the files in the theme folder will be overwritten, which will cause your translation to be lost.
Choose a location for Loco translated files.
Translate the strings of the theme
Once on the editor screen you'll see all the strings included in the .pot file of the theme. The basics of the editor should be fairly intuitive. Select the English string at the top and enter your translation in the pane at the bottom.
You just need to enter a translation and save it.
Text has been translated.
Have questions or problems with Loco Translate?
Please kindly note: Loco Translate is a third-party plugin created and maintained by other authors (not us), when you need help with this plugin,
please contact the author of the plugin. This is the support forum for "Loco Translate".
20. Speed & Performance
"Themes execute the presentation and styling of content, while plugins handle content creation and functionality."
- WordPress code standards and ThemeForest requirements
All WordPress websites require optimization. As the theme author, we follow the WordPress development best practices when creating our products.
But the performance of the website is not determined by the theme or individual plugins.
The performance of the website is determined by the collaboration of multiple factors. Including but not limited to:
In this subchapter, we will introduce some optimization methods.
Please note: The following are only our general suggestions for optimizing a WordPress website when using Eaven.
Depending on the actual situation of your website and your specific needs, you may choose to skip certain steps or use other optimization methods
that we have not mentioned.
There is more than one way to optimize a website.
Please kindly note:
The support service of the theme Does Not include providing optimization for a specific website so that it can get high scores on page speed test tools.
(Because the performance of the website is not determined by the theme alone.)
The webmaster needs to take corresponding optimization measures for the actual environment of the site.
20.1 How to improve performance (General Suggestions)
The suggestions in this sub section (20.1) can help you optimize the user experience of your site: that is, when visitors visit your site,
the sensory response speed of the site will be ideal.
If you want to get high scores on website speed test tools (such as Google PageSpeed Insights, Google Search Console, etc.), you also need to use more advanced optimization methods.
This is a useful tutorial we found.
1. Always keep updated
Please always use the latest version of WordPress, the theme, and plugins.
2. Optimize image loading
The theme provided the following 2 optimizations for image loading (in the Customizer > General > Image Loading):
Progressive Image Loading
Lazy Loading
Please enable these 2 options. If you want to use a third-party plugin for "lazy load", please disable these 2 options provided by the theme, otherwise, conflicts will occur.
3. Optimizing images
Image quality and quantity are important for a website speed & performance, and also important for user experience. You need to find a balance between them.
Before uploading your images to your website, please optimize your images first (using Photoshop or other image editing tools). Please check this article:
How to Optimize Images for Better Web Design & SEO.
Optimal file size: The number of bytes the file takes up on your computer. This is the factor that can slow your website way down.
A 15MB (megabyte) image is huge. Large images or full-screen background images should be no more than 1 MB. Most other small web graphics can be 300 KB or less.
Image size: The actual dimensions of your image, in pixels. As we mentioned in the Image Size subchapter,
the recommended width of images is at least 1920 px when it is supposed to be a full-width image (for example, a fullwidth post slider on the homepage).
If the image is not used as a full-width image, you can resize your image to a smaller size.
After uploading your images to your website, you can install this plugin to further optimize them: Smush.
After you optimize your website according to the above steps, your website speed will be ideal for website visitors.
If you want to get high scores on website speed test tools:
(such as Google PageSpeed Insights, Google Search Console, etc.) you also need to use more advanced optimization methods.
This is a useful tutorial we found, please check this tutorial for the detailed
explanations and instructions.
We followed the tutorial to optimize this website. The current Google PageSpeed Insights score is above 80 (see screenshot),
and the GTmetrix score is B (see screenshot).
Please note that we did not enable CDN. If we enable CDN as described in the tutorial, the scores will increase further.
Please note that you can test multiple times, each test result will be different due to current network conditions.
If you need more help:
Since the support service of the theme Does Not include providing optimization for a specific website so that it can get high scores on page speed test tools (Why? Please click here for details), therefore,
If you need more help, it is recommended that you hire an expert to optimize your website.
You might like to check on Envato Studio.
There are some experts who provide WordPress Speed Optimization Service (Google PageSpeed, GTmetrix, etc.).
When you purchasing products from Envato Market, a supported item includes item support for 6 months from the purchase date.
During those 6 months, we (as the author of the theme) are available to provide the item support services.
Please kindly note: The terms and conditions are set out by Envato exclusively, and every author must follow the rules.
These rules are the same for every author and every buyer and we cannot change them selectively. Thank you for understanding.
What you should do first before asking your question?
To speed along the support request, please check by following the guide below:
Make sure your site is running the latest version of WordPress.
Make sure that the Eaven theme and the required plugin "Eaven Extension" have been updated to the latest version. Some known issues may have been fixed in an update.
Update to the latest version of other plugins on your website.
Disable any other plugins and then check if it fix the issue.
If you still cannot find a solution, please open a support ticket at Loft.Ocean Help Center.
Submitting a support request
When submitting your support request, please include the following information in as much detail as possible so that we can get more clues about your questions/problems:
Your website URL
Which version of the theme you are using
Detailed description of the issue or the question
Screenshots of the problem
Any notices or error messages
Any other information that you find useful
Since we have multiple products, please indicate which product your question corresponds to
And please write in English. Thanks!
Need to renew your support?
If you have less than 6 months remaining on a support item you're eligible to renew your support. For more information about Item Support renewals, please see
Extending and Renewing Item Support.